PROGRAMMING THE TI
C. Regena
GRAPHICS
"Graphics" or drawing pictures on the TI can be a lot of fun, and using graphics in your programs can really enhance them. The TI has 16 colors, and all 16 colors may be used at the same time on the screen, even with high-resolution graphics. Later in this column, I will discuss user-defined graphics characters.
Video-Graphs
First, let's briefly review the TI Video-Graphs command module, since using the command module is an easy way to see graphics on the TI without actually programming. You may see different random color patterns, or you may draw pictures on the screen using the arrow keys and a few function keys. You may save or load a picture on cassette tape.
Because Video-Graphs was one of the first command modules produced by TI, the manual you get with your module may be written for the TI-99/4 console. There are some changes that are necessary for the module to work with the TI-99/4A console. (By the way, if you have the TI-99/4 console, be sure to use the overlay that comes with the module or ask Texas Instruments to send you an overlay. The overlay has all the colors and commands so you don't need to keep referring to the manual.)
Make these changes for the TI-99/4A console. Instead of pressing ENTER, press the period key to return to the activity selection list. You will also need to press the period instead of zero to return to the main index lists. The comma key represents the color GRAY. To save a picture or to get to the TAPE options, press the semicolon key. To change colors, use the virgule/slash key.
The "Patterns" option presents three different random graphics demonstrations. STOP a picture by pressing N. You can't change colors while a picture is stopped. To restart the picture, press 6. While a pattern is going, you may change colors. Let's say you are looking at pulsing lights and want to change all the white squares to magenta. Press / then M then 0.
The "Pictures" option presents four different ways you can draw on the computer. Mosaic and Sketchpad are like using a pen directed by the arrow keys. Color Life is designed to be like the venerable computer game "Life," which replicates cells according to strict rules. Building Blocks has several shapes at the bottom of the screen. You may move the cursor to the shape you want for your picture, then press Y for the pen and move the shape up to your picture. Again, you may change colors by pressing / followed by the present color and then the color desired.
Programming Your Own Graphics
Think of the screen on your monitor or television set as a rectangle divided up into 24 rows and 32 columns. To graphically place a character on the screen, you specify the row number, the column number, and the character number – the ASCII code number of the character you desire. You may also specify a number of repetitions. CALL HCHAR(8,5,65,7) will start in row 8 and column 5 and draw character number 65, which is the letter A, seven times horizontally. CALL VCHAR(12, 14,66,9) will draw the letter B nine times vertically, starting in row 12 and column 14.
If you don't want to draw a picture using A's and B's or the other letters and symbols available, you can define your own high-resolution characters. Each square in the 24 × 32 rectangle can be divided up into an 8 × 8 square, and each dot in that 8 × 8 square, can be turned on or off – colored in or not. By specifying with code numbers which dots you want on and which you want off, you can define your own graphics character and then place it on the screen.
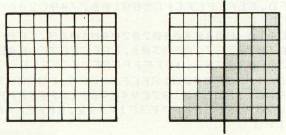
Here is an example. I want to draw a small triangle. The dots in the 8x8 square are colored in. The next step is to divide the square in half so that there are columns of four squares on each side. Now, working left to right and downward, figure out the hex code for each pattern of four squares. In the first row, 0000 is 0 and 0001 is 1. In the second row 0000 is 0 and 0011 is 3. Continue down the rows. The code is 0103070F1F3F7FFF. In your program, you can define the character with a CALL CHAR statement, then place the character on the screen:
200 CALL CHAR(128,"0103070F1F3F7FFF")
210 CALL HCHAR(12,15,128)
Line 200 defines character number 128 to be the colored-in triangle, and line 210 places that character on the screen. You may either redefine one of the existing characters (numbers 32 through 127) or use numbers from 128 to 159. If I had redefined the letter A (character 65), every time I print A on the screen you would see a triangle instead of an A.
200 CALL CHAR(65,"0103070F1F3F7FFF")
210 PRINT "A CAT"
220 GOTO 220
Program 1, "Defining Characters," allows you to design a graphics character. You will see a large square which has been divided up into an 8 × 8 square. Use the arrow keys to move the cursor. Press F if you want the space filled in; press the SPACE BAR if you don't. Press ENTER when you are finished with your character. The computer will go through to compare the patterns of on and off dots and will print the code values, then an actual-size character will be placed on the screen so you can see what your character looks like. The definition is then repeated in a string form so you may copy it and use it in your own programs.
After the character is defined, you have the option of modifying it, defining a new character, or ending the program. If you choose to modify it, the character will reappear, and you may alter it in any way you wish.
Character 97, "a", is defined as an open square □, and Character 98, "b", is defined as a filled square ▪ (lines 200-210). When the 8 × 8 square is drawn on the screen, it is done by printing "aaaaaaaa" eight times (lines 420-440).
The hex codes are read in as data (lines 120-170). H$(I,1) is the pattern of blank or filled squares, and there are 16 patterns. H$(I,2) is the corresponding hex code number or letter. The flashing cursor is red so you can tell where you are on the pattern you are designing (lines 180-190). CALL GCHAR(X,Y,C) determines what character number C is at row X and column Y.
Program 2, "Bull", is a graphics demonstration program that illustrates user-defined, high-resolution graphics. Lines 130 to 340 define graphics characters. Lines 350-460 draw the bull's head on the screen by printing redefined characters. Lines 470-530 place more graphics characters on the screen. (George H. Sunada of Logan, Utah, was the artist of the original Utah State University "Aggie bull.")
A later column will discuss how to use the CALL COLOR statement and how to plan color sets.