Using Atari Joysticks With Your VIC
Christopher J. Flynn
Herndon, VA
Description
What is the most inexpensive peripheral that you can buy for your VIC? A color television? Certainly not. Memory expansion? Probably not. No, a joystick. What? You mean one of those gadgets for playing games? That's right!
Perhaps you didn't realize it, but your VIC can use the very same joysticks that are found on the Atari and Sears video games. Absolutely no hardware modifications are needed at all. Best of all, your local Sears store will sell you a joystick for about ten dollars. How about that! It may turn out, however that the Commodore joystick will differ from the Atari joystick in subtle ways.
Here we will concentrate on showing you how to use an Atari or Sears joystick. Since the VIC joysticks are not available yet (as of this writing), anything we might say about them would only be speculation. So we won't deal too much with what might be.
To give you an idea of the capabilities of the joystick, we've included a demonstration program called Doodle. It's a fast-paced game in full sound and color designed for drawing patterns with the joystick. Your kids will love it – if they can get it away from you.
Before we get into the details, an acknowledgement is due. (Creative Software of California deserves credit for pointing out to me that Atari joysticks are usable on the VIC.)
How We Do ItFigures 1 and 2 compare the VIC joystick socket with the Atari's. The similarities are striking. (Actually, if we ever need to, the Atari joystick can be quite easily rewired. If you take one apart, you'll find that the wires are connected with solderless terminals.)
So let's go with the joystick the way it is. We need to do a little exploratory surgery first. Since I've already done this, please just follow my description. You don't need to do this to your VIC. First we gently open up VIC's case. Armed with our trusty ohmmeter, we trace the joystick connections. We assume that they must reach the 6522 VIA I/O chips. So that's where we start looking. Voila! Tracing all the connections, we find that the joystick switches do indeed go to the 6522s.
Finally, we determine that the joystick is connected as follows:
6522 #1  E    ?    ?    ?     ?    ?    ?    ?
        PB7  PB6  PB5   PB4  PB3  PB2  PB1  PB0
6522 #2  ?     ?    F     W     S     N     ?    ?
         PA7   PA6  PA5   PA4   PA3  PA2   PA1  PA0
E, W, S, and N represent the four compass directions. F represents the fire button. We won't be concerned with the fire button in this article.
How do we use this information in a program? What we generally have to do is read each I/O port and test the appropriate bits. Then our program can take any action needed. And there are some complications. Don't forget that the 6522 has data direction registers which program each bit for an input or output operation. Also, the signals from the joystick are in what is called an "active low" state. That is, if the joystick is pointing, say, north, the north bit will be low or zero. The other three directions will be high or ones.
That probably sounds a lot harder than it is. We can actually use BASIC to obtain the joystick readings pretty easily. The BASIC statements shown here are the key to using joysticks on the VIC.
POKE 37154, 127
VI = PEEK (37152) AND 128
V2 = PEEK (37151) AND 28
POKE 37154, 255
JS = V1/16 + V2/4
JS = (NOT JS) AND 15
These statements read the I/O ports and manipulate the bits. We end up with a bit configuration like this:
O O O O E W S N
The least significant four bits in the variable JS thus correspond to the four joystick switches. Normally, this would mean that JS could range in value from 0 to 15. In practice, JS will take on values from 0 to 10. This is because some bit patterns just aren't possible. With a properly functioning joystick, you can't press the north and south switches at the same time, for example.
The following table shows the values that JS will assume for each of the valid joystick positions.
| Direction | JS Value | Delta X | Delta Y |
| Neutral | 0 | 0 | 0 |
| N | 1 | 0 | -1 |
| S | 2 | 0 | 1 |
| Can't occur | 3 | 0 | 0 |
| W | 4 | -1 | 0 |
| NW | 5 | -1 | -1 |
| SW | 6 | -1 | 1 |
| Can't occur | 7 | 0 | 0 |
| E | 8 | 1 | 0 |
| NW | 9 | 1 | -1 |
| SE | 10 | 1 | 1 |
Note that JS is 0 in the neutral position. This gives us a handy way to test for joystick movement.
Delta X and Delta Y are variables which will help us if we're trying to move an object around the screen. Suppose we're using an X and Y coordinate system like this:
            X
     0 1 2 3 4 5 ... 21
     1
     2
Y    3
     4
     .
     .
     .
    22
Y represents a row number and X represents a position within a row. When the joystick moves, we want to update the values of X and Y so they indicate the new position. We can do this again easily in BASIC:
X = X + DX(JS)
Y = Y + DY(JS)
DX and DY are arrays where we've saved the list of values for Delta X and Delta Y.
An example will show how this works. Let us assume that we have an object at X = 7 and Y = 5. We test the joystick and determine that it has moved. Let's assume that it's pointing north. From our table, we know that JS will contain 1. So, the new positions of X and Y will be:
X = 7 + DX(1)
Y = 5 + DY(1) or
X = 7
Y = 4
Thus, our object is moved up one line closer to the top of the screen. There was no forward or backward horizontal change.
One last detail we need to think about is how to convert X and Y into something VIC understands. As you know, we can POKE things into VIC's screen memory. But we need a memory location for that. Again, BASIC helps us out:
P = 22 * Y + X
That little formula will convert valid X and Y values into a number ranging from 0 to 505. Next, we must add P to the screen and color memory starting locations:
POKE 7680 + P, code
POKE 38400 + P, color
Use any screen code and color that you wish.
Doodling
We've covered joysticks pretty quickly; we've only discussed the highlights. There are many other details involved. The best way to pick these up is to study Program 1 and to enjoy the Doodle game.
Doodle is a lot of fun to play. The object is just to enjoy yourself. When you start Doodle, it will display instructions on how to use the special function keys.
| Key | Message | Description |
| f1 | TO QUIT | Ends the game. |
| f3 | MOVE CURSOR | The cursor moves, but does draw a line. Erases any objects that it crosses. |
| f5 | DRAW LINE | The cursor moves and draws a line. |
| f7 | CLEAR SCREEN | The screen is cleared and the cursor is centered. VIC is ready to doodle again. |
You may press any key at any time while doodling. For interesting effects, alternate the f3 and f5 keys. By doing this properly, you can enclose a figure within another figure without any intersecting lines.
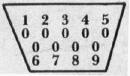
Comparison Of VIC And Atari Joystick Sockets (as viewed from the outside)
Figure 1: VIC Joystick Socket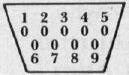
1 JOY 0
2 JOY 1
3 JOY 2
4 JOY 3
5 POT Y
6 LIGHT PEN
7 +5V
8 GROUND
9 POT X
Figure 2: Atari Joystick Socket
1 NORTH
2 SOUTH
3 WEST
4 EAST
5 NO CONNECTION
6 FIRE BUTTON
7 NO CONNECTION
8 GROUND
9 NO CONNECTION