THE PET® GAZETTE

A User-Defined Character Editor
P. J. Rovero FPO
San Francisco
Editor's Note: This program is for the Original ROM PET. The method of generating a user-defined character set should aid anyone dealing with this task. —RTM
The user-defined character set is only one of more than forty functions available from the BASE 2 Model 800 MST printer. Most functions are easily available and require a simple two or four character function code. The "create a user-defined character set" code, however, requires a total of 482 characters. This is because the BASE 2 printer requires five characters to define the five dot columns of each of the 96 characters in the set. The printer will only accept groups of 96 characters, whether you wish to define 1, 10, or 96 characters.
Creating a complete user-defined character set can be a laborious task involving graph paper, manual binary to decimal conversions (480 of them!), and keying the values into DATA or POKE statements. About the only task more tedious would be changing the one character that doesn't look right when printed. However, it doesn't have to be that way. Computer power is the key to easing the drudgery.
While the program described here is written for the COMMODORE PET and BASE 2 printer, it could be adapted to any computer with a video display memory and any printer with a similar user-defined character set capability.
The Program
The program displays a 5 by 7 character grid, the ASCII code assigned to the displayed character, and a command prompt. The commands permit viewing a selected character; modifying that character; storing the modified character in memory; saving or loading complete or partial character sets using named data files; downloading the user defined character set to the printer; test printing the character set; switching between standard and user-defined character sets; and printing a table of ASCII code, user-defined character, and corresponding five data elements in decimal (as required for DATA or POKE statements). The defined characters are stored in BASIC protected memory so that recovery from any inadvertent crash is via a simple RUN statement. Program 1 is the CHARACTER EDITOR.
The program is divided into 16 major routines:
INITIALIZATION. Protects memory for the character table and establishes the screen dot matrix points.
COMMAND DECODE. The cursor will be flashing on the command prompt line while in this mode. All commands are entered by pressing the RETURN key. Table 1 contains a command summary. Normal program termination is via the END command.
DISPLAY. Produces the display grid and displays the current character within the grid.
RASTER. Stores the currently displayed character in memory.
SAVE. Saves the character set on cassette #1 with filename. Includes the data file fix for old PETs.
LOAD. Loads the character set from cassette #1 by filename.
DOWNLOAD. Sends the character set to the printer memory.
TOGGLE. Toggles the printer between standard and user-defined character sets.
INCREMENT. Displays the next character.
DECREMENT. Displays the previous character.
INPUT CODE. Inputs an ASCII code and displays the selected character.
EDIT. Allows editing of the displayed character. The cursor will be flashing within the character grid while in this mode. Table 2 contains the subcommands of the EDIT mode. A raster (*) is the only exit from this mode.
GENERAL INPUT. The CURSOR input routine. It is called by COMMAND DECODE and INPUT CODE.
TEST. Prints the entire character set on the printer.
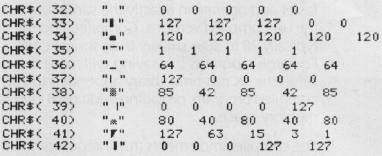
TABLE. Prints a table in the format of Table 3.
END. Closes all devices and clears the screen. Can be called at any time without disturbing the new character set.
It is possible to create a reasonable facsimile of the PET's shifted keyboard graphics with the 5 by 7 BASE 2 print matrix. (The PET screen matrix is 8 by 8.) DATA statements for this pseudo-PET character set are included in Program 2. Printing all characters displayable on the PET screen would require 3 user defined character sets on the BASE 2. An easier way of implementing "full" pseudo-PET graphics is via the graphics function of the BASE 2.
Standard and user-defined characters can be displayed on the same line, but doing so requires two passes of the print head; i.e., normal print followed by carriage return without linefeed and user-defined print. This is not difficult to arrange during formatted printing from a program. Listing a program is more complicated. One approach is to list to the screen, sort and count characters, and then use one of the many screen printing routines previously published in COMPUTE! and other magazines.
While on the subject of listings, it should be mentioned that the normal list sequence of:
OPEN5,4 : CMD5 : LIST
will not work for long listings, probably due to some bug in the timing when CMD is invoked. The following sequence, using the terminal buffer feature of the BASE 2 (run in either immediate or program mode) will work:
OPEN5, 4
PRINT#5, CHR$(27); CHR$(82); CHR$(20); CHR$(80);
PRINT#5, CHR$(27); CHR$(54);
CMD5 : LIST (or LIST XXX-in program mode)
PRINT#5, CHR$(27); CHR$(83) : CLOSE 5
Whether your application is mathematics, foreign languages, APL, or whatever, design your own character set with ease using CHARACTER EDITOR.
Table 1.
COMMANDS (all followed by RETURN)
| I(RETURN)## | Input code and display character |
| + | Display next character |
| - | Display previous character |
| E | Edit. (See Table 2) |
| L | Load character set from tape |
| P | Download Character Set To Printer |
| S | Save Character Set to Tape |
| T | Toggle printer |
| TABLE | Print table in format of Table 3 |
| TEST | Test print entire character set |
| END | Terminate program |
Table 2.
EDIT MODE SUBCOMMANDS
| > | Move cursor to next grid point |
| < | Move cursor to previous grid point |
| ↑ | Move cursor up one row |
| ← | Move cursor down one row |
| SPACE key | Erase matrix point and move to next grid point |
| shifted & | Insert matrix point at grid point |
| C | Clear character grid |
| * | Store displayed character in memory and return to COMMAND DECODE mode |
Table 3.