Animating Applesoft Graphics
Leslie M. Grimm
Mt. View, CA
Animating graphics can add a special plus to your BASIC program. A previous article (COMPUTE! #14) described how to animate low-resolution graphics in Integer BASIC. A method is described here to do animation of either high-resolution or low-resolution graphics in Applesoft BASIC.
Before beginning, however, a few words comparing the two BASICs for this purpose are in order. Integer BASIC is much faster than Applesoft. This is because the Applesoft interpreter must perform time-consuming manipulations of floating point arithmetic, whereas the Integer BASIC interpreter ignores everything to the right of a decimal point. The effect of all this is that Applesoft graphics routines run about half as fast as Integer routines. This can be crucial in animation.
In general, if the object to be animated is very large (bigger than ¼ of the low-resolution screen area or bigger than about 20 × 20 dots in high-resolution) you will get better results in Integer. However, choice of Applesoft may be a matter of necessity for a variety of reasons. By keeping animated objects small and simple, and observing other speed-increasing tips mentioned below, you can get very nice effects.
Designing The Figure
For the low-resolution example listing below, the figure of a flying bird was chosen. The high-resolution example uses a simple shape (square) for the sake of brevity in this article, but you could modify the bird or make any shape you desire for high-res.
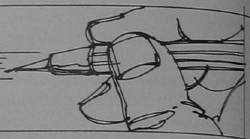
Whatever shape you choose, your first step is to draw the figure in various states of motion. Use graph paper, and number the squares as shown in Figure 1. (This applies to low-or high-res shapes.). Note that, for the flying bird, three different positions simulate the action of flying.
Because the figure will be moving about on the screen, you need to use relocatable coordinates in your plotting routine. Consider the square in the upper-left-hand corner as X = 0, Y = 0. Then specify all other points relative to that point. For example, a point five squares to the right and three squares down would be called X + 5, Y + 3.
You should also think about the most economical way to draw the figure. In the case of the bird, you can see that the body is the same for all three drawings. One subroutine was made for it, and another for the wing in its upward position, and still another for the wing in its downward position. To draw the bird with its wing up, the program does a GOSUB to the body routine (at 100) followed by setting hue to 2 (blue) and issuing a GOSUB to the wing-up routine (at 110). Note that the subroutines for wing up and wing down use a variable (hue) for color. This way the same subroutine can be used to draw (hue = 2) or erase (hue = 0) the wing.
In writing the code it is important to keep speed of execution in mind. As much as possible you should put many statements on a single line, separated by colons. Use HLIN and VLIN commands instead of a lot of HPLOTs. Locate your graphics subroutines at low line numbers.
Smooth Animation
The basic technique in animation is to draw the figure at a certain location on the screen, then erase it and redraw it at a new location. (An alternative method is to draw the figure at location one, redraw it at location two, and erase the parts that are left over from location one. If you know that your figure will always move exactly the same number of spaces each time it is redrawn the latter method is preferable. It could work reasonably well without page flipping also, but, because it is not the most general case, it is not demonstrated here.)
For the flying bird, the erase procedure was done with two routines. Line 150 draws the body in color = 0 (black), and then hue is set to zero and the appropriate wing routine is used. Note that if you wanted to use a colored background the erase routine could use the color of the background rather than zero.
If that were all you did, though, you would probably be disappointed in the results. This is because you would be watching the figure being drawn and erased on the screen. This is distracting and can be avoided by the technique of "flipping pages." Pages can be flipped for either low-resolution or high-resolution graphics, and the methods to do this are described separately below.
The technique for flipping pages is similar for low-and hi-resolution graphics. There are two graphics screen pages for low-resolution graphics (beginning at $400 and $800 respectively) and two screen pages for high-resolution graphics (beginning at $2000 and $4000 respectively). Your program will display one page to the user while erasing and drawing "behind the scenes" on the other page.
In low-resolution graphics it is not possible to draw directly to the second screen page. Drawings can only be placed on screen page two by first making them on page one and then calling a routine in the Apple monitor to move the contents of page one onto page two.
You will need a short assembly language routine to do the move for you. The subroutine beginning at line 10000 pokes this assembly language routine in memory. All you need to do is CALL the routine when you need it.
(A description of how the routine works follows, but you don't need to know how it works to use it. Just skip on to the next paragraph if you wish.) The LDA $C054 at line $C00 causes the Apple to display page one. The lines from $C03 to $C15 specify that the contents of memory locations $400 through $7FF (graphics page one) are to be moved to the region from $800 to $BFF (graphics page two.) Line $C17 sets a counter (Y register) to zero, and the next line does a Jump to SUB Routine (JSR) at $FE2C—the move routine in the Apple monitor. The move routine transfers the contents of page one to page two very quickly. Line $C1C causes page two to be displayed, and the last line ReTurnS you to your BASIC program.
Bird In Flight
Line 10 sets text mode (in case a previous program had left the machine set to graphics mode) and clears the screen Line 20 POKEs the assembly language routine in via the subroutine beginning at line 10000. Line 40 branches around the graphics subroutines to the start of the animation program. (The graphics subroutines were intentionally placed at low line numbers for speed of execution.)
The animating program first clears the screen (page one), sets initial values for X and Y, and calls the move routine (CALL 3072). The user will now be looking at page two, which is blank. Next, line 1010 draws the figure in its initial position (wing down) behind the scenes on page one. It then calls the move routine. Remember that the move routine displays page one while it is copying page one onto page two, and then flips to page two. The user only sees the finished drawing, first on page one and then on page two. The flip between pages doesn't show.
While that drawing is being displayed the original figure on page one is erased (line 1020). The value for X is changed and the figure is redrawn in a new position (wing up) and a new location (line 1030). Once again the move routine is called to put the new drawing on page two and show it to the viewer.
Line 1040 erases the wing-down bird, moves the bird over and up, and draws just the body. Then it performs the move and flip. In line 1050 the body is erased, and the bird is drawn with wing down in its next location. The move and flip is called again. This process is repeated several times in a FOR … NEXT loop.
The last lines of the routine restore the display to graphics page one. The cursor is VTABbed to line 21 so that it will be visible when the program ends. The POKEs instruct the computer to locate the next Applesoft program at the normal location ($800). (See below)
In entering and debugging a program that flips pages you may occasionally get "stuck" on page two due to a programming error. When this happens you will hear the beep that accompanies an error message, but no message will show and there will be no cursor. Just type "POKE 16300,0 to restore the display to page one and see your error message.
Relocating
There is one more step required before you can actually run this program. Page two of low-res graphics occupies the same place in memory that your Applesoft program normally occupies. Your only alternative is to relocate your Applesoft program. To do this, before you load your program you must change the values of the "program start" pointers to a new value. This will cause your program to be loaded in at a different place than usual.
The Applesoft program could be relocated to many possible places in memory. In this example it was located at the end of the assembly language subroutine. The assembly language subroutine was placed just above the second low-res graphics page. Alternatively, one could put the assembly language routine at $300 (decimal 768), but since this area is often needed for music routines, it was left free here.
There are several ways to relocate the program. One way is to type the following commands before running your program:
POKE 103, 33
POKE 104, 12
POKE 3104, 0
The first two POKEs place the starting address of the program in memory. The third POKE sets the first byte of the program location to zero, which must be done in order for the Apple to find the program's beginning.
Alternatively, you can write a short program to do the POKEs for you. A sample listing is Program 1.
(A third method, which incorporates the relocating program as a subroutine of the main program, will not be explained here for the sake of brevity.)
Whichever method is used to relocate the program, it is a good idea to restore the pointers to their usual values at the end of your program. The next Applesoft program will then load into the normal area of memory. This is shown at the end of the example program.
Flipping between high-resolution pages is easier than flipping in low-resolution graphics because it is possible to draw directly on either page. Also, it is not necessary to relocate your Applesoft program. However, only very small drawings can be animated in BASIC, due to speed limitations. Program 3 moves a very small, simple shape (square) diagonally across the screen, flipping pages between each move.
Line 10 clears both hi-res pages and sets the screen to full-screen graphics. Full screen is necessary to prevent text "garbage" from appearing at the bottom of screen page two.
The subroutine at line 100 draws or erases the square, depending on the value given to hue. A value of 5 sets the color to orange, and 0 is black. Line 1000 sets up the original values for X and Y, and causes page two to be displayed (POKE—16299,0).
The value POKEd into location 230 determines whether your program draws on hi-res graphics page one or two. To draw on page one this value must be 32 ($20). To draw on page two, set it to 64 ($40). Note that you could also simply specify HGR for page one or HGR2 for page two, but these commands include an implicit "clear screen" which would erase the whole screen and take far too long.
As in the low-res animation process, the program displays only finished drawings to the viewer while it erases and redraws figures on the undisplayed pages. Line 1002 directs the drawing process to page one, but it will not be seen since page two is being displayed.
Again, as in the low-res animation routine, a FOR ... NEXT loop is used. Line 1010 sets the color to orange and the GOSUB 100 draws it on page one. The POKE–16300,0 flips the display to page one when the drawing is finished. To the viewer, the drawing seems to pop onto the screen.
Line 1020 first resets X and Y to the previous location so that the last square on page two can be erased. Location 230 is set to 64 so that drawing will be done on page two. X and Y are then advanced to the new location, color is set to orange again, and the new square is drawn. Finally, the display is flipped back to page two. The viewer sees the square slide to a new location.
Line 1030 sets drawing to occur on page one again, erases the square there, and sets X and Y to the location for the next square. When the NEXT J instruction in Line 1040 is encountered, the program will jump back to line 1010, which will actually draw the square.
Line 2000 restores the display to page one, and ends. One could add the command TEXT before END to restore the viewer to text mode.
This method for high-resolution animation is not as satisfactory as an assembly language routine would be, but could be useful in many simple applications. Another possibility for a simpler way to use this method would be to have two pictures, (one on each page) showing different positions of the same figure. For example, one could have a Jumping Jack with arms up in one and arms down in the other picture. These could be large, elaborate drawings. By flipping between the two pages (POKE–16299,0, then POKE–16300,0) many times the Jumping Jack would appear to swing its arms up and down. In practice, it would probably be necessary to have a short delay between successive flips for this application.
Many other techniques of animation can be employed, but these methods should provide a starting point for the beginning or intermediate level Applesoft BASIC programmer.
Figure 1. Sketch of flying bird.
1 wing down 2 body (wing parallel) 3 wing up
Figure 2. Wing down and body.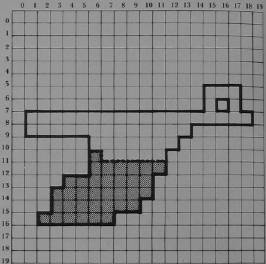
.... = bottom of body
Figure 3. Wing up and body.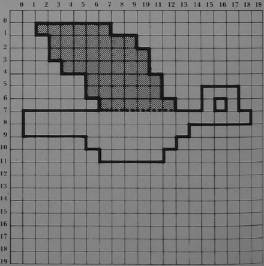
... = top of body