Universal Tape Append For PET/CBM
Roy Busdiecker Woodbridge, VA
Many times we run into the situation where we'd like to combine programs which have been SAVEd separately. Typical examples include subroutines which can be used in many different programs; interest calculations for mortgage, loan, or savings programs; complex arithmetic for math or engineering programs; and sorting routines for data processing applications.
Owners of Commodore PET/CBM 2001-series computers have several alternatives. Several firms offer a plug-in ROM (read-only memory) in the $50 to $100 range, which adds an APPEND command to the normal instruction repertoire.
The program described here allows owners of Version 1 (BASIC 2.0), Version 2 (BASIC 3.0), or 8000 series (BASIC 4.0) PET/CBM computers automatically to combine two or more programs which were saved on cassette from either one of those two computers.
In use, the program is extremely simple. First, LOAD this APPEND program from its cassette. Next, take the APPEND cassette out of the recorder, and replace it with the cassette that has the first program you want to append to it. DO NOT LOAD the second cassette, but RUN the APPEND program that is already in the computer. You'll be instructed to "Press Play on Cassette #1", and once you do that, the program takes over. After the first program has been added, take out the cassette and insert the second one you want to add. When you RUN the APPEND program again, it will once more ask you to "Press Play...", then add the second program at the end of the first. After you've combined all the programs you want to join, delete the BASIC Append routine (type each line number, 0 through 29, pressing ‘RETURN’ after each), and use the BASIC SAVE command to store the combined version.
Preparing Programs to be Combined
A few rules must be observed with regard to the programs which are to be joined. In general, you must assure that there is no overlap in line numbers between the two (or more) programs. For example, if you have two programs where one contains lines numbered from 100 to 500 and the other contains lines 300 to 700, the computer's operating system will not react ‘normally’ if the two are appended. An easy ‘fix’ is to renumber one program or the other, so that none of its line numbers fall in the range of numbers used in the other program. An exception to this rule is the Append routine itself, because it will be deleted before you start using the combined programs.
When programs are appended, the one(s) with lower line numbers should be done first, to avoid problems.
Some programs, especially those prepared commercially, were SAVEd from the Monitor rather than BASIC, and contain machine language instructions ahead of the BASIC routines. These may not be combined using this program unless the BASIC and machine language sections are "broken apart" and stored separately. You may be able to figure out how to do this by careful study of this article and some experimentation... but be sure that you have backup copies of everything critical before you start! If the APPEND program detects one of these (relatively unusual) programs, it will give you an error message and stop without trying to do the APPEND.
As long as you have sufficient room left in the computers free memory, you may keep adding programs. If you try to add a program which requires more than the remaining free space, the program will print an error message and not attempt to APPEND.
How the Program Works
Actually there are two separate programs which work together to do the job. The first (Figure 1) is a machine-language routine, loaded in the second cassette buffer, which inspects the program in the BASIC text area and calculates where the BASIC program ends.
C*
       PC IRQ  SR  AC XR  YR  SP
";   C6FB E62E 3A  9E 36  34  FA
"
":   033A B8 08 A9 01 8D 55 03 69
":   0342 01 8D 4F 03 A9 04 8D 50
":   034A 03 8D 56 03 AD B9 08 F0
":   0352 18 AA AD B8 08 8D 55 03
":   035A 69 01 8D 4F 03 8A 8D 56
":   0362 03 69 00 8D 50 03 4C 4E
":   036A 03 AD 55 03 8D 3A 03 AD
":   0372 56 03 8D 3D 03 60 FE B7
"
Figure 1a. Machine Language Program Listing (Monitor Version, for entering in computer).
The BASIC Append routine (Figure 2) uses the machine-language routine to find the end of the current program in memory. Then it uses one of the built-in ROM (read-only memory) routines to find the "header" on the cassette tape at the beginning of the SAVEd program. That header contains the starting and ending addresses from which its program was saved, and knowing those values allows us to calculate the length of the program on tape.
", 033C A9 01    LDA #$01
", 033E 8D 55 03 STA $0355
", 0341 69 01    ADC #$01
", 0343 8D 4F 03 STA $034F
", 0346 A9 04    LDA #$04
", 0348 8D 50 03 STA $0350
", 034B 8D 56 03 STA $0356
", 034E AD B9 08 LDA $08B9
", 0351 F0 18    BEQ $036B
", 0353 AA       TAX
", 0354 RD B8 08 LDA $08B8
", 0357 8D 55 03 STA $0355
", 035A 69 01    ADC #$01
", 035C 8D 4F 03 STA $034F
", 035F 8A       TXA
", 0360 8D 56 03 STA $0356
", 0363 69 00    ADC #$00
", 0365 8D 50 03 STA $0350
", 0368 4C 4E 03 JMP $034E
", 036B AD 55 03 LDA $0355
", 036E 8D 3A 03 STA $033A
", 0371 AD 56 03 LDA $0356
", 0374 8D 3B 03 STA $033B
", 0377 60       RTS
Figure lb. Machine Language Program (Disassembly Listing)
Armed with knowledge of the end of the current program in memory, and the length of the program to be appended, we can calculate new starting and ending locations for loading the program from tape. By changing those values before we bring the program in from the computer, we can start loading the new program right where the old one ends.
Complications
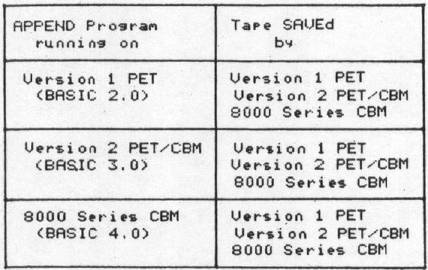
Back when there was only one operating system (set of ROMs) for the PET, the APPEND routine was much simpler. The second version (BASIC 3.0) made several changes which increased the challenge in designing an APPEND program to run on either version and APPEND a tape which had been created on either version. Appearance of BASIC 4.0 in the 8000 series complicated matters further. There are now nine possible combinations, as depicted in Figure 3.
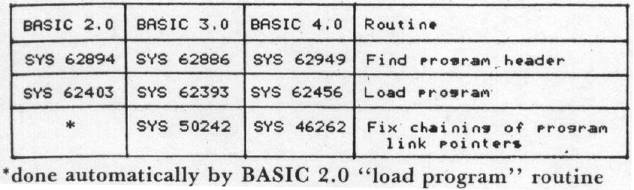
The first problem, and most obvious, is that the/various "built-in" routines used by the program are in different locations in the two versions. Further�more, some "fixing-up" which is done automatically in BASIC 2.0 by the tape load routine requires calls to other routines in BASIC 3.0 and 4.0. A summary of these differences is shown in Figure 4.
0 REM-SUPER APPEND-FOR PET/CBM, COPYRIGHT OCT 79 BY ROY BUSDIECKER
1 P=256 : SYS828 : PRINTPEEK <826> + P*PEEK <827> : PV = PEEK<50003> :PRINT"*******"
2 GOSUB 12 : A1 = PEEK <826> +P*PEEK <827> -1 : A2%=A1/256 : A3=A1 -P*A2% : IFPV = 160THEN16
3 ONPV + 1GOTO14, 15
4 P = 256 : B1 = PEEK <635>+P*PEEK <636> : B2 = PEEK <637> + P*PEEK <638> : IFPEEK <636> <> 4THEN27
5 IFPEEK<635>=0THEN8
6 IFPEEK <635> = i THENA 1 =A1 + 1 : A2%=A1/256 : A3=A1 -P*A2% : GOTO8
7 GOTO27
8 B3 = B2 -B1 + A1 : C1% = B3/256 : C2 = B3 - P*C1% : POKE635, A3 : POKE636, A2% : POKE637, C2
9 POKE638, C1% : IFC1%> PEEK <53> ORC1% = PEEK < 53> ANDC2> = PEEK <52> THEN29
10 IFPV = 160THEN23
11 ONPV + 1GOTO17,18
12 IFPV = 160THENPOKE158,9 : BU = 623 : FORI = BUTOBU + 8 : POKEI, 13: NEXT : RETURN
13 POKE525-PV*367,9 : BU=527+PV*96 : FORI = BUTOBU + 8 : POKEI, 13 : NEXT : RETURN
14 PRINT "SYS62894*******" : PRINT "GOTO4.IIIIIIIIIIIIII" : STOP
15 PRINT "SYS62886*******" : PRINT "GOTO4. IIIIIIIIIIIIII" : STOP
16 PRINT "SYS62949*******" : PRINT "GOTO4: IIIIIIIIIIIIII" : STOP
17 GOSUB12 : PRINT."*****3YS62403" : PRINT": IIIIIIIII" : STOP
18 GOSUB12 : PRINT " *****SYS62393WWW" : PRINT " GOTO19: IIIIIIIIIIIIII" : STOP
19 SYS50242
20 SYS828
21 POKE42,PEEK <826>+2:P0KE44,PEEK <826>+2:POKE46, PEEK <826>+2
22 POKE43,PEEK <827> :POKE45,PEEK <827> :POKE47, PEEK <827> : END
23 GOSUB12 : PRINT " *****SYS62456 ***" : PRINT "GOTO24:IIIIIIIIIIIII" : STOP
24 SYS46262
25 SYS828
26 GOTO21
27 PRINT"**ERRQR.▪ TAPE TO BE APPENDED IS NOT A SIMPLE BASIC PROGRAM."
28 PRINT"MRCHINE-LANGUAGE SEGMENTS MUST BE SAVED SEPARATELY." : END
29 PRINT"**ERROR.▪ NOT ENOUGH MEMORY SPACE LEFT TO APPEND THIS PROGRAM." : END
Figure 2. BASIC Program Listing
One other difference is that on BASIC 3.0 & 4.0 machines, it is necessary to reset the pointers for variable storage to the new end-of-program. This fix, too, was done by the "Load program" routine on BASIC 2.0 machines.
Alignment
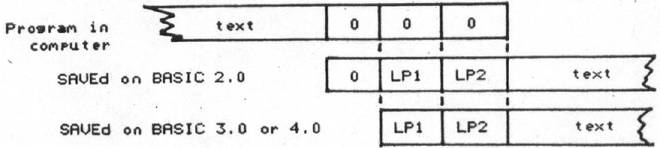
More subtle is the problem of properly aligning the appended program to the one already in the computer. Version 1 PETs start the SAVE process at location 1024 (0400 in hexadecimal notation), which fortunately always contains a zero. BASIC 3.0 & 4.0 PET/CBM computers, on the other hand, start SAVEing at location 1025 (hexadecimal 0401).
At the end of each line of BASIC program text, there is one byte which contains a value of zero to mark the place (not the same as the ASCII character zero, which is stored as a value of 48). Following each of these line-end markers, except the last one, are two bytes containing a line pointer, then two bytes containing the value of the program line number. The last line-end marker is followed by two zero-value bytes, so this series of three zero-bytes may be thought of as an end-of-program marker. Figure 5 illustrates this scheme.

Focusing in on the end-of-program area, Figure 6 shows how each of the two types of SAVEd program must be lined up with the program in the machine, if a successful APPEND is to occur. Notice that the leading byte of the BASIC 2.0 tape (which is always zero since it originated in byte 1024) can be overlaid on the last end-of-line marker, since both values are zero. All we have to do, then, is detect whether the program was SAVEd on a BASIC 2.0 or BASIC 3.0/4.0 machine, and adjust the location for starting the LOAD, if necessary.
Determining Source
When the tape header is found, the starting and ending locations of the SAVE operation which created the tape are retrieved and stored in decimal locations 635 through 638 (hexadecimal 027B-027E). The starting location is in the first two bytes (low order byte first, followed by high), and the ending address is the last two. If the SAVE was done by a BASIC 2.0 computer, then the starting address in location 1024 (0400 in hexadecimal notation), which 636 would contain values of 1 and 4 respectively, after the header was found.
Byte 635, then, holds the key. A value of zero indicates a BASIC 2.0 SAVE, while a value of one indicates BASIC 3.0 or 4.0. The test for this value is in lines 4-6 of the program, Figure 2. If byte 635 contains neither 0 nor 1, or if byte 636 contains other than 4, then the routine on the tape is not a ‘normal’ BASIC program, and special steps must be taken before it can be appended.
Entering the Program
While the BASIC portion of the program may be typed in quite simply, the easiest way to enter the machine language segment is to use the monitor, so it is a good idea to do that part first.
If you are using a BASIC 2.0 PET, it will be necessary to load the monitor from tape, then tell it to RUN. On the newer 2001 series computers, simply enter SYS 64785. On the 8000 series, enter SYS 54386. Either machine will then give a display of register contents, similar to that at the top of Figure 1, a dot at the beginning of the current line, and the cursor just after the dot.
Simply type in the locations and contents as they are shown in Figure 1, ending each line with a carriage return. When you are finished, type
M 033A 0377
and press ‘RETURN’, and your entries will be displayed so you can check them. Should any mistakes be found, simply move the cursor to the appropriate location, type in the correct value, and press ‘RETURN’ to correct them.
When you are satisfied that the program has been entered correctly, enter X, and the monitor will transfer control back to the BASIC operating system.
Before you start typing in the BASIC part of the program, if you are using a BASIC 2.0 PET, be sure to type NEW to clear out the monitor.
Saving the Program
When both programs have been entered, be sure to SAVE a copy (or two) for security, to avoid the embarrassment of discovering a machine language error by losing control of the computer.
In BASIC 3.0 enter SYS 64785, or in BASIC 4.0 use SYS 54386, to return to the monitor. Then enter
S "APPEND", 01, 033A, 08BA
You will get the standard "Press Play and Record" messages, When you're finished, enter X to return to BASIC.
On Version 1 machines, enter
POKE 247, 58 : POKE 248, 3 : POKE 229, 186 : POKE 230, 8
then enter SYS 63153. A second copy may be saved by simply entering SYS 63153 again.
Testing
To see if the program works correctly, first LOAD one of the copies you have just made (if you've done any SAVE or VERIFY, you'll always have to do another LOAD to make the program work correctly.
Then remove the APPEND tape from the cassette unit, insert a tape on which another program has been stored, and enter RUN. After the cassette unit stops and the computer reports READY, you should be able to enter LIST and see the append program followed by the one you just added to it.
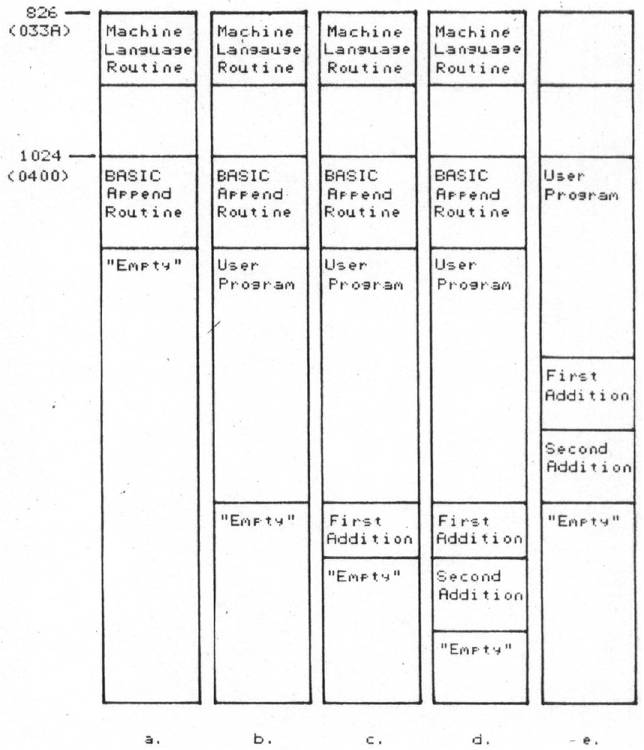
- At beginning of process, append program loaded
- After User Program has been appended
- After first addition to User Program
- After second addition to User Program
- End of process, after append routine is deleted
If you have to make corrections to the BASIC program, do so in the usual manner, but be sure to use the special SAVE instructions described earlier. If you need to make machine language corrections, then enter the monitor, make the corrections, and save as specified.
Machine language corrections on Version 1 are more complicated, but are not too difficult if you're careful.
- LOAD the APPEND program
- On a separate tape, use the regular BASIC SAVE to create a copy of the BASIC portion only
- LOAD the monitor
- Make the necessary corrections
- LOAD the BASIC portion made in step 2
- Use the modified SAVE procedures (POKE, SYS) to save the combined program.
If a "high" (relocated) Monitor is used, steps 2 and 5 may be avoided, but this is recommended only for those who are confident of their ability to do it properly.
Experimenting
If you understand how the program operates, it's possible to reduce the size of the program somewhat, but be careful and test your condensed program on tapes that are not valuable. We intentionally left it longer for the article so it would be easier to understand. If you only need to use the program on one type of computer, you should not have great difficulty in trimming out the unecessary parts.
Credits
Thanks are due to Jim Butterfield, whose discovery and publicizing of PET/CBM ROM details made possible the program described in this article; and also to Jack O'Neil and Mike Johnson, whose patient attempts to use the program in earlier stages were of great assistance in refining it.
Readers with comments or observations on operation of the routines are invited to send them to me at Virginia Micro Systems, Inc., 14415 Jefferson Davis Highway, Woodbridge VA 22191.