RETROFITTING ROMS
Note: We offer this article as a service to our readers. We advise that only experienced users try "home" installation. For safest results, get your local dealer to perform the installation for you.
Larry Isaacs,
Director of Engineering,
Small System Services, Inc.
Greensboro, N.C.
This article is for those readers who have chosen to upgrade their "OLD" PETs with Commodore's ROM Retrofit kit. Removing old ROMs and installing new ones is a task not to be taken lightly. It is hoped that this article will make this task a painless and uneventful experience. If you haven't already obtained the ROMs, note that there are two versions. One contains 6540 ROMs (which have 28 pins) and the other 6316 ROMs (which have 24 pins). Check inside your PET to see which kind to get.
To open the PET just remove the two screws on each side and raise the cover. You can hold the cover up by inserting the end of the support arm on the left side of the cover in one of the screw holes.
HANDLING THE ROMS
These ROMs are MOS devices, which means they can be damaged by high voltage from static electricity. For protection, the ROMs probably came inserted in a piece of black foam or contained in individual carriers. Under no circumstances should they come without being inserted in some form of conductive medium. The conductive medium provides an alternate discharge path should the ROM be exposed to some static electricity.
There will be a period of time for each ROM during the installation process where it will not be in contact with a socket, foam, etc. This time should be as short as possible, and you should avoid touching any of the pins on the ROM during installation. You should also avoid conditions which can generate static electricity such as wearing a sweater or doing the installation while standing on a carpet.
REMOVING AN OLD ROM
This step should be done using a small screwdriver similar device. DO NOT ATTEMPT TO REMOVE THE ROMS WITH YOUR BARE FINGERS! When trying to use just your fingers, it is very easy to jam pins in them resulting in BLOODY FINGERS and bent pins.
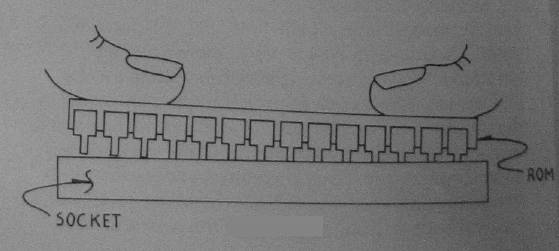
To remove a ROM, first insert the blade of the small screwdriver under one end. Turn the screwdriver back and forth to raise the end of the ROM slightly as shown in Figure 1. Now insert the blade of the screwdriver under the other end and raise that end slightly. Patiently repeat the above procedure raising each end a little more each time until the ROM is free of the socket.

INSERTING A NEW ROM
Before a ROM can be inserted into its socket, it may be necessary to straighten some of the pins. This should be done with the ROM inserted in the black foam, with the bent pins barely hanging over one edge of the foam. This allows you to straighten them while they are still in contact with the foam. Or you can straighten the pins while the ROM is inserted through several layers of aluminum foil. If the pins on the ROM are pointing outward too much to fit into the socket, bend them inward just enough so they will fit. Bending them any further increases the probability that a pin will get bent under the ROM when you try to insert it.
To insert a ROM, first set the ROM on the socket in which it will be inserted with the notched end toward the front of your PET (see Figure 2). It is very important to get this orientation correct because it will destroy the ROM if it is plugged in backwards when you turn the PET on. Make sure the ROM is positioned so that each pin will slip into the corresponding contact in the socket. Now use your thumbs to press downward on the ROM on both ends. Apply a little more pressure to one end to start that end into the socket first (see Figure 3). Then apply a little more pressure to the other end to start that end into the socket. Now apply pressure evenly to insert the ROM the rest of the way into the socket.
A firm pressure will be needed to push the ROM into the socket. If this doesn't seem to be enough, one of the pins may not be aligned right. First try repositioning the ROM then try inserting it again. If that doesn't work, try restraightening any pins that look like they aren't quite right. It may take a few tries at straightening the pins before the ROM will slip into the socket.
EXCHANGING THE ROMS
It doesn't matter whether you remove all of the old ROMs then insert all the new ones, or replace them one at a time. Just be sure to save the old ROMs in the conductive medium that came with the new ones. They will be needed if something happens to the new ROMs. It may be necessary during the exchange to temporarily insert some ROMs in aluminum foil to protect them from static electricity.
The position of each integrated circuit on the PET circuit board is designated by a letter to identify the row, followed by a number to identify the column. The ROMs are located on row H, which is the third row from the front. The columns are numbered from 1 through 7 going from right to left as you face your PET. To determine which ROM to put in each location in row H, refer to Table 1. Notice the Table shows the locations numbered H1 through H7 going from right to left as in your PET. When you have finished installing your new ROMs, check to make sure the notched end on each is toward the front of the PET, and that each is in the correct socket.
CHECKING OUT THE NEW ROMS
While the PET is still open, push down any cable connector which may have been pulled up when opening the PET. Now plug the PET in and turn it on. If the READY message appears on the screen, you can close the PET and proceed with the checkout. If it doesn't come ready, recheck the ROMs to see that each is in the proper location, especially the ROM in location H7. If each was in the proper location, then you should remove and reinsert each ROM while checking to see if any pins were bent during the first insertion.
TABLE 1
| H7 | H6 | H5 | H4 | H3 | H2 | H1 | |
| Old 6316 | 901447- | 901447- | 901447- | 901447- | 901447- | 901447- | 901447- |
| ROMS | 08 | 04 | 02 | 06 | 05 | 03 | 09 |
| Retrofit 6316 | 901447- | 901447- | 901447- | 901447- | 901447- | 901447- | 901447- |
| ROMS | 26 | 23 | 21 | 25 | 24 | 22 | 20 |
| Old 6540 | 6540- | 6540- | 6540- | 6540- | 6540- | 6540- | 6540- |
| ROMS | 018 | 014 | 012 | 016 | 015 | 013 | 019 or 011 |
| Retrofit 6540 | 6540- | 6540- | 6540- | 6540- | 6540- | 6540- | 6540- |
| ROMS | 026 | 023 | 021 | 025 | 024 | 022 | 020 |
Once your PET will reset properly, running some programs should verify that the ROMs have been inserted properly. If a program gives errors, that doesn't mean a ROM is in the wrong socket. Running programs does not prove conclusively that none of the ROMs have been damaged. A much better test for damage would be to run the Commodore's GRAPHIC ROM TEST program in the diagnostic kit for the new PETs.
If you have any problems that you can't solve, or would rather not perform the installation yourself, see your nearest PET dealer with a service department about having them do the installation. You might also find out if your local PET dealer has a copy of the GRAPHIC ROM TEST, if you don't have access to one otherwise.