Commodore 128 Machine Language
Part 2
Jim Butterfield, Associate EditorThis second in a series of articles on programming the 128 computer in its 128 mode, explores the built-in machine language monitor and looks at ways to link machine language programs to BASIC.
A Monitor At Your Fingertips
Some of the earlier Commodore products had no built-in machine language monitor. To work on machine language on the VIC-20 or Commodore 64, for example, you had to load a machine language monitor from tape or disk, or rely on a plug-in cartridge. Other products had simple monitors: Many PET/CBM models had monitors which could display and change memory, save or load programs, and not much else. The built-in monitor on the Commodore 128 has many attractive features; the best way to learn them is to try them.
Type MONITOR and press RETURN. You'll see the familiar register display, with values under the titles: PC (program counter), SR (status register), AC (accumulator or A register), XR (X register), YR (Y register), and SP (stack pointer). They are all similar to what you may have met on other machines except that the value under PC looks a little odd. It has five digits instead of four. The extra digit at the beginning is the bank number, and since it's an F, we're in bank 15.
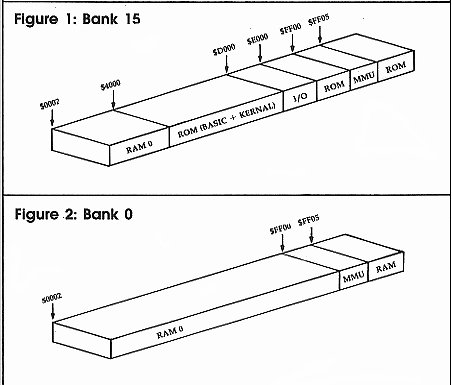
We've noted previously that bank isn't quite the right term. We should more properly say configuration 15, since each configuration consists of a mixture of memory elements. Figures 1 and 2 show the configurations for banks 15 (the default) and 0. You'll notice that for addresses below $4000, both bank 0 and bank 15 use exactly the same memory. Thus, the contents of address $F1000 is exactly the same as the contents of address $01000. In fact, it's the same memory. We'll look for ourselves in a few moments.
Number Conversion
You may be quite comfortable with hexadecimal numbers. You may even be able to do hex-to-decimal conversions in your head and amaze your friends. I can't, however, and I like the number conversion features that are built into the monitor.
We've talked about hexadecimal address $4000 already. Let's find its value in decimal.
Type in the value $4000 on a line by itself and press RETURN. You'll see a display of this number as it appears in various number bases. First, the hexadecimal number. The dollar sign means hex, of course, so the monitor simply echoes what you typed in: $4000. The next line starts with a plus sign (+). To the 128's monitor, the plus sign means decimal. So you can see that $4000 equals decimal 16384. The following line starts with an ampersand (&), which means octal, a notation that's rarely if ever used with Commodore machines. (Octal numbers are base 8, so &40000 is equal to four times eight raised to the fourth power.) Finally, the number that starts with a percent sign (%) is the binary representation of $4000. Since the computer's internal code is always binary—not decimal or hexadecimal—it's sometimes useful to be able to look at a number this way.
You may also convert a decimal number to the other bases by typing it in, leading off with a plus sign. If you like, try entering +16384 and watch the computer figure out that it's the same as $4000. And if you ever need to do so, you can convert from octal or binary the same way.
Conversions are convenient, but the monitor includes another bonus: Any number may be entered in any base, any time. If you put in a number without a prefix, the monitor will assume you mean it to be hexadecimal. But you can slip in a decimal number anywhere by prefixing it with the plus sign. We'll be doing this; you'll see how handy it is.
Looking At Memory
You may display memory with the command M. If you follow M with two addresses, the monitor displays all the values between them. Thus, to display the contents of addresses $1000-$1029, just type M 1000 1029 and press RETURN.
You'll get more than you bargained for. Depending on whether you are on a 40-column or 80-column screen, the monitor will display 8 or 16 memory locations at a time. Each group of locations is on a single line, with the address of the first item on the line showing at the left. We asked for 42 locations, but we got 48, since the computer always finishes the line it's working on.
On the right, we see the ASCII character equivalent of the contents of the memory locations; some locations don't happen to have an alphanumeric equivalent, in which case a period is printed. If you display the addresses suggested above, you'll see some readable text in this area. The zone of memory we're looking at holds the function key definitions.
Just to confirm something that was said before, try using M to display memory locations F1000-F1029. That's bank 15 instead of bank 0, but you'll see that it is in fact the same memory. And you might like to try M +4096 +4137 which uses decimal addresses for the same locations.
If you follow an M command with only one address, you'll get a fixed number of memory locations. This can save you typing, and here's a tip for browsing through large amounts of memory: If you type M alone with no addresses, you'll get a continuation of the last memory display.
Making Changes Directly
The simplest way to change memory is to display the area you're interested in, then move the cursor back and type over the values on the screen. When you press RETURN, the monitor enters all the values for that line. It's a bit like screen editing in BASIC.
Try it. If you have displayed memory as suggested above, you may see the word GRAPHIC on the right-hand side of the memory display. Let's change the G stored in memory to a T so that it says TRAPHIC. The code for a G is $47; it's found in the left-hand part of that line. Move the cursor over the 47 and type 54, which is the code for T. Now press RETURN and the memory change is made.
Remember that you can't change the right-hand ASCII side of the display. And by the way, this is not the recommended way to change the function key definitions. It's easier (and better) to use BASIC'S KEY command.
You can't change locations in read only memory (ROM). Try this: M F4200 F4200 will show you part of the BASIC ROM. Move the cursor back, type over a value, and press RETURN. You'll see from the display that the original values have been restored and ROM has not changed. Here's a note for technical types: The values from the line have "poked through" into the RAM memory which lies beneath ROM, but the monitor shows only the ROM.
The first character on the memory display line is the greater-than sign (>). This is in fact a synonym for the change memory command. On rare occasions, you might like to use this command directly.
Here's a typical case where the greater-than sign might be typed: You want to change a single location in an I/O chip. Using the "display and type over" method, you'd change 8 or 16 locations at a time. Usually, that's okay, but I/O chips are delicate and you don't want to change other registers accidentally. As a simple example, you might like to change the 40-column border color to red, but you don't want to change anything else. You may type >FD020 2 (remember that the I/O chips are in bank 15) and the border will change. The monitor will display a full line of memory locations, but you've changed only one. By the way, did you notice that the address you changed does not now contain the value 2 you put in? Funny things, I/O chips. If you're interested, you might type $D020 to ask the computer what decimal address in bank 15 you have changed. You might recognize the answer, +53280.
Write A Simple ML Program
Let's write a short program to print a line of asterisks. We'll use the built-in assembler. Here goes:
A 1500 LDX #O
The A means assemble. The address at which we will put this instruction is 1500; it's in hexadecimal (put a dollar sign in front if you like). The instruction itself is LDX #0, load counter X with a value (the # character means a value, not an address) of zero. Press RETURN and you'll see that the line has changed to
A 01500 A2 00 LDX #$00
The machine code in addresses 1500 and 1501 (bank 0, but in this area that's the same as bank 15) is hex A2 00. These two bytes have been placed in memory, and the monitor is ready for your next line of code; in fact, it has typed part of it for you. Complete the next line so that it reads
A 01502 LDA #$2A
This instruction, when the program runs, will load the ASCII code for an asterisk (hex 2A) into the A register; that's the register we use for printing. Continue with
A 01504 JSR $FFD2
A 01507 INX
A 01508 CPX #+20
The first instruction in this group prints a character, calling the Kernal ROM routine usually known as BSOUT (also known in the Commodore 64 as CHROUT). The next adds one to the X register, which we're using as a counter. The last instruction says, "Compare the counter with decimal 20." Note the plus sign for decimal. When you press RETURN, the line changes to
A 01508 E0 14 CPX #$14
The value 20 has been changed to hexadecimal. Don't be surprised; it's still the same number. Continue entering with
A 0150A BNE $1504
A 0150C LDA #$0D
A 0150E JMP $FFD2
The instruction BNE $1504 sends the program back to print again if we haven't reached 20 characters. The sequence LDA #$0D:JMP $FFD2 prints a carriage return and terminates the program (we know that the ROM routine at $FFD2 ends with RTS, so we can save a little code by using that RTS to return, rather than ending with the more conventional JSR $FFD2:RTS). After typing the last line, the computer prompts you with A 01511. Simply press RETURN to end the assembly.
If you like, you can proofread your program by entering the command D 1500 150C. The D command is for disassemble, which performs an activity more or less the reverse of an assembly.
Starting Up
You can go to this program with a G (go) command, which doesn't permit a return. Better, you can call it with a J (jump subroutine) command. But first, you must think about what bank you are in.
If you enter the command J 1500, you'll have a disaster on your hands. Why? Because you're entering bank 0 which contains no Kernal ROM and no I/O chips. Remember, the program uses the Kernal ROM routine BSOUT to print each character. If you JSR to this routine when the Kernal ROM is absent, you'll never print those asterisks, and your program will almost certainly fail. If you really want to call this program from the machine language monitor, invoke bank 15 with J F1500.
It's also quite simple to call the routine from BASIC. First, find the starting address. Type $1500 and read the answer, decimal +5376.
Back To BASIC
Return to BASIC by giving the X (exit) command. You'll see the familiar READY response of BASIC. Now type NEW (don't worry, your machine language program won't be banned) and enter the following program:
100 BANK 15
110 SYS 5376
120 PRINT "THIS WORKS"
130 SYS 5376
140 PRINT "WITHOUT PROBLEMS"
150 SYS 5376
Run the program and you should see a row of asterisks. If you've done these exercises, you should have a feeling for the 128's machine language monitor. It's convenient and flexible. In upcoming articles we'll learn more about the monitor, and how to link BASIC and machine language programs together.