

Percom
Primer
Never
Say Die
Yep, I'm back. A few months ago I thought I'd never
see another issue of this magazine, much less one containing yet
another installment of this column. At the risk of stealing a line from
Clemens, I'm pleased to state that rumors of my demise have been
greatly exaggerated.Almost A Guru
As I look back on 10 years as a classic Atari user, I realize how much I owe to other users who helped me when I was a "newbie". One such person was a former professional colleague, Ph.D. chemist Dave Berges. By 1992 Dave had become a Mac convert, and just recently he packed up the family and took off for greener pastures out West. By way of passing he gave me what remained of his two 8-bit Atari systems.
Dave had jumped onto the Atari bandwagon a couple years before I did, so by my standards he was already an expert when I gingerly bought my first 800XL in January of 1984. He started Out with an 800 and 410 tape drive. A little later he got bitten by the floppy drive bug and invested heavily in Percom drives. He was already adding a second 800XL based system with a Newell upgrade while I was still fumbling with the basics of DOS 2.0. I used to go over his house and get wowed watching him use his 80-column version of LetterPerfect. He showed me how to load object code files from DOS and how to boot DOS directly by holding down the OPTION key. Stuff I do now without even thinking, but it was all new to me back then-and Dave seemed almost a guru.
As the years went by, Dave's interest in his Ataris gradually waned while mine grew progressively stronger. At some point our roles became reversed, until in the end it was he who asked the questions and I who supplied the answers. A few years ago I repaired one of his ailing Percom drives (it had a bad voltage regulator), and developed a curiosity for them. Percoms always seem to show up at fests and swap meets, and by 1993 I had collected a basketful of them, all in various states of disrepair. The recent acquisition of Dave's old Percoms (complete with my 1991 repair notes still taped to the case) rekindled my-er, The Alchemist's-curiosity. Wiping the froth from my mouth, I dived into that basket and began fishing up pieces of dead Percoms.
Nomenclature, Please!
Almost immediately I became confused. No two of these drives were exactly alike! There was a daunting profusion of different models. The cases were not all the same size: some were longer than others, and there was a real fat one with two drives in it. Although the drive mechanisms were all standard issue Shugart 51/4" units (as used in IBM PCs and compatibles), they were a mixture of full-height and half-height units. Even when I found several drives with the same model designation, the controller cards in them were not identical. Hrummmph! Why is it you must always wade through a mess on your way to the fun stuff?
After leafing through the various Percom manuals (no two of which were alike) and scanning ads in old issues of ANALOG and Antic, I pieced together the nomenclature of model designations used by Percom Data, Inc. There were basically two series of models: the RFD series and the AT88 series. The nomenclature for the model variations was as follows:
| RFD4x-Sy | |
| where: |
x=0 → a single-sided drive |
| x=4 → a double-sided drive | |
| y=1 → a single-drive unit | |
| y=2 → a dual-drive unit | |
| AT88-Sy[PD] |
Looking over my collection of junkets, it was now easy to see exactly what I had. Among my collection were several RFD40-S1's, an RFD40-S2, and some AT88-S1 PD's. (The RDF40-S2 is the fat one.) Well now, I was getting somewhere. Before you go ripping the guts out of some piece of equipment, it's always nice to have some idea what the critter is. I had eight units all together, and ultimately restored seven of them to like-new condition.
Dumb Demons
I fired up each unit one at a time. Only two actually did something upon powerup; one of those was the one I'd repaired for Dave. The other functional unit tried to initialize itself but made a terrible meat-grinder noise (so familiar to you 810 aficionados). The other six, which were mostly RFD types, just sat there feigning ignorance of electricity. If there's anything an Alchemist hates, it's a machine that won't obey its human master. Putting aside the drives that ran, I summoned up my usual crew of trolls and gnomes and set upon the six recalcitrant units with a vengeance.
As I removed the chassis covers and began disassembling things, an odor wafted up. Ordinary mortals cannot detect this odor, but we Alchemists recognize it instantly: it is the smell given off by an anxious Murphy Demon whose hiding place is about to be discovered. They were sweating. They well knew their time had come. And especially, they knew The Alchemist's favorite pastime is skewering their disgusting bodies upon the point of a hot soldering iron. The odor was really pungent: it withered the little hairs inside my nose.
As Murphy Demons go, these were pathetic. They were easy to find, and the sweet smell of burnt demon flesh soon permeated the house, to the accompaniment of their usual hideous screams. But we Alchemists take no pity on these devils, and in short order I had racked up another pile of Murphy's Little Helpers. A check of all the dead drives with a voltmeter quickly showed virtually all of them had bad voltages on either their +5 or +12 volt lines. In every case, the associated regulators were blown.
Now folks, the garden-variety 7805 or 7812 linear voltage regulator is a bulk commodity item in the electronic component market. They've been manufactured for almost 20 years. Used properly, they are very tough. They have built-in thermal shutdown protection, overvoltage and overcurrent shutdown protection, and their mechanical construction (typically a TO-220 device with a built-in heat sink) is physically rugged. On a few rare occasions I had seen them fail, but never in wholesale lots like this. At first I thought Percom had simply gotten a defective lot from the manufacturer, but that idea went out the window when I observed the blown units were from different manufacturers and of different voltage ratings. The riddle was answered sadly enough when I began removing the controller cards and regulators from the drive cases.
Stupidity Worthy Of Atari
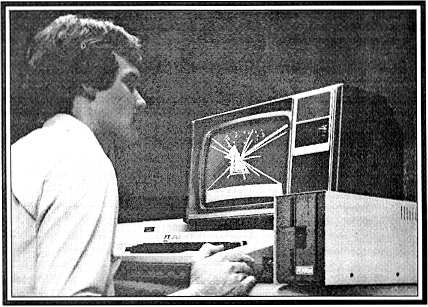
I was astonished to discover that in all the RFD drives, insulators had been used to mount the voltage regulators to the drive chassis. Worse, no thermal transfer compound had been used between the regulator and insulator, but inexplicably the compound was present between the insulator and chassis. It was absurd. Whoever built these things should have been hog-tied, shot, drawn and quartered. It has been previously mentioned in these pages that upon occasion The Alchemist employs colorful expletives, and on this occasion the epithets fairly flew.
We all know Atari did some stupid things when they manufactured our computers, and I can only assume Percom must have borrowed some goons directly from Atari to accomplish such an advanced degree of negligence. The drive cases are grounded, and so is the metal mounting tab in the 78xx series voltage regulators, so no insulator is necessary! And placing thermal transfer cream on one side of the insulator but not the other is just criminal-if you don't use it on both sides, you might as well not bother. The final verdict? Thermal failure of the regulators due to the faulty way they were mounted. Good thing these guys weren't building airplanes!
As I got deeper into the guts of the drives, I saw another possible avenue of failure for the regulators. In all the RFD drives the regulators were mounted in sockets. This is a violation of one of the Basic Laws of Electronic Alchemy: "Thou shalt not draw large currents through mechanical connections." Sockets are fine for TTL gates and other devices that draw small currents, but the hefty 1.5 ampere load of the voltage regulators is no place for a socket. Corrosion must inevitably set in, the connection becomes unstable, and nasty things happen. The 78xx series regulators are known to oscillate themselves to death in conditions of unstable capacitance. What is a layer of corrosion between two pieces of metal but the formation of a capacitor? Add to that the stray capacitance created by the worthless insulator, and top it off with a whopping load of heat that couldn't be transferred to the metal case because of the lack of thermal compound. Party time for the Murphy Demons.
There was one RFD unit, obviously the oldest of the lot, with a two-piece controller card. The regulators on this one at least weren't socketed. They had been soldered in place with corrosive paste-flux solder. Why this thing worked at all (if it ever did) was beyond me. It was just too demoralizing: I trashed it.
In the AT88 drives, thankfully there were no insulators and no sockets. But the Percom people still didn't learn their lessons: there was no thermal transfer compound used to facilitate heat transfer to the chassis. The method of regulator mounting was odd: oversize screw-thread holes had been drilled into the regulator mounting tabs so a screw could be fastened from the outside of the chassis with no corresponding nut inside. All fine and good, but the machine work was done after the regulators were soldered to the boards. The machining operation weakened the pins on one regulator: upon removing the screw, the body of this regulator fell off, leaving the pins still stuck in the board. Even the Sunnyvale Stooges could have done better than this!
Drive Mechs
While I had all the drives apart I took a look at the drive mechs. All but one were Tandon TM-100-1A units, single-sided full-height mechs widely used in early IBM 8088 machines as well as TRS-80 computers from Radio Shack. One AT88 drive contained a half-height MPI (Micro Peripherals Inc.) mech. I hate MPI mechanisms. They are unbelievably complicated and altogether too fragile. This one looked like it had been knocked off the edge of a table and taken a hard landing. All the tiny pieces of the mech were canted in the same direction: the latch was hopelessly jammed and wouldn't accept disks. More fodder for the landfill. I replaced it with a black faced Teac 360K mech.
All the mechanisms were filthy and corroded. I checked them out one by one using the two functional controller cards. Two were stone dead, and the rest worked but sounded awful. Several were out of spec on RPMs. The latches on all of them were very stiff and sticky. Unlike the belts on Atari 1050 drives that dry rot after a few years, the belts on all these Tandon mechs were in good shape. Come to think of it, I've never seen a belt failure on one of these old full-height mechs. I salvaged parts from the dead mechs and trashed the carcasses, and replaced them with Tandon TM-100-2A double-sided mechs removed from junket IBM PC's.
It took several days' application of rags, Q-tips and a fine varnish brush to chase out all the dust bunnies, dead roaches, and gross particulate matter. Application of Teflon tube-gel (available at Radio Shack) to the latches immediately restored them to free movement and eliminated the stiffness and stickiness. Mild application of ultrafine steel wool (grade 0000) to the head carriage rails removed rust spots, but lubing the rails required The Alchemist's special technique.
Why not just squirt some oil on the rails and be done with it? Because to do so would violate another Alchemist Law: "Thou shalt not use any liquid lubricants in disk drives or printers." This may seem dumb, but verily there is wisdom in this Rule. Liquid lubricants never stay where you put them: they migrate. They end up where they shouldn't be, like on circuit boards or floppy disks (assuming you haven't dribbled oil all over the innards of the machine by the time you reached the desired location). Worse, oils are chemically unstable. Either the volatile components of the oil slowly evaporate and leave behind a gummy muck, or else the oil itself slowly polymerizes upon exposure to air-which also creates a gummy muck. I get enough muck in other areas of my life, thank you: I'll not have any in my disk drive.
My technique begins with a wooden Q-tip stick (available at Radio Shack). Sight along the stick until you find an area where the wood grain slants at a shallow angle, then break the stick in that area. You should end up with a long slender sliver of wood whose tip can be curled without breaking. Put a slight curl in the end of this sliver and apply a small dab of the tube-gel. You can then apply the gel very precisely to wherever you wish, even the underside of rails where you can't see very well. Working the head carriage back and forth to gain access to the rails, I applied a thin coat of gel all over the rails with my wood sliver. This eliminated most of the meat grinder noises made by the drives when the heads move.
The Lazarus Thing
With all the demons slaughtered and the drive mechs spruced up, it remained only to give the chassis and cover of each drive a good scrubbing and reassemble everything. Controller cards and mechanisms were reinstalled, along with new regulators to replace the failed ones. There wasn't much I could do about the sockets, but at least I treated them with a 5% solution of Cramolin Red in trichloroethane to ensure gastight contact. All the insulators were trashed, and the regulators remounted directly to the drive chassis with thermal compound. (Thermal compound is available in small tubes from Radio Shack. It's a suspension of zinc oxide in silicone oil. Squeeze it into a thimble and stir it well with a wooden Q-tip stick, then use the stick to place small dabs of the cream onto the mounting tabs. When the screws are tightened, you should observe only a small seam of compound squishing out from under the tab. Big messy gobs of thermal cream are the sure sign of a bungling amateur.)
One of the noble goals of the ancient Alchemists was the restoration of life to the dead; as a modern follower of the alchemical arts, now came my supreme moment. I plugged in the remaining seven drives and turned them on one at a time. Each one briefly flickered its READY light and initialized itself with a slight noise. This is as close as I'll ever come to bringing the dead back to life, and it's a magnificent feeling.
Just having the drives respond to power isn't enough, of course. It remained to connect them to a computer for final tweaking and a thorough checkout. This required some consideration of what DOS to use for testing.
DOS & Disk Experiments
Percom drives were shipped with either OSA+ DOS (version 2 or 4) or, later on, a Percom version of DOS-XL. I have those DOS's around here somewhere but am no big fan of them. I long ago became addicted to SpartaDOS 3.2d for my personal use, and of course I still use AtariDOS 2.5 as a common medium of exchange with other Atarians. All the Percoms worked fine with AtariDOS 2.5.
I was delighted to discover the Percoms also work well with SpartaDOS, which opened the door to a rich variety of format possibilities. There was no problem laying down either an Atari or Sparta single-density format. Then I tried double density and found that both the RFD and AT88 drives readily performed a true double-density (180K) format. I started getting ambitious and tried an UltraSpeed (sector skew) format. Nope, the Percoms wouldn't do that. Oh well, I could live without UltraSpeed. I tried booting a Percom from a Sparta disk formatted with UltraSpeed in a 1050; it booted OK, but the bootup was S - L - O - W.
Next I tried formatting in doublesided mode using an RFD40-S1 drive in which I had installed a double-sided mechanism, and here I found weirdness. To my surprise, the drive performed a true double-sided/double-density format (360K) without complaint. I didn't trust it. I took the Percom-formatted disk, stuck it in the CSS modified XF551 drive in my main system, and commenced dumping files to it from my hard drive. The dumping continued for a good while before my 800XL called a halt and bombed out with an ERROR 162 (Disk Full) message. I did a DIR to make sure the files were really there, then a CHKDSK to see how much of the 360K had been consumed. I was relieved to see that the entire disk really was full, and confirmed it with a manual tally of the byte count for each file. But we Alchemists are not easily sold, and I would not believe the Percom RFD40Sl capable of true DS/DD operation until I had actually retrieved files from anywhere on the disk. Placing the full disk back into the Percom, I found it was only possible to read files from the first 180K of the disk. The second 180K was inaccessible. This exercise leads me to speculate that the only difference between the RFD40 and RFD44 drives is probably the controller card ROM and the type of mechanism installed (single-or double-sided).
Users of U/S Doubler 1050's seldom bemoan the absence of doublesided operation, since it is common practice to obtain full 360K capacity by merely notching the other side of the disk and formatting the flip side. This won't work in the Percom drives, since the mechanisms require a timing hole as well as the notch. DHDN (double-hole double-notched) disks are impossible to find, so you have to make your own. I took a junket disk (one with failed media), sliced open the envelope, and trashed the magnetic media. The empty envelope provides a perfect template for marking the location of the timing hole on the opposite side of a fresh disk. Use a pencil to draw the little circle on both sides of the fresh disk. Use a single-hole hand held paper punch tool (99 cents at Staples office supply) to punch out the hole you've drawn on the disk envelope. You have to do it separately for each side of the disk; don't punch out a hole in the disk media! Making these DHDN disks is a bit of a chore, so it's best to make a stack of them all at one sitting.
With my DHDN disks I had no problem formatting a bunch of 360K "flippies" on the Percoms. A couple disks refused to format side B because I hadn't positioned my hole puncher squarely so the holes didn't align well. This was easily remedied by nipping out a bit more of the envelope until the holes aligned, and all the disks worked fine. With a stack of DHDN disks at hand, the Percom RFD40 or AT88 drives are functionally equivalent to a U/S Doubler upgraded 1050 without the UltraSpeed capability.
I tweaked RPM's on all the Tandon equipped drives using Sparta's RPM.COM utility. The adjustment pot is located on a small circuit board attached to the rear of the drive mechanism and easily reached with a jeweler's screwdriver. The correct speed for these drives is 300rpm, but I always set them a little low, like 295, to provide downward compatibility with disks formatted on 1050 drives that spin at 288rpm.
Finally, I experimented to check for incompatibility among my various other disk drives, using a single-density format with AtariDOS 2.5. Disks formatted with DOS on side B in my CSS upgraded XF551 and no timing hole booted up just fine in the Percom. A similar disk formatted with DOS in a U/S Doubler 1050 refused to boot in the Percom. When a DHDN disk was formatted on side B in either the 1050 or the XF551, it booted OK in the Percom. Again it can be seen that the timing hole in the Percom is involved in disk compatibility.
I didn't try writing files to side B of the non-hole disk from the 551 that booted OK in the Percom. It may be that the hole is required at formatting time and when the disk is written to, but not when the disk is read. Still, I thought it odd that the non-hole disk from the 551 was able to boot in the Percom. The situation is complicated by the fact that my 551 contains both the CSS Dual Upgrade and the Enhancement Upgrade. Further, I was recently informed by Ron Fetzer of the Ol' Hackers user group that SuperDOS has an interesting feature that permits disks formatted on either side in a 1050 to boot in a Percom even with the timing hole covered. Sheesh! I decided to leave matters alone and move on to more interesting stuff.
Slavery Is Legal
Percom drives can be daisy-chained off the SIO just like 1050's, but I'd consider that rather a wasteful way to employ them. A neat feature of Percom drives is their ability to accept up to three add-on slave drives. These slave drives consist only of an IBM compatible mechanism and the appropriate power supply and case. You don't need another controller card in the slaves. Although new 360K drives are becoming a rare commodity, they are plentiful in the surplus/salvage market for giveaway prices. A cheap ribbon cable with crimp-on connectors attaches the slaves to the "mother" drive. You can thus add extra drives for practically nothing, and their performance will be limited only by the performance characteristics of the controller card in the mother drive.
On the RFD40-S2 and AT88 drives, the slave ribbon connector requires a card-edge connector that attaches to a small circuit board extending from the rear of the drive. On the RFD40-S1 drives, the connector is a 34-pin mass termination type that connects to a socket on the rear of the drive. (It would've been nice if these guys had standardized the type of connector to use!) I tested all my Percoms with slave drives and found the setup worked pretty well, with the exception of the AT88 drives which I'll describe later. However, you have to set the configuration switches properly to avoid problems and achieve maximum utilization of the add-on hardware.
On the rear of the RFD drives is a bank of 4 switches accessed through a cutout in the chassis. These are the drive configuration switches, and they're numbered 4,3,2,1 from top to bottom as seen in Figure 1.
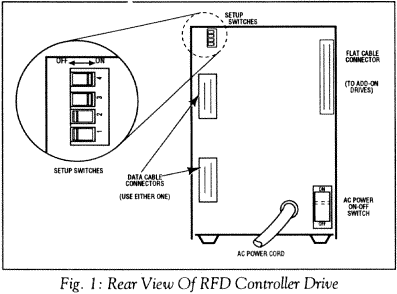
The functions of these switches are as follows:
Switch 4: Sets density mode for the mother drive. ON for single density, OFF for double density.
Switch 3: Sets density mode for the first slave drive. ON for single density, OFF for double density.
Switches 2 and 1 are used to designate the drive number of the mother drive, according to the following table:
| D1: |
D2: |
D:3 |
D:4 |
|
| Switch 2: |
On |
On | Off |
Off |
| Switch 1: |
On | Off | On | Off |
I recommend that Switches 4 and 3 should always be OFF. Most Percoms will handle double density, so there's no point in hobbling performance by leaving them in single density configuration. If you use a single density disk in a drive configured for double density, the drive will automatically drop down to single density operation. However, if set to single, it won't recognize a double density disk and will bomb out with an error message. The same goes for any slave drives attached.
I had a little trouble with AT88 slaves at first. AT88's have no configuration switches like the RFD series has, so you can't tell them what the density of the slave drives should be. With a double density slave attached to an AT88, I found it would only recognize single density disks. After some fiddling around, I found it was possible to force the AT88 slave into double density mode by formatting a double density disk in the slave with SpartaDOS. After that, the drive recognized both double and single density as long as the system remained powered up.
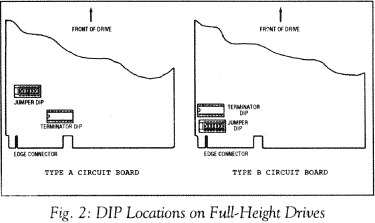
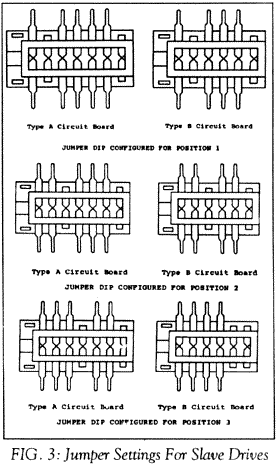
The drive number designation of the slave drive is set by jumpers on the drive itself. In half-height drives these jumpers are usually pretty obvious on the drive card where you'll see a jumper block screened for DSO, DS1, DS2 and DS3 (DS = "Drive Select"). On these drives, the settings 1, 2 and 3 are used to designate slave drives D2:, D3:, and D4: respectively. On older full-height drives the situation is messy, as there are two types of drive cards and the positions usually aren't marked. The Percom manual does a decent job of showing how to configure these mechanisms as slaves. The information is shown in Figures 2 and 3.
Beware The Terminator
All standard Shugart interface floppy drives require a resistive termination at the end of the signal chain. The nominal value of this resistance is 150 ohms, but the exact value is actually a rather sloppy number. I've seen these drives operate fine with no termination at all, but severe read/write errors occur when the resistive terminator is too low a value. I have my doubts as to whether it really even makes a difference exactly where in the cable chain the terminator resides (provided you're using relatively short cables).
The actual terminator is typically a DIP chip package containing seven or eight resistors, sometime referred to as a "term-pak". Sometimes they are black like semiconductor chips, but more often they are a bright blue or yellow color to distinguish them from other chips. The terminator is nearly always in a socket (occasionally you'll find one soldered in place but with jumpers elsewhere on the board that will connect or disconnect it).
Although some Percom drive models have the term-pak installed in a socket on an extender card in the rear of the drive, all Percoms will accommodate terminator installation directly on the mechanism control card. I had a few odd experiences with the terminator installed on the extender card and preferred to keep it installed directly on the drive meth. When adding a slave drive, ideally you would remove the term-pak from the mother drive and place it on the last slave mechanism in the chain.
Some models with extender cards also have a six-position jumper block next to the term-pak socket (Figure 4).
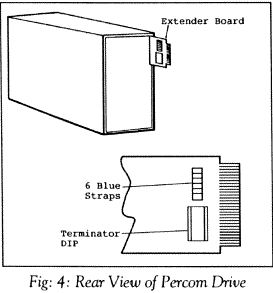
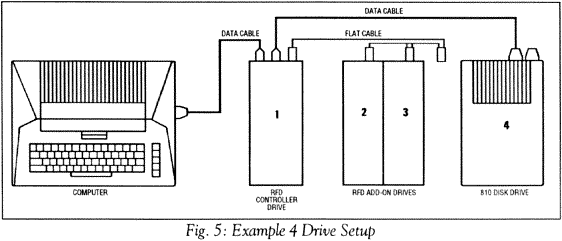
These jumpers are for configuring the drive number of the mother drive in combination with any other Percom mother drives, slave drives, or Atari drives in your system. Manipulating these jumpers is a pain in the neck, so I left them all connected (jumpers all in place) and used the jumpers on the slaves to set the drive number of the slaves whenever possible. The Percom manual does a clumsy "monkey job" of showing how to manipulate these jumpers for specific drive setups laboriously illustrated "A" through "L"; tough luck if your setup doesn't match one of their illustrations! Figure 5 shows a four drive setup employing a master Percom, two slaves, and an Atari 810 drive. By substituting a US Doubler 1050 for the 810 you could could access all four drives conveniently with SpartaDOS, taking advantage of most of Sparta's advanced features with all the drives.
Some History
I'll diverge a little at this point to convey some impressions I have of Percom Data, Inc. and give a brief sketch of the company's history.

Percom Data was founded around 1980 by a group of venture capitalists eager to cash in on the expanding home computer market. They used the technology developed in the 1970's by Dan Shugart Associates for floppy disk interfacing and adapted it to sell into the various home computer markets then in existence.
Until 1984, the company did fairly well in the Atari market. Despite the fact that prices on its products were outrageously high by today's standards, Percom won Atari converts by a combination of aggressive advertising and a technological edge over the competition in a market where competition was already scarce. During the First Era of the Classic Atari (the era of the 400/800 computers, 1979-1982), Percom's only serious competition was the 810 drive from Atari. Percom's offer of double density and double-sided drives combined with desirable features like built-in Epson printer interfaces appealed to the growing "power user" segment of the market. These users were typically affluent and willing to pay any price to achieve ever more productivity from their machines. Whereas the 810 drive appealed to the moderate user or to users who had gotten fed up with the hassles of tape drives, the Percom was the power user's drive of choice. Here's a sample of prices of Percom and Atari drives taken from a Lyco Computer ad in the December 1983 issue of ANALOG:
| Percom: |
AT88-S1 | $349 |
| AT88-S2 | $535 | |
| AT88-S1PD | $449 | |
| RFD40-S1 | $499 | |
| RFD44-Sl | $575 | |
| RFD44-S2 | $899 | |
| Atari: |
810 |
$399 |
| 1050 | $335 |
Percom clung to existence for another year, but by the end of 1985 was no longer profitable. The company was liquidated in 1986. Percom's material assets-several tons of disk drives, parts, manuals, schematics, and other paraphernalia-were acquired by a computer repair company in Virginia which continued to offer Percom drives and service at bargain prices during 1987-1990. In 1991, the repair company gave up the ghost and sold the remaining stock of material to a private owner in the vicinity of Washington DC, after disposing of only a fraction of it in the liquidation sales.
Although Percom lasted longer than most other third-party manufacturers of floppy drives for the Classic-8's, my impression is that the company was poorly managed. During Percom's short life there were umpteen revisions of both the user manuals and the controller cards in their drives, indicating a serious weakness in quality control that came back to haunt them just as they were blindsided by a firestorm of fierce competition. Their splashy ads in ANALOG and Antic were impressive but not informative: there were no details to educate the uninformed reader why Percom drives were better than someone else's. In the early years they made top dollar selling into a cushy, relatively stable market, so they could afford some degree of squander and excess. But by 1984 the market had changed so drastically they were living in a fool's paradise and were simply swept away with the tide. By 1987 Atari Corp. ( had emerged as the clear winner in the disk drive market, effectively driving all the others into the dirt with a combination of low prices, mass merchandising through chain-store retail outlets, and lowered prices on the 1050 with the introduction of the XF551.

Hardware Hacker's Paradise
I'm the sort of fellow who eats the cake part of a cupcake first and saves the icing for last. Having waded through the "cake" of this article, now near the end I'll give you the "icing".
The controller cards in Percom drives will handle 3.5" drives It's true. I did it. It works. You can either slave a 3.5" floppy to the mother drive, or dump the 5.25" mech in the mother drive and replace it with a 3.5 incher. There are, however, some caveats. My experience was limited to 720K (Sony brand) drives which today are difficult to find. (I bought these a few years ago when Jameco Electronics in California was clearing them out at $30 apiece.) I won't guarantee what may happen if you hook up a high density 1.44 meg drive: maybe it will work, maybe not. Further, just because you hook up a 720K drive doesn't necessarily mean you'll get full 720K disk capacity. If the controller card in your mother drive is a single-sided controller, the most you'll get is 360K on your 3.5" disk, because it can't use both sides. (From the Sparta XINIT menu, select single-sided, 80 tracks, double density to get the optimum single-sided format.) If your mother drive's controller is a doublesided type, you'll be able to use the full 720K capacity of the 3.5" disk. The maximum you'll ever get is 720K even with a 1.44 meg drive installed (assuming a 1.44 meg drive will work).
Even if you don't replace the original mechs with 3.5" drives, the space occupied by those ancient full-height mechs is tempting. Midwest Micro (6910 U.S. Route 36 East, Fletcher OH 45326, 800-552-8080) still sells half-height Chinon 360K 5.25" floppy mechs for $39 apiece. I love these Chinon drives. They are completely shielded, well-made, and energyefficient. I haven't tried this myself, but I'd be willing to bet you could replace the old power-hungry full-height Tandon mech with two of these Chinon drives mounted in the same case (the 2nd drive configured as a slave) with both of them connected to the power supply via a splitter. If your regulators have been properly re-mounted to the case, you just might get away with running both drives off the the old power supply without blowing up anything. It goes without saying this exercise is not for the timid: don't blame me if something goes PFFFFT!
And what of that parallel printer port in the AT88-SPD drives? Does it work? Yup. I made up a three foot ribbon cable with a 34 pin mass termination crimp connector at one end and the usual Centronics 36 pin connector at the other. Slapped it into my Epson L-1000 24 pin printer and began dumping some AtariWriter text files to the Epson. What can I say? It printed. Will it do graphics? I don't know: I didn't try that. I thought it pretty neat to print to a parallel printer without an external interface and the usual snake's-nest of wires.
Then I got wild. I grabbed a Digital Devices 64K printer buffer that never worked with my Epson when it was connected to the parallel port on my Black Box. Maybe it would work with the parallel port on this Percom disk drive? I had to try it! Got it all hooked up, and once again dumped text files to the Epson via the Percom printer port. Zilch. Nothing. RATS!!!! What was it with this print buffer anyway? It works on the parallel side: parallel data in, buffered parallel data out. I mean, parallel data is parallel data, right? RIGHT??? (From the vicinity of the buffer there came a faint high-pitched cackle, and I turned just in time to see a green web-fingered claw disappear behind the printer.)
And here, dear friends, is the classic example of how one problem leads to another. It was time for me to bid my Percoms adieu, and take another look at this parallel printer buffer. Why didn't this thing work? Perhaps the answer will be revealed in a future installment of The 8-Bit Alchemist.