

ADD SOUND TO YOUR MONITOR (& other Neat Stuff)
Paul Alhart
When I found a good deal on a composite video monitor at a garage sale, I jumped at it. Only after I got home did I realize it contained no audio circuitry. What to do? I could have run the audio to my home stereo amplifier, but that was in another room and normally being used by my wife for such mundane tasks as playing music. After considering all my options, I decided to add the audio circuitry to the monitor myself. This turned out to be quite easy and inexpensive.
No, I didn't end up with a 100 watt Hi-Fi, Dolby quality stereo sound system. What I did get was audio comparable to that of most small TVs and, as a bonus, the monitor can now be used with a VCR (actually, mine sounded very nice with a good speaker - the specs on the LM386 are quite good! - ed.).
Details
The following article explains how to add audio to
your monitor. You will need the following parts: (They are all
available at Radio Shack for about $10.00. If you can scrounge a
speaker from a dead radio, you should be able to get by for under
$5.00.)- LM386 audio amplifier IC
- 10K ohm potentiometer
- 220uf @ 35V capacitor
- 8 Ohm speaker
- chassis mount RCA jack
- 2ea. 12" lengths of shielded audio cable
NOTE: The audio circuitry requires DC power that is between +4 and +16 volts and assumes that you will be able to obtain this power from your monitor.
Of course, you will need a soldering iron, some solder and some hook-up wire. I etched a PC Board to mount my IC, but you could glue the IC to the back of the speaker and solder the components directly to the IC or an IC socket, if you prefer.
Directions
So, let's get started. Refer to the schematic in
figure 1. as we proceed.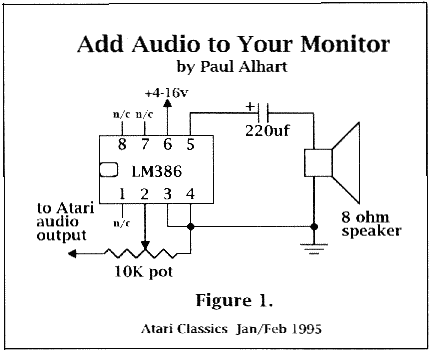
Step 1: Remove the case from your monitor and find a suitable location for the speaker. It doesn't have to face forward and should be away from the high voltage circuitry of the monitor. (if you don't recognize the high voltage section, replace the cover and forget the whole thing! ed.)
Step 2: If necessary, drill holes for the sound to come out, then mount the speaker.
Step 3: Using a multitmeter or a schematic of your monitor, locate a source of DC power between +4V and +16V as referenced to chassis ground.
Step 4: Using hook-up wire, connect this DC power source to pin 6 of the IC.
Step 5: Connect one end of each of the shielded audio cables to the 10K pot. The two shields should both connect to one of the pot's end terminals. One center conductor should connect to the wiper or center terminal and the other center conductor to the remaining terminal.
Step 6: Mount the pot in a handy location on the monitor. This will be your volume control.
Step 7: Mount the RCA jack on your monitor and connect the shielded audio cable that goes to the pot's upper pin to it. The center conductor connects to the center pin of the jack. The shield connects to the jack's ground solder tab. This jack is where your Atari's audio output will be plugged in.
Step 8: Connect the 220uf capacitor between pin 5 of the IC and one of the speaker terminals. Be sure the + side of the capacitor is connected to pin 5.
Step 9: Connect the other speaker terminal, the remaining audio cable shield, as well as IC pins 3 & 4 to Chassis Ground.
Step 10: Connect the remaining audio cable center conductor to pin 2 of the IC.
Step 11: Put your monitor back together and you're ready to test.
NOTE: If your volume control seems to work backwards, reverse the wires going to the pot's two end terminals.
IBM COMPATIBILITY?
How many users do you know that have given up the Atari for IBM compatibles because they just couldn't easily move files between their Atari at home and the PC they were forced to use at work? I have felt the PC tug many times myself - wouldn't it be nice to be able to work on my A-T-A-R-I columns during lunch (my hours) and then bring the disk home to finish editing as an Atari file?
The
old way
I used to send my files to a local BBS where the
SysOp would then put them on an MSDOS disk for me to take to work. To
get them back to my Atari, I would have to give the SysOp an MSDOS disk
that he would then make available for me to download from his BBS. Sure
it worked, but it could sometimes take a week or more to get my files
from one machine to the other.But
now...
Thanks to the programming genius of Charles
Marslett, I just carry my Atari disks to work with me and pop them into
the PC's floppy drive.It's
true!
With Charles' great utility, "UTIL.EXE", the PC's
floppy drive is configured to act as an Atari double density drive.
Your PC can then format Atari disks as well as read & write files
to them. Files are copied between your Atari disk and the PC's hard
drive. You have the choice of a "straight copy" or automatically
translating to or from ATASCII. Once the files are on the PC's hard
drive, you can boot WordPerfect or whatever software you want and go to
it. When done, use "UTIL.EXE" to copy the files back on your Atari
disk. Although Atari programs won't run on you PC or visa versa, you
can download PC programs from any BBS with your Atari and they will run
on your PC after being copied to the hard drive.You
need
Your Atari needs to have a true double density drive
to use this program. A stock 1050 dual density drive won't do. If using
a modified 1050, do not use the Ultra Speed sector skew on your
transfer disk.Problems
There can be problems due to head alignment. I've
found that if I first format the Atari disks on the PC drive, I have
fewer problems here.Sources
One source for this program is CompuServe. It is in
the IBM file section and is named ATARIO.ZIP. The ZIPed file contains
the program, a .DOC file, and the source code. Also, I will try to get
this program put on a future AC Disk (I
think it is on this disk - ed.)Get a copy and LOSE the Atari/PC BLUES!