

| New screen Fonts For AtariWriter+ | Paul
V Alhart |
Welcome to the New Atari Classics. I trust you are happy to find your favorite column, A-T-A-R-I, is still here. I have been writing the column using my trusty word processor for so many years now, that it just seems natural. But it wasn't always that way.
Back in the early '80s I wasn't even sure what a word processor was. I knew about food processors from ads on TV, but couldn't relate to word processors. Then I bought my first computer. A shiny new Atari 1200XL complete with the AtariWriter cartridge. It wasn't long before I wondered how I ever got through school without a word processor. My friends just wondered how I got through school at all. Come to think of it, we didn't have calculators, spell checkers, or microwave popcorn when I went to school either, but that's a whole 'nother story. I learned all about the wonders and trials of word processing on the trusty old AtariWriter cartridge. It wasn't till a few years later when our User Group held a "Word Processing Night" that I learned about some of the newer word processors available for the Atari. I tried most of them, but with AtariWriter as comfortable as an old shoe, I resisted change for some time. The addition of a new (non-Atari) printer to my system signaled the beginning of a change though. This new printer had so many neat new features and I wanted to use them all. The minute I got the printer home, I plugged it in and booted AtariWriter only to find that my new printer wasn't listed on the printer menu. I quickly learned all about the "Control O" codes, as well as the hassle of having to use them all the time.
AtariWriter+ To The Rescue
The logical move for me, was straight to AtariWriter+ since most of the editing and formatting commands were exactly the same as those used by my friendly old AW cartridge. AW+ also had several added features as well as a spelling checker that I really needed. Best of all, it allowed me to create my own custom printer driver that could access all those neat functions of my new printer. I have been using AtariWriter+ ever since.
Another advantage of AtariWriter+ is that it is disk based. This means that unlike the old AtariWriter cartridge, it is much easier to change the code and make custom modifications to the program. This month I am pleased to present two short type-in programs that will allow you to replace the character set used by AW+ with any standard 9 sector character set.
NOTE: These programs are for the 48K version of AW+ only and will not work with AW+130 or the 80 column version.
For even more fun, create your own custom character set using one of the many font editors available for the Atari.
What A Character!
A little background is in order. The character set we are talking about is the one you see on your monitor or TV screen and has no effect on what is saved to disk or sent to your printer. AW+ uses a redefined character set. This means that the standard Atari character set you see when your computer is first turned on is replaced by AW+ with its own custom character set. Figure 1 shows the standard Atari character set as well as the redefined set AW+ uses. Note that the only changes AW+ makes to the original character set are found in row three. The Atari graphic characters are replaced with the characters AW+ uses to mark editing commands such as paragraphs and carriage returns.
With the following type-in programs and a font editor you can change any or all of the 128 characters to suit your own taste. I personally like the standard Atari text characters but found the editing command characters of row three too hard to spot in a long document. I redrew these characters to take advantage of artifacting. Now all my editing commands are reddish gold and easy to spot.
Although the AW+ disk is copy protected, the file we want to modify (AP.OBJ) is a standard disk file that we can work with. It is important to make a back-up of this file. If something should go wrong, copy the back-up to your original AW+ disk and you are back to square one.
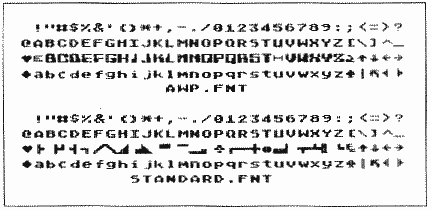
Figure 1
Let's Get Going
Step 1: Make two backup copies of the file AP.OBJ and put them away in a safe place.
Step 2: Make another copy of the file AP.OBJ to a freshly formatted work disk that also contains DOS. Any DOS that supports the standard Atari NOTE/POINT functions will do. If in doubt use Atari DOS 2.0 or 2.5.
Step 3: Type in the two short BASIC programs (AWF.GET and AWF.PUT) and save them to your work disk.
Step 4: RUN the AWF.GET program. This program reads the redefined character set contained in AP.OBJ and uses the information to create a 9 sector font file called AWP.FNT
Step 5: Use a font editor to customize this character set or just replace it with your favorite 9 sector font file. Be sure your new customized character set is saved back to the work disk with the file name, AWP.FNT
Step 6: RUN the AWF.PUT program. This program will install your new character set into AP.OBJ.
Step 7: Copy this modified AP.OBJ file from your work disk back to your original AW+ disk. NOTE: Your original AW+ disk can not be Write Protected for step 7 to succeed.
Step 8: Reboot your system using your now modified AW+ and enjoy.
If something went wrong or you just don't like the results, copy one of those back-ups of AP.OBJ to your AW+ disk. This will restore your AW+ disk to its original condition.
1 REM AtariWRITER+ FONT GETTER
2 REM by: PAUL V. ALHART
3 REM
4 REM
10 TRAP 130
20 OPEN #1,4,0,"D:AP.OBJ"
30 FOR I=1 TO 277:GET #1,A:NEXT I
40 OPEN #2,8,0,"D:PWP.FNT"
50 FOR I=1 TO 512:GET #1,A:PUT #2,A:NEXT I
60 NOTE #1,Q,W
70 FOR I=1 TO 260:GET #1,A:NEXT I
80 FOR I=1 TO 256:GET #1,A:PUT #2,A:NEXT I
90 NOTE #1,E,R
100 POINT #1,Q,W
110 FOR I=1 TO 256:GET #1,A:PUT #2,A:NEXT I
120 POINT #1,E,R
130 CLOSE #1:CLOSE #2
1 REM AtariWRITER+ FONT PUTTER
2 REM by: PAUL V. ALHART
3 REM
4 REM
10 TRAP 180
20 OPEN #1,12,0,"D:AP.OBJ"
30.FOR I=1 TO 19:GET #1,A:NEXT I
40 GET #1,A:GET #1,B:IF A<>255 OR B<>39 THEN
? "NEED AtariWriter+ (48K VERSION)":GOTO 180
50 NOTE #1,E,R
60 FOR I=1 TO 256:GET #1,A:NEXT I
70 OPEN #2,4,0,"D:PWP.FNT"
80 FOR I=1 TO 512:GET #2,A:PUT #1,A:NEXT I
90 NOTE #2,Q,W
100 FOR I=1 TO 256:GET #2,A:NEXT I
110 FOR I=1 TO 256:GET #2,A:PUT #1,A:NEXT I
120 POINT #2,Q,W
130 FOR I=1 TO 4:GET #1,A:NEXT I
140 FOR I=1 TO 256:GET #2,A:PUT #1,A:NEXT I
150 NOTE #1,T,Y
160 POINT #1,E,R:POINT #2,Q,W
170 FOR I=1 TO 256:GET #2,A:PUT #1,A:NEXT I
180 CLOSE #1:CLOSE #2