The
Personal Publisher:
PAGESTREAM GETS SERIOUS
by Donavan Vicha
Last month I described a book project I put together using the Migraph "Art Department" (Easy Draw and Touch Up). This month I will continue the story, concentrating on SoftLogik's PageStream. But first, let's look at what's involved in the editorial production of a book.
Once an author submits his manuscript to a publisher and it's accepted, it's no longer his or her labor alone that puts the finished book on the shelves of a B. Dalton or Waldenbooks store. The manuscript goes from the acquisitions editor to a project editor (there are other titles used: content editor, associate editor), whose responsibilities include fact checking, evaluation of contents for consistency and comprehensiveness (as well as comprehension!) and ascertaining whether all illustrative material (photos, charts, graphs, line art, etc.) is included and properly keyed to its place in the manuscript.
Once this editor has completed his or her work, the manuscript is copyedited. The copy editor ensures that the manuscript is grammatically correct, that captions for illustrations are correct and appropriate, and that the author's style remains consistent. The copyedited manuscript then goes for design, either by a book designer or the production editor.
The production editor (PE) is given the responsibility to oversee the manuscript through the rest of the publication process. Usually, the first-pass galleys (the typeset manuscript) are read by a proofreader and the PE to catch typos and dropped words/lines/paragraphs/etc., and to see that all the type specifications have been correctly carried out. The author also sees this set of galleys to make any changes, which the PE is obliged to transfer to the proofread set that goes back to the typesetter. Secondpass galleys are also proofed, but another set is given to a layout artist who creates a dummy of the book. (As a production editor myself, I have often been the layout artist as well.)
The dummy shows, page by page, where text and graphics go, usually in two-page spreads. All elements of the book are accounted for here: running heads (or footers), part and chapter openers, front matter (copyright, title pages, contents, dedications, epigraphs and so forth), back matter (glossaries, appendices, index), and the body of the book (text and graphics). The PE goes over the dummy to ensure that it has been handled correctly, as does the acquiring editor or the project editor. The PE also keys patches to the dummy pages-patches being the corrected portions of revised (second-pass) galleys caught by the second go-round of proofreading. (Instead of rerunning a third complete set of galleys, corrections are made only of the offending line or lines and then pasted over the incorrect passage.)
You
might begin to wonder about
those Macintosh ads where the senior
executive, holding the complex book
in his hand, looks askance at the
dimpled Mac user who claims to
have done it all himself.
those Macintosh ads where the senior
executive, holding the complex book
in his hand, looks askance at the
dimpled Mac user who claims to
have done it all himself.
Once the dummy has been approved, the layout goes to a keyline artist who does the actual paste-up of the camera-ready type and other elements, if any, on "boards." These boards are generally of a lighter weight than run-of-the-mill cardboard and are preprinted with blue lines, which are invisible to the camera used by printers, to create the plates used to print the pages of the book. These blue lines indicate where text should go and where running heads and folios should go, making the keyliner's task much simpler. In some cases, these boards are printed with black ink for elements that are supposed to be captured on the (negative) plate and printed.
The printer usually provides the publisher with a trial printing of the book, usually called a "blueline" due to the blue ink used in its creation. Depending on the kind of press used, these pages are grouped in "signatures" of 12, 16 or 32 pages of very cheap, slick paper, which I've always found hard to write on except with a grease pencil. The PE must check every page for instances of broken type or blobs of ink, note that photos and graphics are cropped and positioned correctly and watch for irregularities in print quality of text and graphics. Oh, yes, they must also verify pagination (make sure the pages are in the correct order).
As you can see, a complicated process and a team effort lies behind the production of any book you purchase. A similar process occurs for most publications, but because newspapers and magazines generally follow the same format, the process is simplified. The deadlines for newspapers and magazines are stricter and shorter, necessitating the simplified process, but certainly not making the job for the production editor any easier.
If you've followed this cursory explanation of the publication process and understand desktop publishing, you might begin to wonder about those Macintosh ads where the senior executive, holding the complex book in his hand, looks askance at the dimpled Mac user who claims to have done it all himself. The exec is right: No way! I hate to report it, but a week just doesn't have enough hours, folks, unless Mr. MacDimple doesn't eat and sleep, and unless his Mac is equipped with a time machine.
It's unlikely a laser printer-especially the much-vaunted Lino 300-is going to give you several hundred text pages (let alone text and graphics) in less than two or three days. That leaves four days for writing, editing, compiling notes, creating graphics and laying out the material. (And assumes no corrections are needed.) Also, most corporations require a multitude of executives to make their own additions and subtractions, as do book editors.
Personal Publishing magazine ran an excellent article in their August 1989 issue debunking eight desktop myths. (I highly recommend this magazine to anyone seriously using their ST for desktop publishing despite its minimal attention to our favorite computer.) One of the myths missed by the writer was the printing speed myth: a laser printer is not faster than a dedicated typesetting printer. And sending a large document out to a Lino service can be almost as slow as sending a manuscript to a typesetting service. It is also just as expensive.
That was the rub when I worked on an experiment with a major Chicago publisher to produce a book on The Munsters TV series. I had the tools, but we didn't have the budget to carry it out. However, the fact that we didn't follow through does not mean that DTP isn't ready for the world of book publishing. It just isn't ready to take over the entire process. I have several friends who use their computers to create dummies of textbooks from which the publisher then typesets-virtually recreates from scratch-the final version of the book. Textbook publishers have the money (and time) to do this; but slowly, trade-book publishers are beginning to jump into the DTP arena as well.
Enter
PageStream
The sample pages included with this column were
created using PageStream and
were employed to guide the design of the Munsters book we talked about last
month. (The book should be now available at a bookstore near you.) I
used PageStream because of
its ability to wrap text around irregular objects.Also included in the figures is a page from the working dummy of the book to give you a rough idea of how the typeset book would turn out. Scans of photos were created using PictaScan (E. Arthur Brown) and ST Scan (Navarone), but were for position only, meaning that the printer would use the actual photo for creating a halftone picture.
Another reason for using PageStream was that I am very familiar with it.
I am indebted to beta-tester Bill Rehbock and SoftLogik's Mark Wetzel for use of beta copies of PageStream (1.55b and, most notably, 1.57b), which vastly improve upon the performance of 1.5. By now, Version 1.6 is available, and anyone who has been hanging on since the horrendous beta release of 1.0 knows that, at last, PageStream is a serious, state-of-the-art publishing program.
To me, the most significant improvement has been the solidification of tagging operations, although most people will find the speed of its loading and redrawing increased remarkably over 1.5. Since its first appearance as Publishing Partner, right through to the PageStream 1.5 release, the most annoying aspect of Deron Kazmaier's labor of love has been the arbitrary way in which "default" font styles were handled. If you had used 60-point Palatino in a previous session, it would likely be the default for the next dozen sessions. Loading in text would be a nightmare, if not next to impossible, if your text area was too small. And having to reset the text to the font you really wanted in the first place seemed a foolish waste of time and energy. Furthermore, inserting text was also a horrendous task because it never matched the style into which it was inserted.
With PageStream 1.6 you can now select a tag before importing text and get just what you want. Granted, the Ventura-like tagging ability of Timeworks Desktop Publisher (TDP) is easier to work with, but PageStream allows more options to be selected. Desktop Publisher lacks many of the oneshot typestyle options that PageStream offers, so it gives with one hand while it takes away with the other. The main point is that, to master PageStream, you must master its tagging capabilities and learn to live with its present limitations.
Setting
Up a Template
Thus, once you've set the document size (by choosing
New Document under the File menu), your next step in using PageStream should be to create
tags. These tags can be modified later, but first begin with the
"default" tag, which is usually the first tag you create. Name the tag,
then go down the list of options. Unless you are getting creative and
know what you are doing, leave the Fill and Color options at the bottom
of the list alone. I cannot begin to relate the anguish and frustration
that dogged me once I'd set a white fill to print black and saw nothing
printed despite what appeared correct on screen. You cannot go back to
an uncommitted Fill or Color choice.Let's look at what I had to do after I created a new document for my Munsters sample. In the copyediting process, 16 distinct text treatments were identified. Along with the usual chapter titles, heads and subheads and body-text styles, there were several kinds of sidebars indicated, each requiring a head. This did not mean I had to use 16 different typefaces or sizes. Generally, good design sticks to one or two font families, so the rest of the distinctions are broken down into using bold and italic styles and changing sizes and the measure of a line of type (or how it is indented).
I also had to consider how photographs would be treated. This is where I took my lead for handling the design of the book. A majority of the photos were on two kinds of contact sheets (film strips exposed on 8" x 10" sheets of photo paper). Thus, each sheet had either four or 12 photos per sheet. The quartets were generally 23 picas by 28.5 picas (3¾ " x 4 5/8") or 13.5 picas (2¼ ") square. Since neither I nor the printer who would create the negatives for the printing plate wanted to mess with getting all the photos reduced or enlarged to the same size, I sought to keep pictures at a standard percentage of their original size (100% filled the bill nicely). And 23 picas is a nice size to accompany 11/13 type (11-point type with 2 points extra leading).
I was working within a web frame that measured 42 picas wide and allowed 44.5 picas of text area below the webbed corners. Discount a pica from either side of the frame, and I have 40 picas of text area. Subtract 23 picas for the main text, plus a 1.5-pica space for breathing room between main text and the sidebar area, and that leaves 15.5 picas. At 115 %, the 13.5-pica pictures fit in the sidebar area. If I included the photo inside a box in the 15.5-pica sidebar area, the photo could stay at its original size. Thus, I would generally work with three photo widths: 15.5, 23 or 40 picas.
I could also go against this asymmetrical text arrangement with two 18-pica columns of sidebar text with two picas between the columns and a pica on the outside margins. Optimum layout flexibility was achieved using a pica rule and calculator even before I turned on the computer!
Now the tagging operation could begin. Here are a few examples:
~Body text: Schoolbook, 11 point; 13 fixed leading (or 2-point Auto); no change in character spacing; no baseline settings; no margins; 12-point (1 pica) paragraph indent; word justification (never use character justification for books); no fill or color.
~A head: Schoolbook, 15 point; 18 fixed leading (or 3-point Auto); - 4 character spacing; center.
Remember that the line measure is "set" by the text column created, which, in this case, is 23 picas for the main body of text. For the sidebars, however, the text column would be only a guide for creating boxes for photos or boxed and screened text, thus indents would come into play.
~Sidebar: Avant Garde, 10 point; 12 fixed leading; 12-point left, 12-point right, indents; 12-point paragraph indents; word justification.
~Sidebar head: Avant Garde, 14 point; 17 fixed leading; 12-point left, 12-point right, indents; center (even though it's centered, I still have to account for the space needed between head and box rules that will enclose it).
Note that I can use the same tag for the sidebar whether it is 20 picas with the extra space in-between text columns or 15.5 picas in the outside text columns. Yet each kind of sidebar will be distinct. The same kind of text coding cannot be done with regular typesetting. So, yes, there are a few advantages to DTP after all!
When handling special situations, like using bullets or having the first paragraph of a chapter not indented, PageStream is somewhat awkward. First, you need to set up the tag for the main body of text, then click on ADD to save it. Then hit Escape and rename the tag appropriately. In the case of a bulleted list, just change the font to the bullet font (PageStream currently has "Dingbats" and Jay Pierstorffs excellent "Crackers" fonts), keeping all other specs the same. In the case of an unindented first paragraph at the start of a chapter or a break in the body-text, click on the body-text tag, rename it and change the paragraph indent to zero.
Once the tagging system is in place, save the document as a template. Since I used the web frame in the same position for each left and right page, I also loaded it onto the master pages and put it into position before saving a template. From there on, each chapter would be named (using "Save As. . ." under the File menu) immediately before proceeding with any work in order to preserve the blank master document.
Speaking of master pages, I have yet to see the real value of the master pages as far as setting up text columns, since it appears you cannot load text into the text column thus displayed on pages 1, 2, 3, or so on. The Create Columns option does not take into account double-sided pages (left-right distinctions), so it does not serve my needs in regard to asymmetrical left-right pages. The beta copies I've used so far do not seem to improve the situation, but perhaps it is improved in Version 1.6, which is available to registered owners. The only trick I can suggest is to use the text columns created from the master page as guides for creating separate columns on each page.
So the next step I took was to create a left hand master page with the 15.5-pica column on the left and the 23-pica column on the right. I also created text boxes for the display text and quote text, even though such text does not appear on every page. Finally, I placed left and right folios (page numbers) centered below the bottom of the web frame. I used the LM and RM codes that automatically set the appropriate page numbers (right-hand pages are always oddnumbered; left-hand pages, evennumbered). Then I saved the master document one last time. (Note that I will break the book into a number of chapter documents, and so assign each chapter's master pages with appropriate starting folios.)
The
Hypothetical Layout Process
Had we actually proceeded with desktop-publishing
the
book, the procedures outlined below would have been followed. The
copyedited manuscript would have been typed on PCs using WordPerfect. This is the routine
the publisher follows for creating scannable printouts for its
typesetting system, but the typists would have inserted typesetting
codes into the text. The disk files I received would have been
unadorned WordPerfect 4.1
files on 3.5 " disks that I could easily read into my system, and into
PageStream after breaking up the chapter files into sidebars and such.
I would not have wanted to flow regular text and sidebar text together.My first-pass galleys probably would have followed my page format, but without the web frame to save file overhead (and thus printout time), since I could easily add the frame to the master page of each chapter document later, when camera-ready printouts were needed. After proofing, I would have made corrections within PageStream and then began the layout by adding "photos" in the form of boxes drawn to the size of the photo. I would still have to crop and mark the photos for size outside the program. Only for photos where I would have outlines (the background cut away, leaving heads or other prominent foreground features of a photo) breaking into the text would I need to use scans. And those scans, however nice they might look using halftone mode in Navarone's ST Scan (special thanks to Coz Computers in Chicago for its use), would be for position only. Again, to avoid file-size problems, I would have likely foregone halftones and gone no further than 150 dpi (although my sample did use a 300 dpi scan of the Munster family-just showin' off!).
Doing page-sized galleys from the startunlike what we traditionally do with firstpass galleys-would have put us ahead of the game by having an idea of the page count before photos were inserted. And there's always somebody looking over my shoulder, wondering about the length of the book....

Clicking
Off
Except for the problem of 300 dpi PS output being
unacceptable and the Lino service being too expensive, it would have
been possible to do this book using PageStream
and the other ST programs, like WordPerfect, Touch Up, Easy Draw
and ST Scan. It still would have required some traditional hands-on
work with scaling and cropping photos, but I've been doing that stuff
for years. The point is, we do have the tools to do serious,
professional publishing with Atari hardware and software.I'm probably going to return to this book project one last time in order to illustrate the power and applicability of the ST to real-life DTP tasks. Then I'll be looking into various other areas of personal-publishing topics. Next month, however, Christmas comes upon us, and I've always wanted to play Santa's helper and discuss stocking-stuffers and gifts for the personal publisher in your life. I'll try to give you my choices from among word processors, drawing programs, accessories, utilities and hardware, as well as DTP programs and an odd game or two.
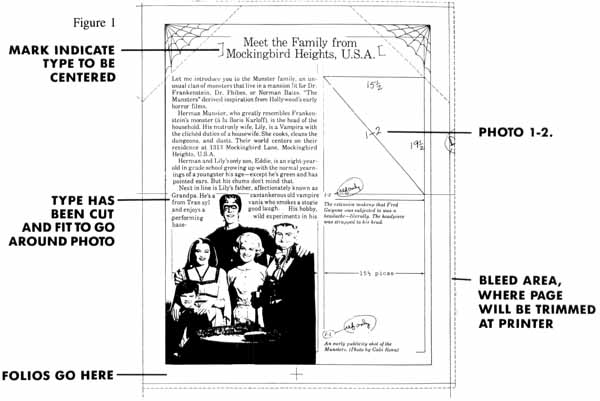
| 1 This is a page from the layout
for the Munsters book. You can see the
web frame as well as all the blue lines (the arrows and "15'/s picas"
are not meant to print, but are there as a guide for the keyliner). The
galley was cut up in order to do the "wrap" around Herman Munster (note
the bit of hyphen in "Transyl," the lack of hyphen after "transyl," and
"vania" on the other side of his head). The broken diagonals below the
webs are also non-reproducible to the printer's camera and mark off an
area where text should not go, as well as marking where the text area
begins. Photo 1-2, like the majority of photos in the book, is drawn
for position, with measures for the keyliner to reproduce on the
boards. The printer will place the halftones (the printable versions of
the photos) into position. (All illustrations of the Munsters in these
samples are copyright 1989 by MCA Publishing Rights, a Division of MCA
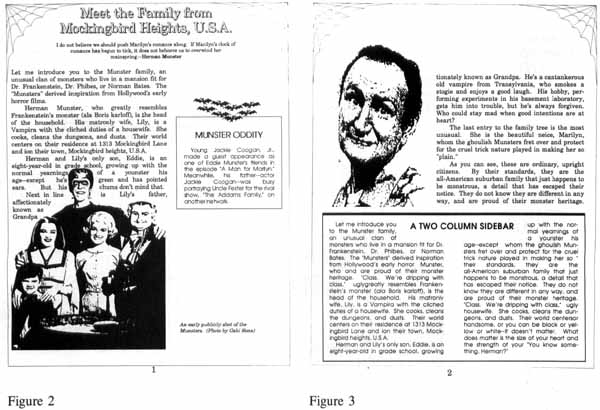
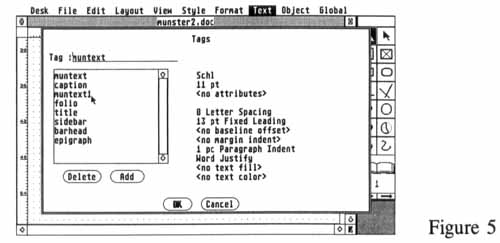
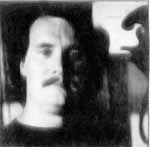
Inc. Used with permission.) 2 This page shows many of the elements that had to be considered in designing the Munsters book: display text, opening quote, opening paragraph and body text, sidebar, folio and caption. There's also some fun stuff with the webs and bats, to say nothing of the text wraparound and photos. One thing lost from the return to traditional typesetting was the shadowed text since the publisher did not have the font. On the other hand, the bats will be treated to a 40% gray screen and print under the larger "MUNSTER ODDITY" head. (All illustrations of the Munsters in these samples are copyright 1989 by MCA Publishing Rights, a Division of MCA Inc. Used with permission.) 3 Not all of my design suggestions were carried out. For example, the "TWO COLUMN SIDEBAR" head shown here didn't make it into the finished book because I forgot to write up the specs. The scan of AI Lewis was done with PictaScan at screen resolution, the only resolution available with this otherwise excellent scantier. For this project, such a scan would have been acceptable since it was "For Position Only." (All illustrations of the Munsters in these samples are copyright 1989 by MCA Publishing Rights, a Division of MCA Inc. Used with permission.) 4 Here, I've just set the text wraparound for the polygon I created around the Munster family. I made it large so I could click on either the picture or the shape to help position theist. The next step is to call down the Object menu and choose zero for the Line choice. leaving the polygon invisible except for the graphic itself. Open polygons can be very useful for creating unusually shaped text. 5 Here's a snapshot of my tags for the Munsters book sample pages. Note the '"Muntextl" entry: To get the first paragraph of every chapter to run without an indent, I made a duplicate of the "Muntext" tag, without the paragraph indent. Get your tags set up before working, and life with PageStream is much easier. |
Donavan Vicha has been writing about desktop publishing on the Atari ST for three years. He uses a Mega ST2 system for his freelance editorial service, adapting 12 years of book publishing experience to this rapidly growing field. He lives in Chicago with his wife and two sons.