A N I M A T I O N
S T A N D
SPECIAL EFFECTS
MAURICE MOLYNEAUX
Beyond the important aspects of such animation basics as squash-and-stretch, antiecipation, characterization through motion and so on (discussed last time), there is another realm of techniques that fall under the general heading of "special animation effects." These range from such simple things as speed lines to the bizarre world of distortion, double and triple images and so forth. If you want to animate something moving quickly, exploding, being disintegrated, flattened, you'll want to take advantage of these techniques.
LESS
IS MORE
Before we proceed, I feel it's important to once
again stress that the following techniques should not be overused. They
should be used only where necessary. The reasons for this sparing usage
are twofold: First, they are meant to add energy and/or life to a scene
or action, and their overuse tends to make them less special, and,
consequently, they have less impact. Second, since most of these
techniques involve some kind of distortion of the image to attain a
certain effect, continual use gives the viewer a chance to see the
effect repeatedly, allowing them to see through the effect to what
you're actually doing. Therefore, they start seeing the effect as an
effect, rather than as part of the action.I've said it before, and I'll say it one more time: Nothing exceeds like excess.
SPEED!
Try making some relatively large object move across
the screen in a span of ten frames or less. Go ahead, try it. No matter
what animation program you're using, chances are you're going to notice
a sort of "jumping" effect. The object doesn't seem to actually move
smoothly across the screen. It gets there in a series of small "hops".
No matter how fast the playback is, you can see each individual image.
And, because these images are so few and the changes in each frame so
great, it seems there's almost nothing you can do about it. Adding more
frames would smooth out the action, but it would also slow it down.
Even at full-speed playback, the object wouldn't seem to be moving all
that fast. So, how can you make an object move quickly from one
position to another without encountering this staccato movement problem
or slowdown? There are a number of techniques that can be used to cover
this effect, but the three basic types are speed lines, blurs and
distortions.SPEED
LINES
Everyone knows these. They appear everywhere from
animated cartoons to comic books. When you want to imply speed, you
simply do not fully draw the trailing edge of the fast-moving
object/character, but instead draw a lot of parallel lines in its wake.
In animated film this effect is usually accomplished via a technique
known as "dry brushing," wherein a brush with very little paint (nearly
dry) is used to streak the colors of an object, creating speed lines.
How to do this with your ST varies with the software you're using.
Since you have to deal with pixels and limited resolution, the easiest
speed lines to draw are those that are perfectly horizontal or
vertical. In such cases you might manually draw the lines on a specific
frame or frames, or, if the program you're using allows it, cut out a
copy of the object, then paste it down elsewhere and edit it. You would
then knock out every other line with the transparent background color,
cut out this new brush and then paint a trail behind the object. To
make this effect less mechanical, you would make the lines of uneven
length and perhaps even let some of the blur spill over parts of the
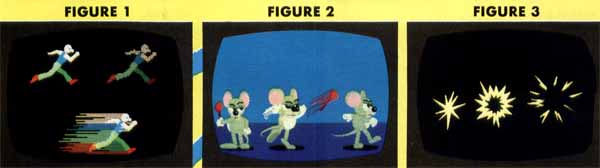
object. Figure 1 demonstrates these steps.Please note that to use this technique, you may have to save a "safety" copy of the original frame, so that if the speed lines obliterate important details, you can retrieve them from this backup screen. Also, if an object has many details and colors, you may have to touch up the speed lines. The rule of thumb is that each speed line should be the same color as the pixel from which it originates on the object. If a speed line comes off a brown belt, it should be brown. The exception to this is speed lines over a color where the actual color wouldn't work, such as a brown sleeve moving in front of the jacket it's attached to. In such a case, you will probably have to use a different color or the lines won't show up.
Speed lines have some limitations. They don't work well if the background features a lot of cluttered colors or lines that parallel the speed lines. In such instances the speed lines can get lost. Furthermore, while speed lines can be successfully maintained for a considerable period of time in a traditional animated cartoon, they don't tend to work well on computers if used for more than a handful of frames. This is because the drybrush technique used on cels provides a certain amount of randomness to each frame, so that each line doesn't stand out for long. On a computer, the screen resolution tends to make the lines heavier, and such randomness is much harder to achieve. Therefore, the lines themselves are much more obvious and have a tendency to "stand still," drawing attention to themselves.
BLURS
Blurs are often accomplished in the same manner as
speed lines, but they are usually heavier. For instance, having a
character turn his head suddenly might involve one frame where the head
is almost to its destination pose, but all the colors "leak" back
toward the previous position. The key difference between a blur and a
speed line is that a blur isn't a bunch of parallel lines, but a mass
of color, occasionally featuring a few speed lines atop it for added
effect.Blurs don't always convey as much velocity as speed lines. Speed lines lend a look of great speed to a movement because they are somewhat transparent, making it seem as if the object passed by so fast that you could see through it. Because blurs tend to be more opaque, they seem to have more weight and thus less speed. They are better for shorter actions, like the aforementioned head movement, rather than something like Road Runner bolting down the highway at Mach 2 (which is better accomplished with speed lines).
DISTORTIONS
To the average viewer of animated film, this is
probably the least-noticed speed effect. It is the "stretch" part of
squash-and-stretch taken to ridiculous extremes. Rather than some mild
warping of form to lend a little more oomph
to an action, a distortion
is a wild deformation of an object for a frame or two (no more). It is
commonly used to accomplish nearly instantaneous transitions from
point/position A to B.For instance, in Bob Clampett's The Great Piggy Bank Robbery (1946), Detective Duck Twacy (Daffy Duck) is on the phone, and in the span of three frames he goes from leaning on one side of a desk to laying atop it, on his back, on the other side.
I've
said it before,
and I'll say it one
more time: Nothing
exceeds like excess.
and I'll say it one
more time: Nothing
exceeds like excess.
There is a frame where he starts moving, one where he stops, and the single frame in between them features a drawing of Daffy that is hardly recognizable as the duck. The animator has created a pose that features one half of Daffy in the starting position and the other half in the destination position, with the duck's details stretched in between, as if he were made of Silly Putty! The drawing is so severely distorted that when you look at it your mind refuses to believe such a wild drawing would work at all. You think, "Surely, that bizarre image would stick out like a sore thumb." But, no, when you view the cartoon, you don't see it. You see Daffy zip into another pose, but you don't actually see the distorted drawing. Chances are, even if you've watched it via freeze-frame, you'll have a tough time seeing it during normal playback.
A few months back, I loaded one of the scenes from the Art & Film Director video into my ST and decided to try a little experiment on it. At the end of the shot, Megabit Mouse spun around and hurled a mallet at and through the Art Director toolbox. I had never been satisfied with this action, because I was unable to make him throw it as fast as I wanted and have it look right. To get a pleasing action, I had to use more frames than I wanted, and the throw lacked the force I sought. As an experiment, I deleted a few frames of Megabit spinning around with the hammer and replaced them with a single frame featuring a wildly distorted mouse. Figure 2 shows the start and end positions, with the distorted image in the middle. Like the Daffy Duck scene described above, when I played it back I couldn't really see the distorted image, but wow! did that throw have force! That single frame of distortion accomplished what I thought was impossible.
Such wild distortion can be used to strengthen a lot of other types of action. Just freeze-frame through almost any door-slam in an old theatrical cartoon. The door "bends," its top and bottom trailing. In the middle of its action, it will often appear six times as thick as normal. The doorknob may even lag behind, stretched out, and actually sink into the door when it catches up. Cars bunch up and change shape as they "wind up" to zip away, buildings bulge and radically change shape and volume, and characters' limbs become massive arcs for a single frame.
And it's all virtually invisible to the viewer.
MULTIPLE
AND AFTERIMAGES
Another technique for enhancing movements is the use
of multiple images. These can sometimes be used in lieu of speed lines
and blurs and are often useful for effects involving movements too
rapid to animate with single images on each frame.Afterimages have a distinct look. Specifically, they tend to be either transparent or, at the very least, dimmer than the object in its current position. If not, it becomes difficult to discern which image is the actual object. The easiest way to create an afterimage for a frame is to take the previous two or so frames, combine them into a new image, dim the colors (if your palette permits) and add them to the current frame. The best program for such effects has to be Cyber Paint, where you can overlay and underlay pictures and whole animation sequences. If you do this to each frame, the selected moving objects will have "trails" that follow them. If done properly, they can add the illusion of speed, but more often they are used for different effects.
(Using TRACE ON in Film Director automatically leaves afterimages, but it leaves all afterimages for the range of frames selected, and no color-dimming is possible.)
While afterimages are composed of multiple items, what I refer to as multiple images is a different animal. This means creating a frame that has two or more images of the same item or character. For instance, a frame that has a character looking both left and right at the same time (in essence, having two heads). Multiple images are mostly used for extremely rapid motions where more poses must be struck than there are available frames. For instance, you want a character to look up, down, left and right numerous times in a matter of only a few frames. You do this by having one frame where the character is looking one way, another frame where he is looking in three directions at once (perhaps enhanced with speed lines), another with him looking in two directions and so on. The eye doesn't necessarily perceive these as the same image. You see him looking wildly about, striking more poses per second than there are frames.
This same technique is used for vibrations. Let's say your character has just been hit on the head, which vibrates like mad. Drawing his head in a series of positions going left to right would look just like his head going from left to right. To get the chaotic feel of a real vibration, multiple images are used. Like the example of the guy looking in multiple directions at once, here we draw the character's head in the same way on each frame, but on some frames we have two, others three, another one and so on (you may add some speed lines to heighten the effect). If you make sure not to put any specific or repeating pattern into it, the effect will be one of his head rapidly vibrating. If you make the images fall into a repeating cycle, such as one head, three, two, one, two, and then repeating the cycle again, the viewer will pick up on this, and the illusion will be destroyed.
VIOLENT
SOLUTIONS
In classic cartoons, the most common "effects" were
violent actions, such as explosions, crashes and other catastrophes.
Most of us are consciously aware of such obvious effects as fiery
explosions, clouds of smoke and cartoon characters imprinted in steel
doors. Those are pretty obvious. But there's a whole range of
techniques used to make these acts of violence have more impact.For instance, let's say you want to drop a safe on a bulldog. How do you do it? You animate the safe falling into the picture, covering up the bulldog as it lands on him and embeds itself into the sidewalk. If you animated such an action exactly as I've just described it, the action would lack any sense of weight and impact. How would you make the safe "feel" heavy?
The easiest way is to jar the whole scene, as if the impact of the safe had shaken the camera. This can range from a slight quivering of the entire frame to severely shifting the image. Sometimes enlarging and shrinking the image on a few frames will achieve the same effect. If this is done over a series of frames, and it doesn't fall into a pattern, the shot will have a lot more impact than it would without this special effect.
To make the impact even more severe, you could try tilting the entire frame; that is, rotating the image so it is at an angle. On alternating frames you would reverse the direction so that on one frame the image would tilt to the left and on the next frame go to the right. Doing this over a series of frames, varying the tilt angles all the time, will create the sense of a tremendous impact.
Of course, since computer images rarely extend beyond the confines of the screen display, shifting and tilting images in such a fashion may leave blanks in your picture, which will have to be touched up.
POW!
How about a smaller impact, where you don't want the
screen to shake? How do you emphasize the impact? The easiest way is to
use an impact indicator. You know, one of those jagged shapes that
radiates from the point of impact in a comic book. Of course, since
this is animation, it has to move. One picture is worth a thousand
words, so I'll let Figure 3 explain it.KABOOM!
Explosions are such a common element in many older
cartoons that I could almost write an article on that subject alone.
For the sake of brevity, I'll keep it to a small section.Explosions are usually bright, quick affairs. Like the violent impacts discussed above, they will often involve camera-shaking techniques. The easiest explosions to animate are of the ultra-cartoony variety, with lots of jagged, starlike polygons of bright color filling the screen. These aren't often effective, so most explosions are of the fire-and-smoke variety, featuring either a flash followed by swirling smoke or just fiery-colored smoke.
Fiery explosions are difficult to animate properly, particularly when you have a palette as limited as the ST's. Usually, such explosions feature a lot of swirling clouds of reds and blacks, which need to move like real smoke in order to look right. They also have to be dissolved out, which isn't easy to do with only 16 colors. Unless you're feeling really ambitious, I'd recommend not using such explosions.
The most violent-looking of all explosions is the flash variety. First,a point of bright light briefly emanates from the exploding object, then the entire screen goes white. The problem with this effect is that the white alone seems violent for a splitsecond. If you hold it for longer than that, it becomes a white screen instead of an explosion.
I learned the trick to this years ago when I animated the Balance of Terror Star Trek game proposal. I wanted the starships to explode in a way not usually seen in a computer game. No little sparks flying or animated fireballs. I wanted it to look like their power sources had been violated and the vessels were instantly vaporized. I selected the white-flash technique for this and solved the inherent problem by changing the screen colors to black on every third or fourth frame. The effect was instantly transformed from a static field of white to a flashing, strobing spectacle. People tended to comment that the explosion was almost too violent. But it works. It's one of the simplest effects, and at the same time, one of the most effective.
LIGHTNING
AND ELECTRICITY
Let's face it, the stereotyped zigzag lightning bolt
won't cut it anywhere but in the most cartoony of circumstances.
Lightning doesn't look anything like the cartoon symbol of it. It's
much more complicated and, therefore, a lot tougher to animate.I recently suffered through the movie Star Trek V, and of the myriad bad special effects that film contained, one of the worst violators were the lightning bolts fired by the "un-God" at the film's climax. These things looked like beams with little electrical frayings around the edges. No go. They didn't work. The way to do electricity is to think of a Jacob's Ladder. You know, one of those gizmos in the labs of mad scientists where a little electrical arc runs up between two metal rods. The electrical arcs seen in those writhe and twist as they go. You never see frayings. The electricity follows the path of least resistance, which is rarely a straight line.
The best-looking lightning-bolt effects are simply a bunch of thin, scrawly lines connecting two points. Make those lines change frame after frame, and you'll get a much more interesting effect. If you want to freeze-frame through some well-executed lightning effects as reference, study either the opening scenes of Star Trek-The Motion Picture (where the Klingon ships get zapped) or Return of the Jedi (where the emperor lets Luke have it).
By the way, such electrical effects can benefit greatly from occasional one-frame flashes where you brighten up the palette. Heck, even the white/black alternating effect discussed for explosions comes in handy. Make an occasional one-frame negative image, and it works quite well.
THE SECOND-TO-THE-LAST ROUNDUP
I was planning to wrap up this series with this article, but it seems I've once again run out of space. Next time it's on to postproduction, where we'll discuss putting it all together, from adding sound to putting it on videotape. See you then.
Blissfully ignorant of the realities of time and space and plain old common sense, Maurice Molyneaux hopes someone will someday discover retroactive reincarnation so that when he dies he can come back in a previous life as animation director Chuck Jones. His greatest fear would be to come back as Wile E. Coyote and, in the process, have to learn some humility.