Ultra Sound
Imagine sitting in your easy chair in front of the color television set with a stereo speaker to your right and left. The Star Raiders cartridge is in the computer. After selecting your destination you press "H". A slight rumble emanates from the speakers as the engines engage. From the forward view, you see the stars moving faster and faster towards you as the sound increases to a roar. You explode into hyperwarp and the sound from the speakers rattles your chair. RED ALERT!
You reach for the joystick to direct your photons but it's too late! You receive a direct hit from Zylon fire. The room echos from the impact, the vibration causes little nick-nacks to fall from the cabinet shelves. DAMAGE CONTROL. You can hear the cries of your injured crew reverberating through your star cruiser. No, its your neighbors yelling for you to turn down your stereo. What excitement! Maybe next time you should use the head sets.
You can make a simple, inexpensive cable that will channel audio from your ATARI 800 to your stereo speakers. This article will show you how.
The cable will attach to most stereo systems or radios. Unfortunately, the other end will only attach to an ATARI 800 computer, where the monitor is external. The ATARI 400 would require disassembly, interior soldering and case modifications. There are three components that you need to buy. We have listed these items, their approximate cost, a possible distributor and comments in Table 1.
Table 1: List of Components
Item                       Distributor             Price      Comments
-------------------------  ----------------------- ---------  ----------
5-Pin Audio/Video Plug     Radio Shack (#274-003)  $1.49      Shielded
                           APX (#90002)            $2.49
RCA Type Phone Plug        (#274-339)              $1.39      Shielded
10 Ft. PVC Insulated Cable Ask Local Electrician   $4.61      0.25" O.D., shielded
                                                              2AWG 10-12 conductor
The 5-Pin Audio / Video Plug is sometimes called a 5-Pin DIN plug. The outer jacket can be made of plastic ($1.49) or metal ($2.49). It contains five small pins mounted through an insulator panel and arranged in a 180-degree arc. There is a small notch at the top for alignment purposes (Figure 1.)
Figure 1. S-Pin Audio/Video plug configuration (outer facing side)
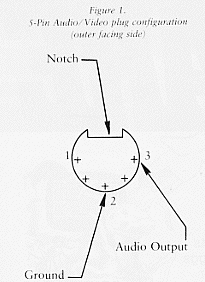
One side of the insulator panel usually has small numbers printed on the board. These numbers correspond with the numbers in Figure 1. For our purposes, it is important to know that the ATARI 800 uses pin #3 as the audio output and pin #2 as the ground. The RCA-type phono plug has an outer jacket of metal. The inner workings contain one large pin held in place by insulation. These units are usually sold in pairs since the typical use is for a two channel stereo input. The large pin is the audio input and the outer jacket is the ground.
PVC insulated cable is sometimes called telephone cable. There are hundreds of different types of cables to choose from. We recommend a tinned copper, PVC insulated, conductor cable with 22-24 AWG stranded drain wire. Wire gauges much larger than 22 (i.e. 18,16, 14 . . .) are very stiff and difficult to work with. Stranded wire should be color coded. The cable should be jacketed in a chrome PVC with an outer dimension (O.D.) of 0.25 inches to ensure a snug fit with our plugs. If you choose a smaller cable (ea. speaker wire) you run the risk of pulling the wires out of the plugs or crimping the cable when you move the computer. If you have your computer in an area of severe electrical interference, we suggest that you purchase a cable with aluminum-polyester shielding. The minimum length for your cable should be ten feet to allow for some flexibility in where you can place your components.
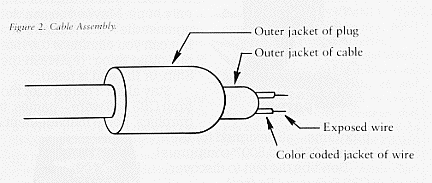
Next, gather the necessary tools for soldering. You will need a pencil-tip soldering iron with a heating element of 25 to 35 watts. The best solder for this application is an alloy of 40% tin and 60% lead with a resin flux core. This is sometimes referred to as television or electrical repair solder. In addition, you will need a razor, a needle-nose pliers, a wire cutter, a clampable heat sink and a clean, well lighted work area. Remove the outer jacket from each plug and slide the jackets onto opposite ends of the cable. With a razor, carefully strip away 3/4" of the PVC cable cover from each of the cable ends. If your cable contains more than two color-coded wires, snip off the extra ones to make them flush with the PVC cable cover. Compare the ends of the cable side-by-side to make certain that the color codes are an exact match. Strip away 1/4" of the color-coded PVC from each wire (Figure 2). You are now ready to solder.
Figure 2. Cable Assembly.
Hold the inner workings of the plugs with a pliers and attach the heat sinks to the appropriate areas. Solder ground to ground and audio to audio. If the insulators begin to melt, discontinue soldering and attempt to restraighten the pins. Once soldered, reassemble the plugs. Firmly insert the 5-pin plug into the ATARI 800 monitor jack and the RCA-type phone plug into the accessory or tape (in) jack on the back of your stereo. Boot something musical onto your 800, turn down the volume on your TV and switch your stereo to accessory or tape. If you have a stereo / mono switch, place the switch in mono position. Otherwise, the sound will only come through one speaker. Very slowly, turn up the volume. You should hear perfectly clean music. If you hear a hum, you have a poor connection. Check that your solder has not bridged across the insulator.
For the adventurous experimentor, you could also build a frequency separator making this a pseudo stereo rather than a monotone cable. Use a high/low frequency shunt and patch the high frequency to one channel and the low frequency to the other. I'll leave the design up to your imagination. In addition, the strength of the audio signal could be monitored and used to control some other devices. For example, you could place a fan on the top of your television and an inclinator platform beneath your chair. As you enter hyperwarp, the fan would blow faster and faster, and you would gently sink back into your seat. The seat would jolt whenever you were hit by enemy fire and it would pulse during engine damage. An affixed 'Le Stick' on the arm of your chair would allow you to bank to the right or left, climb or dive, by shifting your weight. The ultimate in home aviation simulators!
by Thomas Krischan