Photo LabelMaker
By Gary Coppola
Print any labels just right for your 35mm slides -- or anywhere you need lots of information in a little space
Photo LahelMaker is just the ticket for keeping tabs on your fast-growing 35mm slide collection -- or for printing tiny return address labels and many other uses. This BASIC program works on Atari 8-bit computers with at least 48K memory and disk drive. The program is designed for Epson-compatible printers with codes for producing compressed pitch, superscript font, and 6/72-inch line spacing. Other types of printers may also be able to use Photo LabelMaker if you can insert the proper code sequences from your printer manual, as explained in the article.
Photographers, whether amateur or professional, tend to rapidly accumulate an overwhelming amount of pictures. Keeping track of these pictures usually requires some sort of filing system, either manual or computerized. Professionals who routinely send photos to clients need to be able to quickly locate a particular image. However, the serious photographer who enters club competitions, or even the casual photographer who just wants to identify vacation shots quickly, can find a good filing system invaluable.
No matter what type of filing system you use, it is important to put a substantial amount of information, clearly written, on each image. These facts may include a title, location, subject description, exposure values, photographer's name and address, filing data, etc. For those who prefer to shoot 35mm slides, there just isn't enough room on the mount to write much of anything.
Out of necessity I wrote Photo LabelMaker. This program lets you rapidly make mini-labels for your slides -- or anything else where space is scarce, for that matter. These labels of either three or four lines, with up to 28 characters per line, provide plenty of room for lots of information, especially if you use two labels per slide.
GETTING STARTED
Type in Listing 1, check it with TYPO II and SAVE it under the name PHOTOLBL.BAS. If you have difficulty typing the special characters in line 10030, don't type them in. Instead, type in Listing 2, check it with TYPO II and SAVE a copy. When you RUN Listing 2, it creates this line and stores it in a file called LINES.LST.
To merge the two programs, LOAD "D:PHOTOLBL.BAS" and then ENTER "D:LINES.LST". Remember to SAVE the completed program before you RUN it.
Make a copy of PHOTOLBL.BAS on a separate disk, and set one copy aside as a master copy. If you have the Antic Monthly Disk, make a "working copy" of the program on a separate disk before you try to use it. Your working copy should be on a disk that is not write-protected. At certain points in operation, the program may rewrite several of its lines and SAVE the modified program back to disk. Such self-modifying programs are more vulnerable to damage than most others, so it's very important to keep a master copy as a backup.
When RUN, Photo LabelMaker displays a title page which prompts you to press [START] to begin. Then, after a short pause, the main menu appears, with four different label options -- SINGLE LABEL, DOUBLE LABEL, 4-LINE LABEL, and LABEL SETUP.
LABEL TERMINOLOGY
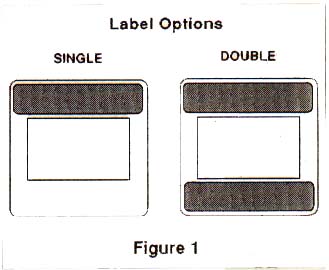
Choosing SINGLE LABEL will allow you to make one label at a time. In DOUBLE LABEL mode you can make two separate labels. This is useful if you need an upper and lower label on a slide (see Figure 1). Both of these options will produce labels with three lines of text. The 4-LTNE LABEL mode will provide you with four lines of text. However, the 4-line label is only available as a single label.
For any of these labels there is a choice of three label types -- BLANK, FIXED, or FORM. A BLANK label allows you to enter any text you wish on it. A FIXED label contains information that is used repeatedly, such as your name and address, company name, etc. Picking this option automatically enters the information on the label with just one keystroke, ready for printing.
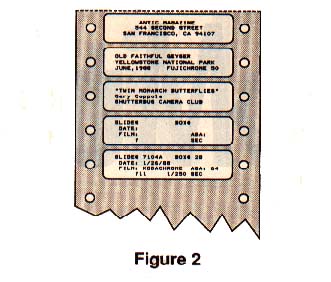
A FORM label is a mini-form of your own design that, when chosen, is displayed on the screen. All you have to do is fill in the appropriate data for each subject. An example of such a label before and after completion is shown in Figure 2 (4th and 5th labels). It is available in both 3-line and 4-line format.
Before you can use the fixed or form labels you must create them. This is done in the LABEL SETUP mode in the main menu.
ENTERING YOUR TEXT
Before you enter the LABEL SETUP mode, you should familiarize yourself with the text-entering screen. Select the SINGLE LABEL option. A figure of a slide will appear on the screen, then an outline of the label will be drawn above it.
An OPTIONS menu will then be displayed. Choose LABEL TYPE and, when the LABEL TYPE submenu appears, select BLANK. If you select FIXED or FORM at this point, a message will appear within the label outline that these have not been created yet.
You will notice that to the left of the label outline you are prompted to type in the first line of text. For now, just press [RETURN] three times. The default prompts used in the program are Line #1, Line #2, etc. If these are not to your liking you can customize them to fit your needs.
LABEL SETUP
Return to the select LABEL SETUP. A menu will appear with six options. The first option, SUMMARY, displays the current prompts, fixed labels, and form labels that are in memory.
To create your own prompts, select CUSTOM PROMPTS from the setup menu. Next, choose which type of label your new prompts will be associated with. Finally, type the prompt (9-character maximum) in the box, press [RETURN] and then enter the remainder of the prompts. When finished, either select another label type or return to the setup menu.
To create a fixed label with Information you will want to print repeatedly, choose FIXED LABEL from the setup menu. Select either a 3-line or 4-line label, then type the text within the outlined area. Press [RETURN] after each line is entered.
Form labels are just as easy to create. Select CUSTOM FORM from the setup menu, choose a 3-line or 4-line label and then type your categories. You can have as many categories on each line as will fit within the label outline. Press [RETURN] after each line is entered.
After you enter your fixed or form label, the program returns you to the setup menu. The screen will go blank for a few seconds while the new lines of the program are being rewritten. Now if you choose SUMMARY, all of your customized prompts and labels will be displayed. If these modifications are only going to be used temporarily, return to the main menu and continue on. However, if you want to make these changes a permanent part of the program select SAVE TO DISK before returning to the main menu. Remember, make sure there is no write-protect tab on the disk.
MAKING LABELS
With the setup completed, making a label is a snap! From the main menu, choose a label, then from the options menu select LABEL INPUT (UPPER or LOWER LABEL if you are in DOUBLE LABEL mode). Decide whether you want a blank,fixed, or form label. If you choose form label, the form's text appears in the label area. Move the cursor to the desired location along each line with the [CONTROL] [ARROW] keys and then fill in the appropriate information. Press [RETURN] after each line is completed. Once you finish your label, you're ready to print.
PRINTING LABELS
Make sure your printer is hooked up, and on. Carefully position the pin-feed label in the printer. Then select PRINT LABEL from the options menu. Enter the number of labels you want to print and press [RETURN]. Out comes your label!
The printer control codes in line 7160 are for Epson or Epson-compatible printers. If you have a different printer, you must change them accordingly. Consult your printer manual for codes controlling compressed pitch, superscript font, and 6/72 inch line spacing.
Two labels will fit on a standard 3 1/2 x 15/16 inch label form, although some trimming is required for mounting on 35mm slides. If you plan on making a lot of slide labels it may be more convenient to buy specially designed labels which fit exactly on a slide mount. These can be purchased from: SlideScribe, 7141 Shady Oak Road, Minneapolis, MN 55344.
Try to plan your label making session to print your 3-line and 4-line labels in separate groups. When you switch between these two formats you should reposition the label in the printer, otherwise the printing will be slightly off center.
If you leave the text-entering screen and go either to the main or setup menu, you will notice that when you return to SINGLE, DOUBLE, or 4-LINE LABEL modes the label area is blank. Select SHOW LABEL and the current label in memory will be displayed. Even though Photo LabelMaker is designed for printing photographic labels, you need not limit yourself to this one purpose. Use it anytime you need a small label with tiny print. Since I have my name and address as a fixed label, can rapidly print several dozen return address labels with just a couple of keystrokes.
Gary Coppola of Budd Lake, New Jersey is a senior research chemist for a major pharmaceutical company. He has written two books and has over 75 scientific publications and patents. His Tape Time LabelMaker appeared in the July, 1989 issue of Antic.
Listing:PHOTOLBL.BAS Download