Joystick Laboratory
Check your joystick accuracy and speed.
Ever wonder if that old gamer's alibi, "It's the joystick" might really be true? Check out the accuracy of your joysticks and the speed of your reflexes with this handy BASIC utility. Joystick Test Laboratory works on 8-bit Atari computers with at least 48K memory and disk drive. |
 |
By Kevin Gevatosky
Have you ever wondered just which joystick is right for you, or which stick will give the best performance in those fast-paced arcade games? Do you wish there was some way to test and rate a stick so you would know for sure which one to use? Well, if so, your wish has come true -- Joystick Test Laboratory is here!
 |
This simple BASIC program is designed to test you and your joystick for overall accuracy, horizontal & vertical positioning, diagonal positioning, and response time. The results are displayed so you con see for yourself just how well you performed with the joystick. |
Not only will joystick Test Laboratory help select the joystick that's right for you, but it can also he used to keep a record of your performance so you will know if your joystick abilities are improving or not and which areas might need work.
In addition to giving performance ratings, joystick Test Laboratory also has the capability to test joysticks and paddles to make sure they are functioning properly. Of course, you could test them using BASIC's STICK and PADDLE functions (printing the values to the screen), but why keep driving a VW when you have a Porsche?
GETTING STARTED
Type in Listing 1. JOYTEST.BAS, check it with TYPO II, and SAVE a copy to disk. Then, RUN the program and a menu will appear with three options -- joystick Tester, Paddle Tester, and Evaluator. To select an option, just press the highlighted letter. But, before you do, be sure that a joystick or pair of paddles is plugged into joystick port 1.
When you select the first option, joystick Tester, a 3 x 3 grid will appear on the screen. The squares of the grid represent the nine possible joystick positions.
With the joystick in the neutral position you should see a red colored indicator in the center of the grid. Move the joystick around and the indicator will also move to show the joystick's current position. Press the joystick button and the indicator will dash a brighter red. If you cannot get the indicator to move to all the positions of the grid or make it flash, then the joystick is not working properly.
When you have finished testing your joystick, press [START] and the program will return to the options menu.
PADDLE TESTER
The second option, Paddle Tester, will test a pair of paddles plugged into joystick port 1. Paddle 0 is represented by a yellow indicator and paddle 1 by a blue indicator. Turn the paddle knob clockwise and your indicator should move horizontally, left to right, across the screen. Press the paddle button and the entire background will dash yellow or green, depending on which paddle is being tested.
A numerical display shows the exact paddle value over the possible range of 0 to 225. A paddle that is functioning normally will be able to span the whole range of values and will not vary by more than 2 or 3 units when fixed at any particular position. As with the joystick test, press [START] to return to the options menu.
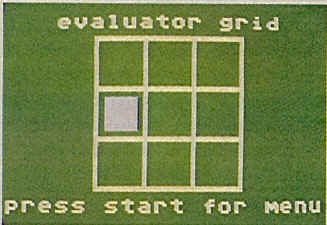
EVALUATOR
When the last option, Evaluator, is selected, you will be asked to enter the number of response cycles-from 10 to 100. The more cycles, the more representative the evaluation will be. But it will also take longer. If this is the first time you are using this option, try 10 cycles, just to get a feel for the process.
Next, you will be prompted to press the joystick button to start the evaulation As soon as you press the trigger, the familiar 3 x 3 grid will be displayed and the red indicator will appear in one of the squares. As quickly as you can, move your joystick to the position indicated. A short beep tells you to act swiftly, because the timer is ticking away to measure your response time.
 |
If the stick is moved to the correct position you will hear a high-pitched tone. If you make a mistake and move the stick in the wrong direction you will bear a low-pitched buzz. This completes one response cycle. To start the next cycle, just return the stick to the neutral position. The red indicator will appear somewhere else in the grid and the timer will start a countdown again. |
Once you complete the specified number of cycles, the evaluation will end. If you don't want to finish the remaining cycles, you can abort the routine by pressing the [START] key.
INTERPRETING RESULTS
At the end of the evaluation the results will be displayed and are interpreted as follows:
Overall accuracy -- This is the percentage of correct responses made.
Total error -- This is the total number of incorrect responses, reported as a percentage.
Horizontal & vertical error -This is the percentage of the total error due to incorrect responses when prompted to move the stick in a horizontal or vertical direction.
Diagonal error -- This is the percentage of the total error due to incorrect responses when prompted to move the stick in a diagonal direction.
Average response time -- This is the average amount of time (total time/cycles), in seconds, that it took you to respond. This value a significant to a hundredth of a second.
After viewing these results, press the joystick trigger and the recorded values for the individual response cycles will be displayed. The "grid" and "response" categories show, respectively, values for both the indicator position on the grid and the actual position to which the joystick was moved. These values correspond to those given for BASIC's STICK(X) function.
Kevin Gevatosky of Eugene, Oregon is a full-time software engineer who enjoys writing programs for the 8-bit Atari. His most recent article, Butterfingers, appeared in the May 1989 issue of Antic.
Listing: JOYTEST.BAS Download