XL Color Boost
By Jon Krahmer
This is a simple hardware rewiring enhancement for improving color on the Atari 800XL computer. You'll need to solder one wire and one inexpensive capacitor. XL Color Boost requires a video monitor that has separate inputs for video, audio, and color--such as certain Commodore, NEC and Hitachi models. It will not work with a color television set. As with any hardware modification, opening up your Atari voids the warranty.
(Frankly, we have never been particularly bothered by the "colorsmear" problem the author describes in his article: But we tried this simple hardware rewiring project at Antic and, in our judgement, it produced a more vibrant and intense 800XL color display on our monitors. In fact, it seemed to make 800XL color look a lot more like the outstanding color of the old Atari 800. Note that this project has only been tested with the Atari 800XL--there are differences between the main circuit boards for the 130XE, 600XL and 1200XL models. - ANTIC ED
With the arrival of the Atari 800XL, I had at last found an affordable computer. I expected it to be better than my old 800 model, due to Atari's additional years of experience at making computers.
But when I got my 800XL home and hooked it up, I soon encountered a problem that I call "color smear." For example, in the Donkey Kong game, the blue snapper jaws had a blue smear on the right edge and a green tinge on the left. The blue scoreboard had a similar problem. There was also a "busy" look in the background.
I was using a 19-inch color television as a monitor, and I thought that the problem must be in the high frequency tuner or the IF circuitry. In search of a cure, I tried out several monitors. Each monitor eliminated the busy background, but the green tinge and blue shadow remained. I concluded that the problem was computer.
I have been involved in electronics most of my life and I design and build instruments. For my next project, I set out to improve the color of the 800XL.
I wrote a letter to Atari asking for the 800XL schematics. A reply came informing me that these schematics were confidential. I ended up spending about one week tracing the circuitry with my voltmeter and osciloscope before finding a cure for color smear.
| .01uf Capacitor -- Figure 1 |
 |
THE DIAGNOSIS
The video monitor jack on the back of the 800XL is a 5-pin DIN connector. According to my information, these pins are supposed to provide ground, audio, composite sink, composite video, and composite chrome (color). However, I did not find that to be the case.
Instead I found ground, audio, a complete composite for picture and color and a composite with everything but color. One pin had no connection.
When I finally isolated the chrome, it became apparent that there was a very simple fix. All I needed to do was solder one end of a .01 microfarad disk capacitor to the composite chrome (color information) and the other end to the unused pin of the monitor jack. You should be able to find this kind of capacitor for under $1 at most electronics shops.
After the simple soldering was completed, I tried out my machine and PRESTO! No more color smear. But let me make an important point. This modification works only with monitors that have separate inputs for video, audio, and color--such as Commodore, NEC and Hitachi models.
INSTALLATION
(As with any hardware modification project printed in Antic, we must remind you that if you open your Atari, you void whatever warranty coverage you may still have left on your computer.�ANTIC ED)
Be sure to observe the way that parts fit together before you remove anything! Remember that you will have to reassemble your XL afterward.
Begin by removing the six screws from the bottom of your XL computer. Set the computer upright and carefully lift the keyboard (top half of the computer) about three inches. At this time, carefully note where the keyboard plugs into the bottom half of the computer. Unplug the keyboard by grasping both edges of the clear plastic ribbon connector and pulling slowly upward.
Remove the two retaining screws that hold the chassis (circuit board) into the bottom shell. Carefully work the chassis from the bottom shell. Remove the screws that hold together the circuit board and the metal shielding plates.
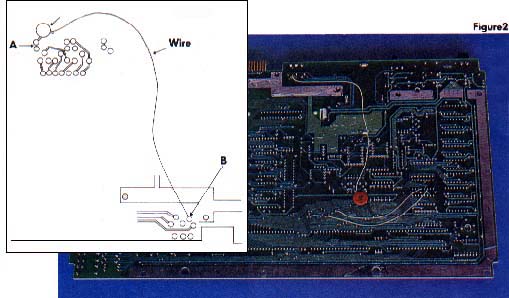
Cut a length of thin insulated wire about six inches long. Strip 1/16 of an inch from each end. Solder one end to Point B. (See Figure 1.) This is the connection to the monitor jack, as shown in the diagram.
Now take a .01 microfarad disk capacitor and cut the leads to 1/8 of an inch in length. Solder one lead to Point A, which is where you'll see the R64 and R97 connections labelled on the main board. Solder the free capacitor lead to the free end of the wire. Put a piece of black electrical tape over and under this connection. When you reassemble your XL, route the wire so that it will not be pinched when you tighten the screws.
If you have any doubts about your ability to do this project successfully, I strongly suggest that you take your Atari 800XL and this article to a qualified electronics technician.
Jon Krahmer is an electronics consultant from Vista, California.