LINKLINE
Run your 8-bit Atari from your ST
Your eyes dart back and forth. A cold sweat breaks out on your forehead. You lean over the Atari ST and run your hand over the cool plastic. The desire is very strong this time. Dazed you stumble out of the store and clutch at the cornice, waiting for your head to clear.
You almost bought the ST that time. But you've made up you mind that as long as your trusty 8-bit Atari keeps running you aren't going to trade up.
You don't need to stuff your 8-bit Atari in the closet when you get an ST. This month I'm going to show you the simplest way yet to cable the two computers together and transfer files back and forth. You'll even learn how to use your 8-bit Atari as the ST's intelligent printer buffer.
Since January, 1986 we've included an ST HELP file on the Antic Monthly Disk describing how to swap files between the two types of Atari computers. But the earlier method is much more cumbersome. It requires simultaneous use of two different modem programs while the user must constantly check back and forth between computers. So starting next month, the Antic Monthly Disk side 2 ST HELP file will explain how to transfer files by using LinkLine.
MEET LINKLINE
LinkLine, which we are introducing this month, lets you control an
8-bit Atari from your ST keyboard, using the RS-232 communications standard
to transfer files back and forth at 4800 baud. Connect a null modem cable
between the ST and the 8-bit Atari, then run 8-bit BASIC LinkLine and ST
LinkLine (a C program) on the respective computers.
For simplicity, the ST is the master computer and the 8-bit Atari is the slave. The slave computer waits for a command from the master computer, then decodes and acts upon that command.
Both versions of LinkLine currently recognize two commands-LOAD and SAVE. You can LOAD a file from any properly installed 8-bit Atari device, such as D: or C:, and SAVE an ST file to any 8-bit Atari device, such as D: or P:. For example, sitting at the ST, you could LOAD an 8-bit Atari file onto the 3.5-inch ST disk, or SAVE an ST file onto the 8-bit's 5.25-inch disk.
When you SAVE an ST file to the 8-bit Atari P: device, the 8-bit Atari becomes a printer buffer that accepts the ST file and patiently passes it to the printer, character-by-character, while the ST goes on about its business.
Although you can LOAD an 8-bit Atari program into your ST, it won't RUN. LinkLine is not an 8-bit Atari emulator.
As written, LinkLine does no error-checking on the incoming data. While I was developing this software I saw a need for some simple error-checking, such as generating a checksum for each block. So far, practical experence with the program has shown that none seems to be needed. Still, prudence demands at least minimal error-checks, so go ahead and add one if you like.
LinkLine's file-sending protocol is loosely based upon the original 8-bit Atari DOS file format protocol chosen by Optimized Systems Software. The LinkLine file protocol goes as follows: Byte zero is the ASCII STX (Start Text) character. Bytes one and two describe in LO, HI format the number of bytes that will follow in byte three through byte X. Byte X + 1 is currently the ASCII ETX (End Text) character. This format allows transfers up to the limit of memory available. However, to keep the program simpler, LinkLine was written to work with files only as large as 33K, or about 270 sectors of a floppy disk.
If you need to transfer files which are larger than 33K, it is possible to rewrite the LOAD and SAVE routines to check the last character in each block transmitted. If the character is indeed an ASCII ETX the file transfer is finished. If not, you could expect another LO, HI pair of bytes describing the length of the next block of data. At the end of that block would be another check for the ETX character, etc. Files of practically limitless length could be sent this way.
CABLE CONNECTION
The "line" in LinkLine is a cable called a null modem. In the past,
when Computer A needed to talk to Computer B-even in the same room-someone
would have connect Computer A to a modem, connect Computer B to a modem,
then have Computer A call computer B on the telephone. Then some bright
inventor figured out that it was possible to plug computer A directly into
computer B by using the modem ports and programming each of the computers
into thinking it was the modem for the other. Since no modem is actually
hooked up, the connection is called a null modem.
In our case, the modem port on the ST is next to the printer port and uses the RS-232 standard for communication. The modem port for Atari 8-bit computers is on the Atari 850 Interface Module (see the August, 1985 Antic for a list of dealers who carry the 850) and is known as device R1:. This port also uses the RS-232 standard for communication.
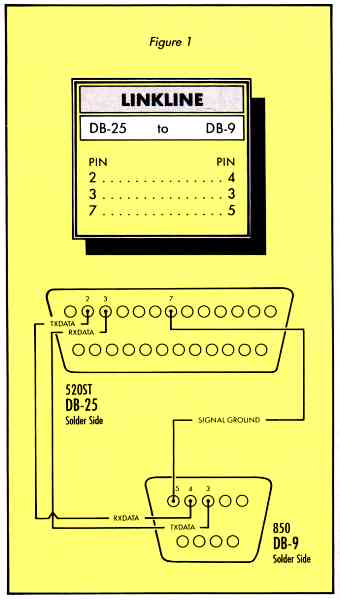
To build the null modem cable, you will need three inexpensive items that should easily be found in any large electronics store. For the ST connection, you need a DB25 female jack such as Radio Shack #276-1548 ($3.99). For connecting to the Atari 850 Interface, you need aDB9 male plug like the Radio Shack #276-1537 ($1.99). Finally, you'll need enough multi-connector wire to reach both the 8-bit and the ST. Radio Shack #278-1320 does the job for 10 cents per foot. You can separate the computers by up to 100 feet without undue problems.
Figure 1 shows the wiring diagram and a table of pin-to-pin connections. While this project falls towards the low end of the complexity scale, if you don't know which end of a soldering iron to pick up, get help from someone more knowledgeable or bring these instructions to your local electronics repair center and pay them to build the cable.
THE PROGRAMS
Type LINKLINE.C into your Atari ST and save a copy to disk. LINKLINE.C
is the ST master program written in Alcyon C (from the Atari ST Developer's
Kit). Compile, assemble and link this C language code to apstart,
with aesbind, vdibind, osbind and libf traillng
along behind. Relmod the resulting file into a .prg file and save
it to disk.
For the Atari 8-bit, you don't need to type in Listings 2 and 3. They are assembly language source code provided for your information. Instead, type in BASIC Listing 4, LINKLINE.BAS, check it with TYPO II and SAVE a copy before you RUN it. This creates an executable disk file called AUTORUN.SYS.
Antic Disk subscribers should first copy AUTORUN.SYS to another 8-bit disk. Then, following the directions on the monthly disk (one last time), port LINKLINE.PRG to an ST disk.
USING LINKLINE
To start transferring files, plug in the LinkLine cable and turn on
the Atari 8-bit computer. The program will start within seconds, a white
screen with dark letters and a READY prompt appear, showing it's ready
to receive a command. if you get a long stream of "heart" characters, turn
off your 850 interface and then turn it on again.
Over at the ST, make sure you boot With a disk that has the "Set RS-232 Configuration" desk accessory Activate it, and set the RS-232 parameters in the box exactly as listed below:
Baud Rate: 4800
Parity: None
Duplex: Half
Bits/Char: 8
Strip Bit: Off
Xon/Xoff: Off
Rts/Cts: Off
Finished? Click on OK and return to the desktop, then double-click on the LINKLINE.PRG icon and follow the prompts. First comes a welcome box, then a box asking whether you want to LOAD or SAVE a file.
If you want to LOAD an 8-bit file, type the desired filename in the file selector box that follows. When you click on OK, the requested file will be loaded from the 8-bit and saved on the ST disk using the same filename as the 8-bit file.
If you want to SAVE a file, first choose the ST file to transfer from the file selector box and click OK. Next, choose the device and filename to send to the Atari 8-bit computer from the next file selector box. When you click OK this time, the file is transferred to the 8-bit computer.
In either case, when the transfer is finished you are asked if you want to SAVE/LOAD another file. If you don't select another SAVE or LOAD, then click out through the thank-you box at the end of the program.
ST TAKE-APART
Any C program must have a main() section and this one describes
what the program does: initialize();, then communicate();,
and when finished finally becomes TRUE, terminate(); the
application. Next, communicate() decides whether you want to LOAD
or SAVE a file. Below that, load_file() requests a file from the
Atari 8-bit, then writes the file received to the ST disk.
The function below that, save_file(), reads a file from the ST disk and transmits it to the Atari 8-bit disk. The function send_file() is called from save_file(), and stuffs the text in text_buffer out the RS-232 port character-by-character. Next, read_the_file() reads a file from the ST disk into text_buffer and write_the_file() writes text_buffer back to the ST disk.
The next function load_8bit_flle(), calls the function after it, get_file(). This pair sends the LOAD command to the 8-bit computers and receives the file from it. Next to last send_command() formats and sends the LOAD or SAVE command and filename to the Atari 8-bit. Lastly, terminate() returns us to the desktop.
8-BIT TAKE-APART
Again, you don't need need to type in assembly language Listings
2 and 3, described below. You can get the same results by following the
previous instructions for typing in Listing 4.
Listing 2 is LINKLINE.M65, the slave program written in 6502 assembly language as implemented by MAC/65 (from Optimized Systems Software). At the top, following the program's title and revision date. we .include two files from the MAC/65 system disk. These files contain the System Equates and OSS macros such as OPEN and CLOSE that operate exactly like their BASIC counterparts. Further down we .include the main file LINKA.M65 and then create an autorun file by pointing the program counter to the autorun vector (* = $02E0) and stating the autorun address (.WORD STARTCODE).
Listing 3, LINKA.M65, is the main section of code called from the first file, LINKLINE.M65. First we define three Macros of our own, BUMP, DBUMP and LDW. BUMP will perform signed two-byte addition. DBUMP performs signed two-byte subtraction, and LDW will LOAD the LO, HI bytes that make up an address (from a label) into two consecutive memory locations, forming a pointer.
Lines 530 through 810 contain local definitions and equates, with the program itself starting at line 860. The entire work loop is contained between lines 1280 and 1470. There we OPEN channel TV to the E: editor device which also clears the screen, changes the background and border colors to white (color 0, luminance 8), and sets the letter luminance to dark (color 0, luminance 2). Quickly we BPUT the title message to the TV channel we opened to the screen at line 1350.
Line 1370 is an XIO command which sets the level of character translation the R1: handler performs. This translation is explained fully in your 850 Interface manual. Here we set the translation level OFF by using a value of 32. Line 1380 is an XIO command which sets the BAUD rate for communication. Here, the value BAUD(13) is used to set the communication rate at 4800 baud. Falling into the MAIN routine, we BPUT the READY prompt to the TV screen, then go wait for a command. When one is received, we fall down to line 1440, where we BPUT the "working" message to the screen and go off to decode the command.
When the command has finished, we jump back up to the start of the MAIN loop to wait for another command.
OPENFILE is a subroutine which will OPEN a 5.25-inch disk file (to read from) named in the buffer FILENAME. Below that, WRITEFILE is a subroutine which will create and write the file in TEXTBUFFER to the 5.25-inch disk.
SENDANSWER is the subroutine which will transmit TEXTBUFFER out to the RS-232 port. GETCOMMAND is where the Atari 8-bit sits waiting for the ST to send it a command. It accepts characters from the RS-232 port until a CR is received. Control then passes below to DECODE, where the command line is scanned for an S or an L, meaning SAVE or LOAD. If one is found, the following letters constitute the filename, and control is passed to either SAVE or LOAD.
ADD-ONS
How far can you take LinkLine? Being as expandable as it is, probably
very far. I expect to see many utilities designed to be used with LinkLine.
The person needed to accomplish this is you. And then write to Antic and
tell us how you did it.
As just one example of the possibilities, it would be nice to be able to display the 8-bit Atari disk directory on the ST screen. (How about clicking on an Atari 8-bit Icon?) Go to it!
Listing 1: LINKLINE.C (not available)
Listing 2: LINKLINE.M65 (not available)
Listing 3: LINKA.M65 (not available)
Listing 4: LINKLINE.BAS (not available)
On disk LINKLINE.PRG Download
On Disk LINKLINE.EXE Download