1ST WORD PRINTER DRIVERS
How to make them
As more and more ST workstations show up at Antic's office, I've been called upon to make 1st Word printer drivers for a number of different brands of printers. It's really not hard--if you have created printer drivers for word processing software before and are familiar with control codes expressed in hexidecimal numbers.
But just in case you don't meet all the above qualifications, the following article will teach you how to build your own printer drivers for the 1st Word software that's currently packaged with every ST. For a sample printer, we chose the Gemini 10X--which ranked first in popularity with Atari owners in Antic's February, 1986 survey.
Why does 1st Word need printer drivers? Well, different printers often need different instructions to get the same job done. For example, to switch on boldface, Printer A might want an escape character followed by the letter E. But Printer B wants an escape character followed by a Z. Printer C wants another character sequence, and so on. So what can we do about this Printing Tower of Babel?
EPSON SALTS
Epson did a lot to cure the communications gap by introducing a printer that everybody wanted to copy. As a result, many well-known printers--including the Gemini 10X are "Epson-compatible.." This means they should respond to the same control codes that Epson printers respond to. However, the harsh reality is that most of these compatible printers are only 80-90% Epson compatible. You usually won't notice any difference. But eventually you'll run into character styles which won't print correctly no matter how hard you try. This is the time to create your own 1st Word printer driver.
1st Word will take your editing commands like "start boldface" and save them along with your document. When it comes time to print the file, and 1st Word runs across an embedded command, the word processor will consult its Printer Configuration File (printer driver) to determine which control character sequence to issue for that particular command.
To create a printer driver for 1st Word, you'll need the manual that came with your printer and several special files from your 1st Word disk. From your 1st Word PRINTER folder, you'll need INSTALL.PRG, which actually creates the finished configuration file, and ASCII.HEX, which is where you answer the prompts to customize your printer driver. INSTALL.PRG will accept a .HEX file and put out a .DOT file.

Figure 2 Decimal to hexadecimal number conversion chart
BUILDING DRIVERS
Double-click on 1st Word. When the file selector box appears, click on the ASCII.HEX file from the PRINTER folder. When the file loads, you'll see the Teletype Printer Driver header. Don't worry, we're about to fix that. You may change or delete the header message if you desire. Everything on a line after an asterisk in the printer configuration file is ignored, like REMarks in BASIC.
The first line you'll come to which doesn't have an asterisk on it is: NAME OF PRINTER. Type in GEMINI 10X and press [RETURN].
Next we find a block of text titled MISCELLANEOUS CONFIGURABLE VARLABLES. A row of six zeros is beneath the title. The first selection determines the type of printer used. If it is a zero, 1st Word assumes that a dot-matrix printer is connected and ignores the next five numbers. Since the Gemini 10X is a dot-matrix printer, we leave all six zero entries as they are.
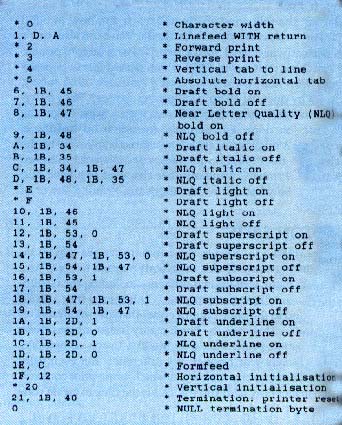
Now we come to where you'll need your printer manual. Below the Configurable Variables, we find PRINTER CHARACTERISTICS, which is the section we actually need to change. Let's compare the top two lines of Figure 1 to see how they differ. The top line has an asterisk, a zero, a few spaces, another asterisk and the words Character Width. The first asterisk tells us this line is a comment and is not active. Next, the zero is the number of the control code--in hexidecimal-- recognized by 1st Word. The final words describe what control code this line contains. This line is not active because 1st Word has no control code zero.
The next line down is a recognized control code, so it doesn't start with an asterisk. It starts with control code one (1), followed by the ASCII codes--in hexidecimal--for Carriage Return ($0D) and Linefeed ($0A), separated by commas. This means every time 1st Word runs across its internal command one, it will output not a number 1, but a carriage return and line feed character.
INSTALLATION
Figure 1 shows the finished Gemini 10X configuration file. The Near Letter Quality (NLQ) control sequences here refer to double-strike printing. If you own a Gemini 10X printer, you could use this file simply by changing the lines in your ASCII.HEX file to match the example. When you finish typing the corrections, SAVE your finished file to disk as GEMINI10.HEX.
Locate and double-click on INSTALL.PRG, which will power-up asking for the .HEX file to install. Double-click on GEMTNI10.HEX and sit back. In 30 seconds or less, INSTALL.PRG will finish and you should find GEMINI10.DOT on your desktop. Rename GEMINI10.DOT as 1st_PRNT.DOT and copy it to your 1st Word disk for automatic loading along with the rest of the program.
EXTRA HELP
To build a driver for your own printer, follow the general process described above--but answer 1st Word's prompts with the appropriate control codes given in your own printer manual.
Figure 3 Sample printout using Gemini 10X configuration file.
Figure 2 is a Decimal To Hexadecimal Conversion Chart. It will help you find the proper hex numbers to insert in your own printer drivers. The extra zeros and dollar signs are simply programming conventions. For example, the entry 042 = $2A just means that decimal number 42 is 2A in hexadecimal.
If you have access to CompuServe, there are many different configuration .HEX files all ready for downloading from the DL (Data Library) section of ATARI16. Just type GO ATARI16 when you log onto CompuServe, and then BROwse DL0, DL3, and DL5.
TRANSLATION TABLE
The second half of the 1st Word printer driver file is called the Translation Table. Although we don't need to edit this section to create our Gemini 10X printer driver, let's explore what it controls.
To do this, I'll demonstrate how to convince the Gemini 10X to print the Copyright, Registered and Trademark symbols.
First, we need to make it clear exactly where the two different sections of the printer driver come into action. Let's follow what happens when 1st Word attempts to print a file.
FIRST HALF
Each time 1st Word gets another character from the file to print, it first tries to determine if the character is an embedded command for style or format. These characters normally do not show up onscreen, but rather they control the displayed onscreen characters in special type-faces such as boldface or italics.
1st Word starts by comparing the character to the entries in the top half of the printer driver. If the character is indeed a command, the command itself is not issued to the printer. Instead, the sequence of bytes in the printer driver table that follow the command character are issued to the printer.
Figure 1 1st Word configuration file for Gemini 10X printer.
This is the section of the printer driver where we typed in the commands teaching the Gemini 10X how to boldface or underline.
SECOND HALF
Just before 1st Word attempts to output a character to the printer, it scans the bottom half of the printer driver (the Translation Table) for a match. If no match is found, the character is transferred unmolested to the printer.
However, if 1st Word does find a match, the character in question is not issued. Instead, the byte sequence which follows the character byte in the Translation Table is issued to the printer.
In short, the top half of the printer driver file filters characters going between the file and 1st Word, while the bottom half filters characters between 1st Word and the Printer.
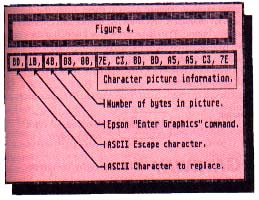
Figure 4 is a DEGAS diagram showing what each element does in a sample line at the bottom half of your printer driver. In this case, the line will create the Copyright symbol.
What we need to do here is interesting. Since the Gemini 10X doesn't have the Copyright, Registered and Trademark Symbols burned into its character ROM, we'll teach the Gemini 10X to slip into graphics mode and draw a picture of the needed characters whenever we output them.
Keep in mind that all numbers in the printer driver file are decimal. In Figure 4, we see that the first number on a line must belong to the character we wish to translate. The Copyright symbol is Atari ST character number $BD, so the first number on the line is $BD. When 1st Word finds this number, it knows that character $BD must be translated and starts outputting the rest of the bytes on the line.
The second number in the line is an ASCII [ESCAPE] character ($1B) which informs the Gemini 10X that a command follows. The third number in the line ($4B) is the command that Epson printers use to enter graphics mode.
At this point, the printer will want to know how many bytes of picture information to expect to recieve. Consequently, the next two bytes into the translation table are $08, $00, which tells the printer to expect (8 + (0 * 256)) bytes of picture information. The last eight bytes on the line are the image of the character itself, copied from the character set located in TOS ROM.
WHAT YOU NEED
Figure 5 is a listing of the Translation Table needed to get your Gemini 10X to print the three symbols we've been discussing. The first line controls the Copyright symbol, the second delivers the Registered symbol and the third is the Trademark symbol. The last line consists of a double zero, which should be kept. The table must be zero-terminated.
To get these characters to print, create your printer driver according to instructions given earlier in this article. But this time, include the four lines of our Translation Table (Figure 5). Install the new printer driver in the same directory where you have 1st Word.
To actually type in the Copyright, Registered, and Trademark symbols, simply point at them inside the desktop special characters box with the mouse and click the left mouse button. The characters will be inserted at the cursor.
To find out the number and location of any other character you wish to reconfigure, there is an excellent table of character shapes located on page 208 of your Atari ST BASIC Handbook.