MEET GEM DESKTOP
Get started operating your ST
by JACK POWELL, Antic Technical Editor
If you are an experienced Atari user you will face a challenging new world when you first boot up your Atari ST. The 512K memory 16-bit 520ST computer, based on the powerfull 68000 microchip and the GEM Operating Environment, does many things differently from the previous generation of 8-bit Ataris.
During your first few hours you will need to get used to navigating around the GEM Desktop. A 'desktop', which is the starting image that appears on your ST screen, has become the standard visual metaphor for the new breed of "user-friendly" computers that substitute onscreen self-explanatory graphic symbols for confusing keyboard commands.
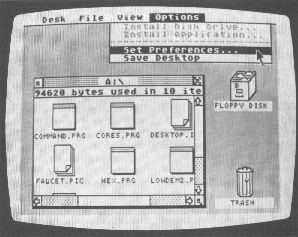
On your GEM Desktop (Figure 1) you will see icons (pictorial symbols) of file cabinets (which actually mean disks), a trash can, and a line across the top offering four choices.
In the middle of the desktop area is a small, black arrow which is your cursor. Move the cursor around with your mouse.
MICE & ICONS
The Atari mouse is a small box – about the size of a cigarette pack – with two buttons on top. It plugs into joystick port 1 and you can think of it as a sort of upsidedown trackball.
When you roll the mouse around your real desktop, a ball on the bottom of the mouse signals your movements to the computer and causes the screen cursor to match the mouse movements.
As you will find, this is a very fast way to choose items on the screen. When the cursor is over the item you wish to choose "click" the item by pressing one of the mouse buttons.
The items can be highlighted text or icon visuals. lt doesn't take long to figure out what will happen when you move a file icon to the trashcan icon and click the mouse button.
DRAGGING
Let's use the mouse to move the cursor over the file cabinet labelled FLOPPY DISK A and click it. It turns black, indicating that you have "selected" it. Now if the cursor is moved away from the file cabinet and clicked again, the cabinet returns to its original color and is no longer selected.
Maybe we don't like having the trash can in the lower right corner of our desk. We soon find that if we click the can without releasing the mouse button, a ghostly outline of the trash can icon stays with the cursor as we move the mouse. Release the mouse button and the trash can reappears in the new location. This is called "dragging."
If we have two disk drives, there will be two file cabinets, labelled A and B. (No more drive 1, 2, etc.) We can look at the disk directory of either drives by "double-clicking" on its icon. A double-click is simply two quick clicks in succession. One click chooses an item, a double-click acts upon it.
WINDOWS
Move the cursor to the drive A icon, double-click it and ZOWIE! Right out of the icon, a square "window" zooms onto the desktop. The top frame of the window shows which disk we looking at and inside it are pieces of paper that represent the files on the disk.
Take a look at Figure 1. There are many controls built into the window frame for letting us manipulate the window. If we click the small diamond in the upper right corner, the window will grow and take up the entire screen. Click the diamond again and the window returns to its previous size. Click the black rectangle in the upper left corner and the window will "close" and appear to vanish back into the file cabinet.
We can drag this window, just as we dragged the trash icon, by clicking and holding the title. If we click and hold the lower right corner, we see the outline of a "rubber box" which gets bigger or smaller as we move the mouse. Release the button, and the window takes on the size of the outline. This is called "sizing" the window.
Look on the right and lower edge of the window frame and you'll see the "slide" bars plus some arrows. Sometimes you can only see part of what's in a window. The white slide bar represents the part of the window that's seen, and the textured frame portion stands for the file sectors hidden from view. Click the down arrow. The white slide bar moves down and information in the window scrolls up. You can also drag the slide bar and move it to where you wish within the textured area.
Without closing the A drive window, let's double-click drive B. The B window zooms open and appears, slightly smaller, on top of window A. We can still see part of window A under window B. But now only window B contains all the special frame controls. Window B has become the "active" window. Move the cursor anyplace on window A and click. Window A is redrawn on top of B and again becomes the active window.
The icons within window A look like file folders or pages. Some are program, some are text. If we want to run one of tye program, we could simply double-click it. If we want to move a file from disk A to disk B, we click it and then drag it to the disk B file cabinet icon.
DROP DOWN MENUS
On top of the screen is a line with four words: DESK, FILE, VIEW, OPTION. The first thing to notice is you don't have to click these words. Just run the cursor over them and a menu drops down. This is why GEM calls them "drop down" menus.
The DESK menu offers Desktop Info, a Calculator and a Clock. When the cursor is run over these choices – again we don't need to click – they automatically turn black. Click calculator and a pocket calculator appears on the desktop. Handy!
When we run over FILE we might notice that some of the choices are in black and some in gray lettering. We also notice only the black ones react to the cursor. The gray lettering indicates those choices are currently inactive.
If both drive windows were closed and neither drive was highlighted, all of the file choices would be in gray. For example, you couldn't use the Format choice because you have not yet selected a disk to format.
An interesting feature of FILE is Show Info. We can highlight drive A then choose Show Info to find out how many files are on that disk, how many bytes have been used, and how many more are available.
Now that our drive window is opened, we can move to VIEW and see that the choices include: Show as Icons, Show as Text, Sort by Name, Sort by Date, Sort by Size, and Sort by Type.
Also, there are small checkmarks next to Show as Icons and Sort by Name. It doesn't take long to figure that the checkmarks represent the current status of these choices. Our files look like folder icons and they're sorted in alphabetical order. Click on Show as Text and all the little folders are replaced by text name files showing number of bytes, etc.
Mouse on over to OPTIONS and highlight Set Preferences. Among other things, here is where we can set one of the three screen resolution modes: Low, Medium, and High. Another interesting feature in OPTIONS is Save Desktop. Click this and a small file is saved to drive A. Now, when that disk is booted, the desktop will appear in the same configuration of opened windows as it was when it was saved.
We don't have enough room to fully describe all of the drop-down menu choices. Besides, why should we spoil your fun? You now have enough of a start in knowing how to use the GEM desktop so that you won't have trouble figuring out the rest of it when you get your ST.