ANATOMY OF A ROBOT
How to create controlled motion with your ATARI
Currently available robots that attach to personal computers range in price from about $1000 to $3000, and are usually committed to a single configuration. This series of articles will develop and explore a novel approach to creating controlled motion from a microcomputer, with the following rules in mind. A hobby robotics development system should:
- Be very low in cost
- Be expandable in small steps to larger sizes
- Allow the creation of many different robots from a single set of parts
- Have both strength and fine motion capabilities
- Permit simple interfacing with any computer
- Be composed of standard parts available at hobby, toy, and/or electronics stores, or by mail
- Run from any standard programming language
- Have the support of a majore magazine.
We would like to reduce the cost of building a robot by a factor of 10, while significantly enhancing the flexibility and programmability of the final product.
"ROBOT," AND OTHER HOUSEHOLD WORDS
The term "robot" comes from a Slavic language root with a meaning related to "work." It was first used in RUR, a play written in 1921 by the Czech dramatist Karel Capek. These days, any repetitive motion machine with the least bit of reprogrammability is likely to be called a robot, at least by its manufacturer. And laboratories around the world contain complicated mechanisms that can walk, talk, and slide on their bellies like so many reptiles. The term "robotic system" is often used for such advanced assemblies, and we'll use it too from time to time.
Robots are generally made up of elements that correspond to various parts of the bodies of land animals. There are other possible ways to build robots, but on the other hand animals, and particularly animals with hands, appear to have undergone upwards of 10 million years of field testing, and their extremely functional designs should not be quickly dismissed.
Speaking loosely, an animal's body is composed of bones, muscles, a circulatory system, a nervous system, an hormonal system, and several other systems that don't directly bear on our project. The robotic equivalents of bones are sometimes called "rigid members" or "rigid elements," but "bones" will be good enough for us. And although "end-effector" is a professional-sounding bit of robe-speak, we'll simply use "hand" if that's what a particular end-effector resembles. As for our robots' muscle- equivalents, we'll call them "muscles," unless we refer to them by their specific names, such as "motors," "servos," (see below) and so on.
Furthermore, although an animal's circulatory system has many functions, the only one we want to imitate is its capability to supply power to the muscles. Hence, our robots' circulatory system equivalents will be called the "power bus." The form of the power bus depends on the designer's choice of muscles, and can consist of anything from electrical wires to cables to hydraulic plumbing, as well as many other combinations of gadgetry.
As for the nervous system, we'll replace the anatomical terms "sensory neuron" and "afferent nervous system" with the terms "sensors" and "sensor bus." Likewise, "central nervous system" (brain and spinal cord) becomes "computer" and the anatomical terms "motor neurons" and "efferent nervous system" will be replaced by "control bus."
Finally, animals' hormonal systems can be loosely related to moods. In our robots, this is a function of software. Moody robots? We'll see.
MAKING ROBOTS MOVE
For my money, the best way to obtain inexpensive, simple, and flexible computer control of motion is to use the magical little boxes called "servos." These are well known to any hobbyist who has used radio-control mechanisms.
SERVOS
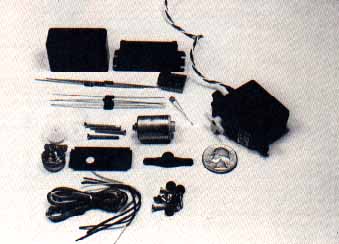
A servo generally consists of a DC motor, a gear train, a feedback potentiometer, and an electronic assembly that converts a sequence of logic-level pulses into the current that drives the motor. The pulses can be conveyed to the servo by a radio link from their source, or can be sent to the servo over a wire.
These capabilities are stuffed into a small box with three protruding wires. The wires are: ground (usually black), 5-volt input (usually red), and pulse input (usually yellow). All you need to produce controlled motion from your computer is a 5-volt electrical source (approximate voltage and simple regulation are okay, as are batteries), a store-bought servo, a connector for a joyport on your ATARI, some wire, and a program. That's it! Now, let's talk about some details.
WHAT SERVOS "WANT"
Servos are analog devices. In order to know what to do, they need to see a variable-width pulse every so often. They are generally limited to either 180 or 270 degrees of rotational motion. This is usually enough to get by on, and when it isn't you can improvise. The pulse width that is sent to the servo carries positional information in a simple format; for any given servo there is a range of pulses it can use.
Let's say that our servo "wants" to see pulses from 1 msec to 2 msec in length. ("Msec" means "millisecond," or 0.001 second, which is about 1000 ATARI clock cycles.) If we send this servo a 1.5 msec pulse, this tells the servo to seek the center-point of its rotational range. A 1 msec pulse tells the servo to seek one extreme of its range, while a 2 msec pulse causes it to seek the other extreme. The pulses have to come to the servo with some regularity, because it only moves slightly in the direction you send it after each pulse. Then it waits patiently for another pulse. Sending no pulses means "Relax, Servo." What could be simpler? Now, about these pulses...
MORE JOY FROM A JOYPORT
For the most part, you've probably been using the joyports on your ATARI as input devices, in combination with a joystick or paddle. However, the joyports can also send out logic signals. Some of you may have seen the various joyport- printer interfaces that are available. These allow printing without the 850 interface.
Behind the four joyports on the 4O0/ 800s is a single chip called PIA (parallel interface adapter). This chip is a 6520 or equivalent, and if you are a spark- hound you can get the spec sheets and find out exactly what it does. We'll provide some of the details below, along with a few lines of cookbook code.
Each joyport contains nine pins. As we look at the joyport, pin 1 is in the upper left corner, pin 5 at the upper right, 6 at the lower left, and 9 at the lower right.
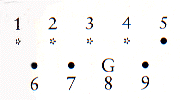
Pins 1 through 4 are memory-mapped to bits through which you can send output or receive input. Pin 8 is ground. (For the curious, pins 1-4 are usually joystick inputs forward/back/left/right, pins 5 and 9 are paddle inputs, pin 6 is the trigger and pin 7 carries 5 volts at a few milliamps.) On the 400/800s the joyports are mapped to memory through locations 54016, called "PORTA'' by Atari, which maps to joyports 1 and 2, and 54017, called "PORTB" which is linked to joyports 3 and 4. We'll illustrate the procedure for outputting from pins 1 through 4 of Port 1. The other joyport pins can be controlled in a similar manner. (Remember that "reset," when applied to a bit, means "make the bit 0," while "set" means "make the bit 1.")
To output from Port 1, we must first "program" its bits for output. At power up, all joystick ports are programmed for input so as to accept jojstick signals. We can program Port 1 by first resetting bit 2 (counting from 0) of 54108 to put PORTA into "program mode." Atari calls address 54018 "port A control," or "PACTL." (54019 is PBCTL.) Since bit 2 of PACTL is set on power up, it can be reset by PEEKing PACTL, saving the result for use in a moment, and poking this result (minus four) back into PACTL. We can now program Port 1 for output by setting the low four bits of PORTA. (Port 2 is the high four bits.) We do this by storing 15 into PORTA. Finally, we set bit 2 in PACTL to get PORTA out of program mode and back into input/output mode. To do this, we simply POKE the original value of PACTL back into it.
In BASIC the above procedure might be handled as follows:
100 X+PEEK(54018)
110 POKE 54018,X-4
120 POKE 54016,15
130 POKE 54018,X
While in Forth it might be handled this way:
54016 CONSTANT PORTA
54018 CONSTANT PACTL
PACTL C@ DUP 4 - PACTL C!
15 PORTA C! PACTL C!
Running either listing will program pins 1 through 4 of Port 1 for output. In other words, the low four bits of anything POKEd into PORTA (54016) will show up on pins 1 through 4 of port 1. The upper four bits will be ignored. If you have a high-impedance voltmeter and a steady hand, you can verify this by checking the logic levels on the pins as you do some POKEs.
HEARTBEATS AND PULSES
Now we can send signals to a servo. The next question is, how do we create a pulse of, say, precisely 1.5 msec?
BASIC executes in the 1-2 msec range, and is too slow to create pulses with width-accuracies in the 10 microsecond (usec) range, which is what we need for small movements in our servos. Forth executes in the 50-150 usec range, which again is too slow. What we need is some machine code from a USR routine in BASIC or a CODE definition in Forth. The routine should take a number from 0 to 255 and put out a pulse of from 1 to 2 msec.
However, we don't want to have to constantly remember to send pulses to the robot. We would rather have a joint simply move to a certain position and then stay there. In other words, we want the appropriate pulses to be sent out automatically and continuously by a background task. This would probably be best driven on the ATARI by the 60/second vertical blank interrupt. (Slow, periodic interrupts of this kind are sometimes called "heart-beat" interrupts.)
WHAT DOES THIS MEAN IN PLAIN ENGLISH?
At this point, an advanced hacker could put all the pieces together and create motion. The novice will have to wait until next month, when we'll make and control our first "joint" step-by-step using BASIC, Forth and about $22 in parts.
Evan Rosen is the co-author of ValFORTH from Valpar International.