TAPE TOPICS
Get Your Head Straight
The line on alignment
By Carl Evans
One of the most misunderstood things about the poor little 410 cassette recorder is head alignment. Properly aligned heads tend to stay properly aligned, provided the recorder isn't physically moved around a lot. If you leave the recorder sitting in one spot, then the head alignment should be good for a long, long time.
I align the heads on any new 410/1010 before I use the recorder for any critical CSAVEs. Then I check the alignment once or twice a year. So far, none of those that I personally aligned have drifted enough to justify realigning them. The oldest one has seen heavy use for almost two years now. This article will show you how to align the heads in your own recorder. It is extremely easy once you know how.
Service shops typically use some very expensive equipment when they align the heads on your recorder. The total cost of professional equipment could easily run into many hundreds of dollars. You can build your own head-alignment kit for under $50. The things you will need are readily available, once you know what to ask for. A head alignment kit usually consists of the following items:
a. A special "test-tone" cassette.
b. One very small Phillips screwdriver.
c. An AC voltage measurement device (such as a DVM).
d. Several small clip leads or connector pins and some wire.
First, let's look at each of these components in more detail, along with what to use to make up your kit, then I will show you how to align the heads in your 410 (or 1010) recorder very quickly and simply.
The most important item in your head-alignment kit is the test tape. A professional tape typically contains a perfectly aligned recording of a sine wave with a frequency somewhere between 1KHz and 5KHz, or a special mix of such tones. I have seen tapes like that for home stereo systems that might cost you as much as $70. That is too much money for such a tape. Fortunately, I recently ran across an ad in a stereo hobbyist magazine for a head alignment tape selling for $15.99. That is more along the lines of what I would consider reasonable. I got one of these tapes and tried it out on one of my 410 recorders. It worked like a charm! The tape is called the "GEO-TAPE" and is sold by Mobile Fidelity in Chatsworth, California. If you want to contact them, call (213) 789-8440.
I looked at the output of the tape on an oscilloscope to see what was really on it. The tape contains a recording of digitally synthesized "pink noise". In simple terms, this is a mixture of a lot of tones all set at a constant volume. This is nice. The problem with aligning your heads with a single audible tone is that you can set the heads for that tone but still lose the high-frequency signals. Actually, this is more important to music buffs, but in our case it means that we can align the recorder heads for both of the ATARI FSK tones in one fell swoop.
The screwdriver, in this case, consists of one very small Phillips for adjusting the head screw. (A Phillips is also called a "cross-point" screwdriver). You can use any miniature-sized Phillips, but be careful. If the screwdriver is highly magnetized, you could be causing yourself headaches. To test the screwdriver for excessive magnetism, touch the tip to a small paper clip and slowly lift the screwdriver. If the end of the paper clip stays on the table, then the screwdriver is not "too" magnetic.
The wire can be any old small gauge wire, such as speaker wire. Multiple-strand wire is usually better than solid wire for this purpose.
You will need either a special connector or some wire to tap into the signal lines of the recorder. Those of you with the ATARI 400 model computer will have to use small stiff wire since you don't have a monitor jack on your computer.
You have two options with the ATARI 800 and only one option with the 400. Lets look first at the one option that is common for both the 400 and the 800.
You can use alligator clips and connector pins (small stiff wire) to jump between the pins on the recorder's I/O connector and the proper pins in the I/O connector on the side of the computer. You can then make your measurements by attaching clip leads to the proper lines. The measurements will be taken from Pin 11 (" + ") and Pin 4 (ground).
The pin configuration of the serial I/O port on the computer side looks like this:
  2  4  6  8 10 12 14
  *  *  *  *  *  *  *

 *  *  *  *  *  *  *  *
 1  3  5  7  9 11 13 15
The configuration of the I/O plug from the recorder is, naturally, the mirror image of this. To make our measurements, it will be necessary to connect three wires. One wire goes from Pin 4 on the computer to Pin 4 into the recorder (this is the ground). One wire connects Pin 8 to Pin 8 (this is the wire that turns the motor on and off). The last wire connects Pin 11 and Pin 11 (this is the audio wire).
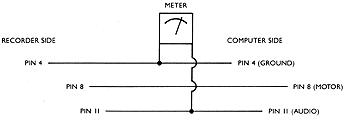
We need to measure the voltage between the wires connecting Pins 11 and Pins 4. Scrape through the insulation near the middle of each of these wires so you can take a reading with the leads from the DVM. This reading will give you the strength of the audio channel signal. The motor must be connected so the recorder can play the test tape.
If you have an 800 model, you can bypass all this wire stuff by measuring at the "MONITOR" output plug located on the side of the computer. The "how-to" part of this article will go into further detail. You may want to get a DIN plug with bare-ended wires coming out of it, to make the job easier. See your APX catalog for the 5pin DIN connector (APX-9002 for $2.49).
The best AC-voltage measurement device to use would be a digital volt meter (DVM), but if you don't have one of them, there are a number of other things you can use. You can use any type of AC-voltage meter. Or, you could use an oscilloscope. You can get these kinds of instruments at your local electronics store. It is also possible to crudely align the heads using your home stereo amplifier by making your measurements on the "VU" or "S" meter located on many amplifiers. If you have a good musical ear, then you could even use the audio playback coming through your TV speaker!
You now have enough information to create your own head alignment "kit". Now comes the easy part: actually aligning the heads. The following is a step-by-step way of doing it.
HOW TO THE ALIGN THE RECORDER HEADS
1. If you have an ATARI 400, insert jumper wires as discussed earlier between the connectors on your recorder and your computer. You will make your measurements between Pin 11 (" + ") and Pin 4 (" " or ground).
If you have an ATARI 800, plug the recorder into the computer. You can measure the voltage between Pin 3 and Pin 2 of the Monitor output port. Pin 3 is at upper left, and Pin 2 (ground) is at the bottom. A DIN plug makes this access easier. Connect Pin 3 to the + lead of your DVM, and Pin 2 to the minus, or ground on your DVM.
When you have done this, insert the BASIC cartridge into your computer and turn the computer on. Then POKE 54018,52 and POKE 65,0. The first POKE turns on the cassette motor so you can playback the contents of the audio channel on a cassette. The second POKE makes sure you don't get any noise from the digital channel. Now put the alignment tape in the recorder and listen for the odd hiss it makes to verify that you are getting a reading on your meter or scope. If you are using your stereo, then make sure you can hear the tape noise over your speakers. When you are satisfied that all of the connections are good, then POKE 54018,60 to turn the cassette motor back off.
2. Now take a razor blade or some other thin flat instrument and gently pry the label off of your recorder. This label is the one that says "REC PLAY REWIND" etc. When you have removed this thin metal plate, you will discover a Phillips head screw and a small hole. Ignore the screw and look down into the hole. You will see a-tiny Phillips head screw inside the recorder. Now press the PLAY button on the recorder. Notice how the small screw moves toward the back of the recorder, almost, but not quite, out of reach. This is the screw you will have to adjust.
3. Press the STOP/EJECT button on the recorder. Now insert the GEO-TAPE (or other test tape) in the recorder and rewind the tape. Lightly press the STOP/ EJECT button to reset the recorder switches. When you are all set, turn the computer on. Now POKE 54018,52 to turn the cassette motor on and POKE 65,0 to disable any input sounds from the digital track. (The GEO-TAPE has pink noise on both stereo tracks with the two signals being exactly 180 degrees out of phase with one another.)
4. When the test tone starts up, notice the reading on the DVM and write the voltage down. When you have got a good feel for the average voltage level, then rewind the tape and play the test tone again.
5. This time, when you hear the test tone, try turning the head adjustment screw clock-wise a tiny little bit. It doesn't take much. Look at the DVM reading. If the voltage level decreased, then turn the screw the other way.
6. Repeat the screw adjustment, rewinding the tape as necessary, until you have found the point that gives you a MAXIMUM reading. When you have found that point, the heads will be in proper alignment.
7. The glue used under the label plate is probably dry and crusty, so you most likely will have to use some fresh glue to stick the label back on your recorder. Be careful not to get glue down the adjustment hole!
A few final words on aligning your heads. Don't do it more than once or twice a year. The heads, once aligned properly, will stay aligned through many hundreds of hours of use. Don't believe anyone who tells you anything different.
TANGLE ANGLES
I have built an FSK-to-Digital Translator, and am advertising it in ANTIC (June, July, August, 1983). This allows me to SAVE and LOAD tapes with my Technics M24 stereo cassette deck rather than with my 410, and after working out the kinks I have recorded 100 programs and suffered no errors. Your readers may be interested in some of my discoveries enroute.
Using my Translator, I still experienced occasional ERRORs 138, 140 and 143. I compared the digital and FSK waveforms and found they did match; therefore, the computer was somehow to blame. I checked the FSK signals (3995 Hz and 5327 Hz) coming from the computer and found them accurate to within 1/ 100 of one percent. Most of my errors were occurring at the beginning of CLOADs, so I suspected the initialization sequence.
I examined the programs I knew to be good and compared them to ones I knew were bad. On good tapes the leader signal was always 5327 Hz, whereas the bad ones were a hissing combo of 3995 and 5327 Hz, with the 3995 Hz signal dominant. This confused the computer and apparently caused the problems. Reviewing my programming practices,
I found that using [SYSTEM RESET] had caused the problems. After a [RESET], the computer seems to lose its ability to begin a CSAVE routine with clean 5327 Hz.
Next I added an LED to my Translator to verify recording quality during CSAVE. Now, if you are in the process of recording and the LED indicates a bad load-you can clear the situation without turning off the computer. Press [BREAK], turn off your printer (or interface), type LPRINT [RETURN], rewind your tape and try the CSAVE again. The LPRINT clears the cassette buffer and resets the pointers correctly.
Steve Wolfe
Essence Peripheral
Atlanta, GA
I am sure our readers will be very interested in your new FSK-to-Digital converter. The technical analysis and solutions you describe are also very interesting.
You've mentioned that no one markets an FSK to Digital Translator. I didn't want to spend another $100 for the 410 when I already owned two reasonable recorders; one stereo, the other monaural, so I designed and built my own interface. It allows me to use either a monaural or stereo player/recorder and is 410 compatible. The only restriction is that anything recorded on the audio channel interferes with the data channel when played back on a monaural, which is to be expected.
Don Larson
Denver, CO
Yes I would like to see your FSK-to-Digital converter. I believe that there is one now on the market (see letter above).
If you are not going to market the one you have, I suggest you write an article for us showing exactly what you did. We would be happy to publish such an article in this department.