STARTING LINE
Turn Coat
Only one color will survive
by Ted Murdoch
 This article presents a short program that helps you learn the fundamentals
of Graphics Modes 1 and 2, which are the text modes. When the program runs,
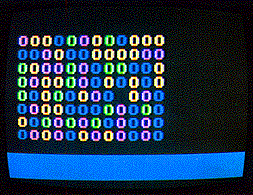
it puts a four-colored block of O's on the screen, then randomly changes
the color of each O until all the O's are the same color. What the program
does is not as important as how much you can learn from it. If you follow
my suggestions, you'll get some understanding of the character graphics
sets, and be able to use tables in the ATARI BASIC Reference Guide to create
other kinds of displays, with other characters.
This article presents a short program that helps you learn the fundamentals
of Graphics Modes 1 and 2, which are the text modes. When the program runs,
it puts a four-colored block of O's on the screen, then randomly changes
the color of each O until all the O's are the same color. What the program
does is not as important as how much you can learn from it. If you follow
my suggestions, you'll get some understanding of the character graphics
sets, and be able to use tables in the ATARI BASIC Reference Guide to create
other kinds of displays, with other characters.
The program has three parts. Lines 200 to 210 set initial conditions. Lines 220 to 275 draw the block of O's. 285 to 325 select two different cells in the block at random, then replace the O in one cell with the O in the other. Sometimes this procedure results in a change of color of an O, sometimes not. If you let the program run long enough, it will change all the O's to one color, but you won't be able to tell in advance which color survives.
The program is organized for you to make some changes. Lines such as 200, 205, and 210 have only one command so that making changes will be easy. Line numbers allow intervals for suggested additions. Type in the program and RUN it. In Mode 2, you can use the text window to display short lines by pressing the [BREAK] key. Use the LIST command to list a line, type in a quick change, and RUN the program again. You can type in GRAPHICS 0:LIST 220,275 to view the part of the program that draws the block of O's.
You can delete a line by typing the line number and pressing [RETURN]. Of course, it's usually a good idea to LIST the line number first, so that you can be sure it's the line you want to delete. Notice that the letter O is typed in a different way (upper and lower case; normal and reverse video) in each PRINT #6; command. Once you get the program running properly, SAVE it and prepare to make changes.
The first thing to look at is the relation between the row number and the column number as they appear in the POSITION command, and as the characters appear on the screen. No matter what names you give to the variables RN and CN, the POSITION command uses the first variable as a column number and the second variable as a row number. Note that the same order of variables is required when columns and rows are selected by the LOCATE command in line 310 and the POSITION commands in lines 315 and 320.
To get a clear understanding of columns, and other matters as well, make some changes in the number of rows (NROWS) in line 200, and in the number of columns (NCOLS) in line 205. If you try a number of rows greater than nine, the extra rows will be hidden behind the text window. If you try a number of rows greater than 11, or a number of columns greater than 19, you'll get error message 141. The ATARI counts from 0, so that the 12 row by 20 column limit for Mode 2 is exceeded after 11 and 19. This program counts from 1, so the first letter is in column 1. row 1, not column 0, row 0.
To see a Mode 1 display, replace the GRAPHICS 2 command in line 210 with a GRAPHICS 1 command. In Mode 1, the letters are shorter, and you can have more rows, but the maximum number of columns is the same.
An issue more specific to Modes 1 and 2 is that the letter O appears in four colors, although the program contains no color commands. Five colors are available in these modes. One of the five colors is the background color; the other four colors appear on the screen because the letter O is typed in four different ways. However, that's not the only way to control color. Add this line to the program.
311 PRINT" ";CHN2;
The number of spaces you leave before the variable name CHN2 is not important, but the semicolon at the end of the line is. When you RUN the program again, you'll see the four numbers 79, 111, 207, and 239 repeated in the window in random sequence.
Those numbers appear in tables on pages 55 and 56 of the ATARI BASIC Reference Guide. The code for capital O is in column 2 of the Internal Character Set Table. The code number is listed as 47. Now look at Column 2 labelled Conversion 2, in Table 9.7, on the following page. Notice the expressions # + 32, # + 64, # + 160, and # + 192. If you substitute 47 for # in each of those expressions, and do the arithmetic, you'll get 79, 111, 207, and 239. This tells you that you could replace the four ways of typing O in the program with a form such as PRINT #6;CHR$(79), or one of the other values. But don't try that yet.
First, type in this command
211 POKE 756,226
and RUN the program once more. You still see multicolored O's all over the screen, but this time they are lower case, and are surrounded by yellow hearts. The same four numbers still appear in the window. Look at the table on page 55 of the Guide again. In Column 4, you find lower case o listed as number 111. If you perform the arithmetic for Conversion 4 in Table 9.7, you get the same four numbers-79, 111, 207, and 239.
To unravel the mystery of the yellow hearts, look at the top of the other columns of the first table. At the top of Column 3, you see the heart (number 32); in the corresponding place in Column 1, you see a place for the space (number 0).
With a little arithmetic, you can now make some other characters appear on the screen in place of all those O's. You have a choice of four colors for each character. While you experiment, keep in mind that there are two distinct sets of 64 characters each in Modes 1 and 2. To return to the character set with capital O's, you can either delete line 211, or change the command to POKE 756,224. In the jargon of computers, the default set for Modes 1 and 2 is the set you get when you first turn on the system. Another way to get the default set is to POKE 756,224. To get the other set you must POKE 756,226.
You aren't limited to the default colors (yellow, light green, blue, red, and black). You can change any one of them with a SETCOLOR command. You can change colors by pressing the [BREAK] key, typing in a SETCOLOR command, and RUNning the program. You can also make SETCOLOR commands part of the program. Try the difference between SETCOLOR commands immediately after the GRAPHICS command in line 210, and SETCOLOR commands immediately after the block of O's is completed in line 275.
While you are experimenting, keep these facts in mind. The color assigned to the text window in Modes 1 and 2 must contrast with the color assigned to text that appears in the text window, or you won't be able to read what is there. Control the color of the text window with SETCOLOR 2,H,L. Control the color of the letters with SETCOLOR 1,H,L. Numbers 1 and 2 are the numbers of the color registers. The letters H and L represent hue and luminance.
You can also experiment with Modes 17 and 18 (1 + 16 and 2 + 16), which delete the text window (and the opportunity to use it as a means for changing the program).
You may find uses for this program other than a means to get familiar with Modes 1 and 2. If you have any interest in ecology or related subjects, you may have noticed that the program is a very simplified model of the extinction of species. Chance, in the form of the ATARI random number generator, reduces the number of members of one species, and increases the number of members of another. In this model, the two species may be identical. Even so, if you let the program RUN long enough, only one species remains. If you choose to watch this behavior, delete lines 315 and 320 of the program. Many of the tools for building more elaborate models are in this program. For information on simple models, refer to a book called Laws of the Game, by Eigen and Winkler. Perhaps you'll find it in your public library, as I did.
199 REM * Initialize number of rows and columns
200 N ROWS=8
205 NCLMS=12
210 GRAPHICS 2
219 REM * Draw random array of cells
220 FOR RN=1 TO NROWS:FOR CN=1 TO NCLMS
225 POSITION CN,RN
229 REM * Select cell type
230 R=INT(RND(0)*4)+1
235 ON R GOTO 240,250,260,270
240 PRINT #6;"O"
245 GOTO 275
250 PRINT #6;"o"
255 GOTO 275
260 PRINT #6;"[INVERSE]O"
265 GOTO 275
270 PRINT #6;"[INVERSE]o"
275 NEXT CN:NEXT RN
276 REM * End of initial array
284 REM * Select cell to remove
285 ROW1=INT(RND(0)*NROWS)+1:CLM1=INT(RND(0)*NCLMS)+1
294 REM * Select cell to duplicate
295 ROW2=INT(RND(0)*NROWS)+1:CLM2=INT(RND(0)*NCLMS)+1
304 REM * Check that cells are different
305 IF ROW1=ROW2 AND CLM1=CLM2 THEN GOTO 295
309 REM * Find contents of cell to duplicate
310 LOCATE CLM2,ROW2,CHN2
314 REM * Remove cell
315 POSITION CLM1,ROW1:PRINT #6;" "
320 FOR T=1 TO 150:NEXT T
324 REM * Replace cell
325 POSITION CLM1,ROW1:PRINT #6;CHR$(CHN2)
329 REM * Continue to remove and replace
330 GOTO 285
Listing 1: TURNCOAT.BAS Download
Ted Murdoch is a technical writer, working for the last 17 years for manufacturers of commercial computers and equipment, including Xerox Sigma. He has recently come to the ATARI 800 from the TRS-80 and is interested in assembly language and LISP.