Picture Utility
Move your Micropainter masterpiece
By William Hough
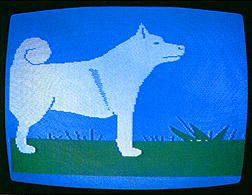
My daughter, Kathy, is quite an artist. She enjoys using MICROPAINTER as a sketch pad. However, the sketches often end up in places on the screen that don't quite meet the rules of good artistic composition (see Fig. 1). Consequently, few of her sketches developed in masterpieces.
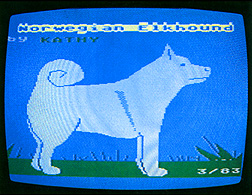
I tried to get her to do some prior planning, but wasn't successful (maybe because she's twelve, or maybe because I'm her dad). So, I decided to write a utility that would relocate her picture to a different place on the screen. Like many utilities, it kept growing. PICUTE, standing for PICture UTility, is currently capable of repositioning and cropping a picture stored on disk in the MICROPAINTER format, and adding bold text or graphics characters of several different sizes and colors anywhere on the screen without disturbing the background picture (see Fig. 2). If you don't have a MICROPAINTER, you can still use PICUTE to make patterned screens in several colors and superimpose text or ATARI graphics characters on them. PICUTE is a fairly complicated program, so you should read these instructions carefully before using it. In a typical session with PICUTE, you might follow these procedures:
First, you load a MICROPAINTER screen you've created. Perhaps the subject is slightly off-center, or you may wish to add text without having to draw the letters. Before loading the specified file, PICUTE will ask you if you want to move the picture. Type YES, and specify a horizontal offset of 0 and a vertical offset of -192. This loads the picture immediately below the visible screen memory, where it remains intact until you load or move another picture to that area. You may now move the picture up into the visible screen by pressing SELECT, then M (for Move), and then specifying a vertical offset of 192. This is a copy of the below-screen area and serves as your working copy. The below-screen master copy may be called up repeatedly at machine speed by using SELECT and M.
When PICUTE begins, you find instructions for program functions. Since prompts could not be printed on the screen at the same time as your pictures, it was necessary to sound a tone as a prompt. If you don't want to load a screen, choose the option to create a blank screen. The screen will turn off for 15 seconds to initialize, then you will be prompted for colors. I have used the same convention as MICROPAINTER for Color commands. This chart should make things clear:
MICROPAINTER   BASIC SPECIFICATION   BASIC SELECTION   RAM SHADOW
  PAINT POT          COMMAND             COMMAND        LOCATION
     1              SETCOLOR 4           COLOR 0          712
     2              SETCOLOR 0           COLOR 1          708
     3              SETCOLOR 1           COLOR 2          709
     4              SETCOLOR 2           COLOR 3          710
At this point, you will probably want to press SELECT in order to write text, draw with graphics characters, or add borders. When you want to save it, press START.
When loading an existing file, do not type the "D:" prefix. As mentioned, you will be asked if you want to move the picture. The screen is 40 bytes wide, so a horizontal displacement of 20 or -20 will move the picture halfway across the screen. The picture always wraps around. You will also be asked for vertical displacement. A positive value will move the picture down the screen one scan line per unit, and negative will move it up. If the picture doesn't display exactly where you want it, the internal move routine will let you achieve the exact placement you want.
If, after a picture is displayed, you press SELECT, you will return to a menu of four choices. Type the highlighted letter to use the appropriate routine.
ADD TEXT--T
You can place up to 20 characters of text per line on the screen with this option. Any characters may be used, including inverse video and graphics. Use the DELETE and INSERT keys to position and edit your text. Text may be of five standard heights, from eight scan lines to 40 scan lines high. The vertical position is measured in scan lines from the top of the picture. PICUTE won't let you print off the screen.
When asked to select color, use the MICROPAINTER "paint pot" numbers 1 through 4. If you do not see your text after it has been placed, it is probably the same color as the background. With experimentation, you will find that this is an extremely versatile routine.
ADD BORDERS--B
The crop routine lets you add a border of any width to any edge. A striped pattern is obtained by answering "M" (for mixed) when prompted for the color, and then specifying a number which determines the colors of the stripes. The number must be the decimal value of an eight-bit binary byte, and therefore can range from zero (00000000 in binary) to 255 (11111111 in binary). The specific pattern of bits in the byte determines which colors will be used in which order.
For instance, the number 27 (decimal) is represented in binary as 00-01-10-11 (hyphens inserted to show pairs of bits).
MICROPAINTER has four paint pots, each of which contain any of the possible ATARI colors, but only one color per pot at a time--ergo, a four-color screen. The bit-pair 00 designates Pot 1,01 equals Pot 2,10 equals Pot 3, and 11 equals Pot 4. If we specify decimal 27, we get a striped border with Pots 1, 2, 3, and 4 in that order.
A byte of 228 (decimal), or 11-10-01-00, will give the same four colors in reverse order. If you want wider stripes in two colors, you could pick 01-01-10-10, or 90 decimal.
You can make a striped blank picture by specifying a byte and overwriting the entire screen.
MOVE PICTURE--M
This internal move is something like a scroll. You can use the RAM area immediately below the screen memory much as you would disk storage. If you don't like a change you've made, you can bring the original back by moving the picture up with a vertical offset of + 192. If you make a change that you like, "store" it with a vertical offset of -192, then bring it back with a + 192, and continue creating. A picture stored in lower memory can be recalled repeatedly without affecting the stored image.
Moving an image horizontally causes it to wrap around. If you invoke this feature while you have a picture stored in lower memory, it will produce a one-scan-line vertical step in the hidden image. Therefore, you should do horizontal moves before storing an image below screen memory.
CHANGE COLORS--C
This routine is straightforward. You can change any or all colors. Use Table 9.3 of your BASIC manual to select color and luminance in the SETCOLOR format.
SAVING A PICTURE--START BUTTON
When you want to store a picture on disk, press the START button. You will be asked for a filename. Don't use the "D:" prefix. The current colors will be appended to the picture file. In case of errors during a write, a TRAP will occur and you will be given another chance to save the picture. Thus there is little chance of losing the picture.
FINAL POINTS
The BREAK key has been left functional deliberately. Once the program is underway, you can press BREAK at any time, except when the picture is actually changing. Some interesting patterns can be generated by typing direct statements in BASIC. Screen memory starts at location "SM" and there are 7680 bytes in a screen. Try, for example, the direct statement:
FOR I=SM TO SM+7640 STEP 40:FOR K=0 TO 39:POKE I+K,(I-SM)/40+20:NEXT K:NEXT I
This will take some time to execute. When the READY prompt appears, type GOTO PIC. There should be a woven rug pattern on the screen upon which you can write text. Try using inverse video characters. The statement GOTO PIC will recover from any possible input errors the program fails to trap.
Three of the relocatable machine language routines, MOVEP$, MOVEN$, and VCOR$, are adaptations of Bob Stewart's MOVE program contained in his article "Supercharging BASIC," in the April, 1983 issue of ANTIC. His single program does not allow the move-from area to overlap the move-to area. These routines do, but you have to know which direction you're going. The cropping routine, HBORD$, is identically his "SPRAY" program from the same
article. I'd also like to acknowledge Mark Huss for help on the text writing routine, PROG$. This routine was originally coded in BASIC, but was very slow (two minutes for a line of 20 characters of height 3). Thanks also to Jimmy Snyder, who gave me some hints on trapping disk write errors from machine language.
Typing PICUTE can be a chore. It is written without the use of any special ATARI characters, so it can be transferred in listed form over telephone data connections that use pure ASCII (all Bulletin Boards). But if you don't have a modem, I am willing to save you the trouble of typing it in. Send a blank, formatted diskette (single density), a stamped self-addressed mailer, and three dollars to:
William W. Hough
1638 Stephens Drive
Wayne, Pennsylvania 19087
If you send seven dollars, I'll use my disk and postage. Kathy tells me that she will throw in a few of her masterpieces. (If you have MICROPAINTER pictures of your own that you would like to share, the disk you send doesn't have to be blank, but please attach a note that it contains picture files.) No cassettes, please.
Listing: PICUTIL.BAS Download
Bill Hough is an engineer with degrees from Northwestern and Stanford, and has been with the Bell System for 17 years. Mastering the ATARI is a principal leisure-time activity. He is the author of a logical game called "Brainboggler," available through Educational Software, Inc., and is working on a program to analyze stock option strategies with the ATARI.