Review
ST Pictascan
Convert Your Printer into an Image Scanner
BY BARON SEKIYA
 |
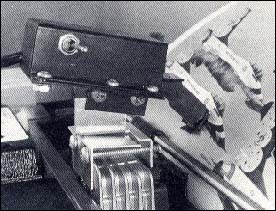 |
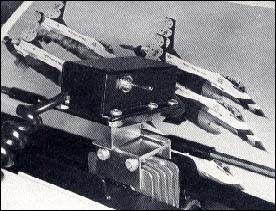
| Pictascan is small--about the size of a matchbox--and fits on top of the printer head. A one-inch ''finger'' extends from the box to the image to be scanned. |
|
A drawing pops out of my printer--but wait!--it wasn't printed out, it was scanned. With Pictascan from E. Arthur Brown, I was able to turn my printer from an output device to an input device. Pictascan is a scanner that plugs into the joystick port on your ST to let you import images from photos and drawings into DEGAS .PI3 format. The package includes mounting hardware for the unit, software to drive it and a manual.
The Hardware
Pictascan's main housing is a matchbox-sized metal box with a one-inch finger that sticks out to lightly contact the artwork during the scan. The unit rides on top of your printer head as it sweeps over photographs, drawings and other images. The tip of this finger contains both Pictascan's "eye" and a tiny light source to illuminate the scanned material. On the bottom of the unit is a removable bracket to attach Pictascan to the printer head.
Installing Pictascan is easy. A clamp rides the printer head of my Star SG-10 printer and Pictascan attaches to the clamp. The clamp is made to attach to almost any printer head. The manufacturer also supplies a little plastic piece that can be glued onto the printer head to provide a sturdier bracket mount. Don't worry though, Pictascan won't be permanently glued to your printer head--the bracket detaches from the plastic piece easily.
 |
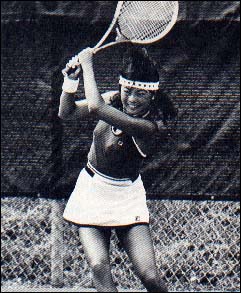 |
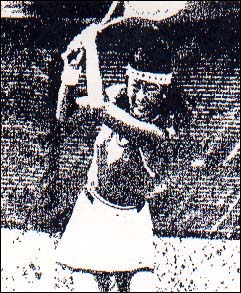
| On the right is a black-and-white photo scanned with Pictascan; to the left is the result of that scan. The complete image took up a whopping 250K of memory, but the image is easily cropped and saved in DEGAS .P13 format for a more manageable size. |
|
Attached to the back of the unit is a coiled cable approximately five feet long that plugs into the joystick port. If you own a 1040STF/520STFM, I recommend that you use a joystick extension cable to save you the trouble of lifting your ST every time you have to plug or unplug the cable.
The Software
The Pictascan disk consists of PICTASCAN.PRG, the program file, a set of .CNF printer drivers to control the scanning unit and a sample RAW DATA picture file.
The .CNF file lets the scanner read the full width, center half, left half and right half of the page. This is important since you may only want to scan part of a page; and you can even use a 15-inch wide printer to scan material if you have something large to scan. The Pictascan program doesn't use GEM windows, so you can't access any desk accessories.
The Scan Unit
Pictascan's scan unit has three controls: an on/off switch, a stippling adjustment and a sensitivity adjustment. You'll need a jeweler's screwdriver to adjust stippling and sensitivity on the unit via two small holes in the unit's top. (I think it would have been better if two control knobs had been used instead of the tiny screws buried in the unit. Even with a jeweler's screwdriver, the adjustment is difficult.)
Run the program, turn on the scan unit and load in the .CNF file for the portion of the page you want scanned. A click on the Send Initialization button sends the necessary codes to your printer. Pictascan's program also lets you customize .CNF files for your printer and the documentation is very clear on how to do this.
The manual presents a walkthrough for your first scan and recommends that you use a newspaper photo as your guinea pig. (A newspaper photo is easily scanned because it's made up of dots.)
Scanning line-art is fairly easy. Turn the stippling control off and run a few test scans to adjust the sensitivity. Scanning continuous tone art, such as photographs, is trickier since you must adjust the stippling control for the desired effect. Too much stippling can turn your photo into an indecipherable mess, while too little stippling will leave out most of your picture's details. Half-toned photos like newspapers and magazines reproduce better since the grey areas are just dot patterns.
It takes Pictascan about 15 l/2 minutes to scan a 7 1/2-by-5-inch area. For a 5-by-5-inch area it takes about 6 1/4 minutes to scan. That's one of the reasons you have configuration files so that you don't scan any more than you need.
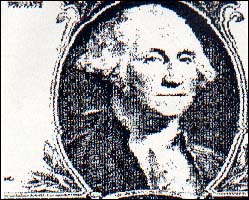 |
This one-dollar bill shows what Pictascan can do with line art. The quality is markedly bet- ter than what you get when you scan photo- graphs. |
Data Files
Since Pictascan scans at over 300 dots-per-inch, your RAW DATA file may be over 250K in size! There's a lot of picture information in that file. Your next step is to size and crop the data file into your final DEGAS picture.
By switching between two fullscreen pictures, one for the RAW DATA and one for the DEGAS picture file, you crop what you want to save. Here's where the power of the software lets you control how you want the final picture file to look. You control the image's size, brightness, cropping and distortion. All of the work is done with the mouse. When you're finished you can save both the RAW DATA and DEGAS file to disk.
Scanning Tips
Since Pictascan has a nasty habit of firing a dot at the start and end of each pass, I suggest you remove your printer's ribbon when scanning. Pictascan does this to let you know what area is being scanned, but I could do without the marring of my photos. In fact, I disconnected the electronic signals to the printer head so it wouldn't fire any pins at all.
Pictascan's eye may get caught on your artwork near the edges so customize your .CNF files so this won't happen.
Many photographs and magazines have slick backings that make friction-feed through your printer nearly impossible sometimes. If you have an adjustable tractor-feed you can make your own sprocket holes in the edge of your artwork. Just use a hole puncher with some computer paper as a guide to align the sprocket holes. I've used this with 8-by-10 prints and it works fine.
I found that the shareware program MegaMatic doesn't work with Pictascan. This is probably due to some problem with its printer spooler. The scanned image went into a stair-step pattern that made straight vertical lines look like the teeth on a buzz saw. If you have a printer spooler it may cause similar problems.
Should You Buy?
If you're looking for a low-cost way to scan pictures into DEGAS files, Pictascan is a wise alternative to a $1,000 flat-bed scanner. You also don't need to own video equipment to scan an image. Keep in mind, however, that Pictascan only scans in black-and-white.
The quality of images produced through Pictascan depends on what kind of image you're scanning in the first place. Buy it if you want to scan line art (Pictascan does this very well); better software is needed for photo.
Baron Sekiya lives in Honolulu, Hawaii where be is a photojournalist. This is his first review for START.
ST-Pictascan, $149.95. E. Arthur Brown Co., 3404 Pawnee Drive, Alexandria, MN 56308, (612) 762-8847.