
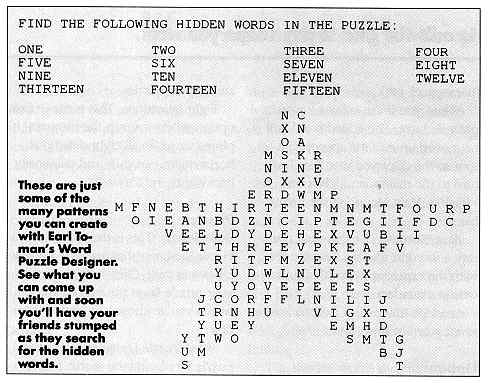
If you're a hidden-word puzzle fan, you'll find Earl Toman 's Word Puzzle Designer especially appealing. With it, you can create puzzles in a variety of shapes and sizes with as many as 80 words automatically hidden-horizontally, vertically, diagonally, frontwards and backwards! Word Puzzle Designer was written in GFA BASIC 2.0 and runs on color and monochrome systems.
Puzzling patterns can be found in the file WORDPUZL.ARC on Side 1 of your START disk.
Hidden-word puzzles can be deceiving-on the surface, it seems all you have to do is find each of the words in the given list. But after a few tries, you give up on the first word and go on to the next-and the next. Pretty soon you're convinced that none of the words are in the puzzle, but you keep on trying anyway.
Word Puzzle Designer lets you create customized hidden-word puzzles in a variety of shapes and sizes. And once your puzzle is created, it can then be previewed on the screen and printed out. If you want, you can even print a solution.
To run Word Puzzle Designer, boot this month's START disk; the START menu runs automatically. At the main screen, click on Prepare, then select "Word Puzzle Designer." The program will un-ARC directly onto the destination drive you specify. At the Desktop, double-click on WORDPUZL.PRG and start creating your puzzle. Word Puzzle Designer was written in GFA BASIC 2.0 and runs in medium and high resolution.
Designer automatically
calculates a solution for you.
Quick Overview
Let's make a puzzle right away to see how easy Word Puzzle Designer
is to use. At the title screen, press any key to get started in the program.
Under Pattern on the menu bar, click on Create. You'll then be asked to type in the number of rows you want your puzzle's pattern to have and then the number of columns. Alter you answer these questions, a grid of pound signs (#) will appear with a dialog box.
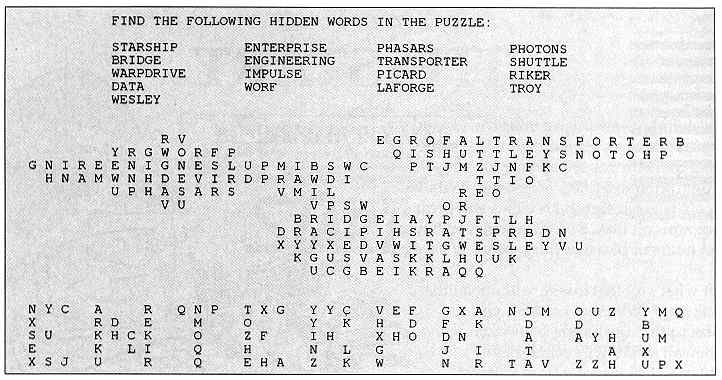
Now click on OK and you're free to edit the grid to any shape you wish. Here Word Puzzle Designer becomes a kind of drawing program where you can create anything from a circle to a square-even a silhouette of the Enterprise from Star Trek (one of the sample patterns included with the program).
When you're finished creating your pattern, click on both mouse buttons at the same time. Now, under Wordlist on the menu bar, click on New Wordlist. The program will prompt you to type in your chosen words. Type in as many as you wish-the program accepts up to 80 words.
After you've typed in all your words, press [Return] at a blank line and click on Build Puzzle under Puzzle on the menu bar. You'll then be asked whether you want your puzzle printed out or displayed on the screen. Click on your choice and watch as your completed puzzle appears before your eyes. When you're through viewing the puzzle, click the mouse or press any key. An alert box will ask you if you want to print the hidden-word directory; if you answer Yes, the program will show a list of the words and their locations in the puzzle.
Word Puzzle Designer's Menu Bar
At the top of Word Puzzle Designer's main screen, you'll see a menu
bar that contains five choices: Pattern, Wordlist, Options, Puzzle and
Done.
Drop-Down Menus
Pattern
Create: Use this option to create a new pattern for a puzzle. You'll
be prompted with questions of how many rows and columns you want the puzzle
to include. A rectangular pattern is then painted on the screen. A pound
sign (#) indicates where letters will appear in the puzzle. You can use
the mouse to erase or fill this design to make whatever puzzle shape you
wish. Note that only every second column is used in the pattern. This is
because a puzzle looks too compressed when letters are printed in each
column.
Edit: Click here to edit your existing pattern or one you've loaded. As in Create, use the mouse to modify the pattern as desired.
New: This option is nearly identical in function to the Create option, except that it clears the screen of the pattern you're currently working on and lets you start over again.
Print: Select this option to print a pattern. Note that this option prints out your pattern-grid only.
Save: Click here to call up a file-selector box to save your pattern-grid to disk. Save your file with the extender .PAT (this is the default extender).
Load: Use this option to load a saved puzzle pattern from disk.
Wordlist
New Wordlist: Use this option to enter the list of words that will
be hidden in the puzzle. You'll be prompted to type in each word. To end
the list, press [Return] at a blank line. Although you can enter up to
80 words, you'll find a list of around 15 words to be more practical. Also,
a word cannot be more than 15 letters. If you wish to redo your entire
wordlist, simply choose this option again and your original list will be
written over.
You're free to edit the grid to any shape you wish.
Print Wordlist: When you select this option, you'll be asked whether you want the list printed to the screen or to the printer.
Add Words: Words you add are appended to the end of the existing wordlist.
Edit Wordlist: Use this option to edit a wordlist. Click here and you'll see the Main Menu screen replaced by the Edit Wordlist Menu. At the top of that screen you'll see your list of words. Right-click to delete the word (right-click again to undo).
To edit a word, left-click on it; it will then appear in the lower left-hand corner of the screen in the "Edit Word" field. Use normal keyboard editing functions to edit the word (i.e., arrow keys, [Delete], [Backspace], etc.).
When you finish editing a word, press [Return]. The edited word will be moved up into the appropriate spot in the displayed wordlist. To return to the main menu, click on "Back to Main Menu" at the menu bar.
Save Wordlist: Use this option to save a wordlist to disk. Save the list with the extender .WDS (this is the default extender).
Load Wordlist: Click here to load a saved wordlist from disk.
Options
Four Directions: This option limits the placement of hidden words in
the puzzle to horizontal and vertical directions only (i.e., north, south,
east and west). Choose this option to create simpler puzzles.
Eight Directions: This is the default option when you run the program.
It places words in all eight directions:
horizontally, vertically and diagonally, backwards and forwards.
Puzzle
Build Puzzle: This is the part of Word Puzzle Designer that makes it
a puzzle creator as well. Click here to create your puzzle from the pattern
and words you've chosen or loaded from disk.
Word Puzzle Designer builds the puzzle by placing the words from your list at random locations in the pattern. The remainder of the pattern is then filled with a random selection of letters. This completes the puzzle.
Word Puzzle designer can handle up to 80 words.
Upon completion of your puzzle, you're asked to choose where you'd like it printed out: screen or printer. After the puzzle prints out, a dialog box will ask you if you want to print a hidden-word directory, which is essentially a solution to your puzzle.
Reprint Puzzle: This option lets you reprint a puzzle and its hidden-word directory-handy if you had it printed to the screen the first time and now want a hard copy, or if you simply need another copy.
Done
Quit: Click here to return to the Desktop.
Additional "Build Puzzle" Notes
If you try to use too many words in too small a pattern, Word Puzzle
Designer may be unable to fit all of them into the pattern. The program
will make a maximum of two passes. At the end of the second pass, any unused
words will be discarded and the puzzle will be completed with a random-letter
fill.
Since word location and direction are random, you may achieve better results if you build a puzzle again for a given pattern and word list. You may "Build Puzzle" as many times as you wish using the same pattern and wordlist. The program will come up with different results each time you build.
The hidden-words directory (puzzle solution) refers to pattern row and column numbers to identify where words are hidden. Depending on the pattern you create, the first row of letters printed on a puzzle may, or may not, be row one. In other words, if you blank row one in the pattern, the first row printed on the puzzle will be spaces. The first visible row of letters will actually be row two as far as the pattern is concerned. This also holds true for columns. If you find this confusing, reprint the pattern on your screen, and compare it to the printed puzzle and hidden = words directory taken off your printer.
Have fun creating your puzzles and don't forget to look at some of my sample patterns included on your START disk. Also, watch for more puzzle designers in future issues of START.
Earl Toman lives and works in Orleans, Ontario. This is his first program for START.