ON DISK
Final Approach Controller
Air Traffic Controller Simulation for the ST
BY KEVIN MASON
Let START put you in the hotseat of an Air Traffic Controller! Kevin Mason's Final approach Controller will keep you on your toes as you guide a variety of military aircraft to safe takeoffs and landings. But be careful--this simulation requires quick thinking and a cool attitude, especially when the traffic gets thick. Final Approach Controller was written in GFA BASIC 3. 0 and runs in low resolution only.
Prepare for takeoff with the file APPROACH.ARC on Side 1 of your START disk!
I'm one of those gamers who likes simulations better than text adventures and that's the main reason I wrote Final Approach Controller. It's a military Air Traffic Control simulation written in GFA BASIC 3.0 and utilizes DEGAS Elite, Cyber Sculpt, CAD 3-D 2.0 and the Animatic Animation System for the graphics design.
To run Final Approach Controller, boot this month's START disk; the START Menu runs automatically. At the main screen, click on Prepare, then select "Final Approach Controller." The program will un-ARC directly onto the destination disk you specify. To start the program, click on APPROACH.PRG at the Desktop.
Getting Started
Final Approach Controller begins with two dialog boxes. The first asks you to choose one of three skill levels according to the volume of traffic you're willing to handle. Depending on the level, aircraft will appear at the following time intervals when you enter the simulation: Student, every 150 seconds; Rookie, every 90 seconds; and Master, every 45 seconds.
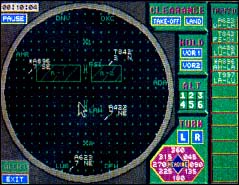 |
Final Approach Controller's main screen: from here you must guide a total of 36 mili- tary planes and helicopters to safe landing and takeoffs. The program is set in Oklahoma's infamous "Tor- nado Alley," so watch out for sudden storms! |
The second dialog box asks you for your preferred takeoff/landing orientation. Choose North for all your takeoffs and landings to face north; choose South for all your takeoffs and landings to face south.
There are total of 36 aircraft that will randomly appear in the final approach control area. Each aircraft is identified by a letter followed by a three-digit number. On the right side of the screen you'll see a list of all the aircraft in the immediate area. The aircraft ID number that is prefaced by an asterisk (*) is the plane or helicopter currently receiving your commands. To choose another, simply click on it with the left mouse button from the list of available aircraft.
The letters used to designate the three types of aircraft and their airspeeds are as follows:
USAF Jet Fighters: F - 180 knots.
USAF Jet Trainers: T - 120 knots.
Army Helicopters: A - 90 knots.
Interpreting the Radar Screen
On the Final Approach radar screen, target airports appear as text icons that contain information to assist the controller in managing traffic. The radar covers a circular area of approximately 20 miles in diameter, overlaid with a grid divided into one-mile units. The six entry/exit fixes positions) are marked around the rim of the screen as three-letter codes. The fixes are connected by airways, marked as lighter-colored and grid marks.
Two airfields are and centrally located and are marked by a three-letter code beside a runway icon. There are two diagonally hatched rectangles labeled as "R-1" and "R-2." These are restricted areas on the Fort Sill firing ranges that pilots must avoid, unless they want to catch an artillery shell in the belly of their aircraft.
The codes for the fixes and airfields are as follows:
DNV: Denver, CO, fix.
OKC: Oklahoma City, OK, fix.
ADA: Ada, OK, fix.
DFW: Dallas/Fort Worth, TX, fix.
LUB: Lubbock, TX, fix.
AMR: Amarillo, TX, fix.
LAW: Lawton Municipal Airport.
FSI: Fort Sill Henry Post Airfield.
A particular aircraft is displayed as a text icon on the radar screen. The first line of the icon is the aircraft identification; for example, "A638" for "Army 638" or "T400" for "Trainer 400." The second line of the icon is divided into the aircraft altitude and the heading. The altitude is represented on the left as a single number from 0 to 7, signifying 0 to 7,000 feet in intervals of 1,000 feet. The heading, the direction the aircraft is flying toward, is represented on the right by characters to differentiate the heading from the altitude "N" is north, "NE" is northeast, etc. The third line of the icon is a slash mark "/" that points to the location of the aircraft on the radar screen.
The Control Panel
The Final Approach control panel around the radar screen is all mouse-controlled. There are no keyboard or joystick commands.
In the upper left corner of the radar screen, you'll find the TIME. Below that is a PAUSE button. If you pause the simulation, an alert box will ask if you want to study the score or radar screen while the game is paused. From either of these screens, click the mouse button to resume play. Below that is the ALERT box, which will turn red to warn you of dangerous situations. Click on EXIT in the lower left corner to return to the Desktop.
To the right of the radar screen is a panel labeled TRAFFIC that lists up to 12 active aircraft, though you'll usually have only two to six aircraft active at one time.
When an aircraft becomes active, you'll see its ID icon appear in the TRAFFIC panel. The first line of the icon is the aircraft identification. The second line shows a code for the arrival fix or takeoff airfield, separated by a dash (-) from a code for the departure fix or landing airfield. These codes correspond to the first two letters of the three-letter codes for each fix or airfield listed above.
The central control panel, to the immediate right of the radar screen, contains all of the final-approach controller commands. This panel is subdivided into five sections: CLEARANCES, HOLD, ALTITUDE, TURN and HEADING. See the sidebar for a detailed description of each command.
To control a specific aircraft, click on its aircraft ID text icon under the TRAFFIC panel. An asterisk (*) will then appear next to it to denote that it is the aircraft currently under your control. Now click on the command or series of commands you wish the plane or helicopter to follow.
Special Rules
Like any simulation, Final Approach Controller has some special rules that must be followed if you want all your aircraft to take off and land smoothly.
1. Aircraft will always enter the final approach control area at an altitude of 7,000 feet.
2. Aircraft must always exit a fix at an altitude of 6,000 feet.
3. Aircraft must always exit a fix aligned with the heading of the airway associated with that fix.
4. Aircraft must always take off and land in the direction you selected at the beginning of the simulation.
5. You are not authorized to direct aircraft over the restricted areas at any altitude.
6. You must keep traffic separated by a distance of three miles if they are at the same altitude to avoid a "near miss" conflict.
7. You must keep traffic separated by 1,000 feet in altitude if they are within three miles of each other to avoid a collision.
8. Do not fly into thunderstorms; avoid collisions.
Scoring
The number of points awarded increases as the difficulty level increases. Points are given for successful landings and proper departures at fixes, "handoffs" to other controllers. Bonus points are given for handling all 36 aircraft without any errors. The number of errors, such as improper departures, landing in the wrong direction or straying out of the control area, are counted, leading to point deductions. Each second over the restricted areas counts as one error. Each second you are in a near-miss situation counts as one conflict error, which will also result in point deductions. Losing an aircraft in a thunderstorm is disastrous for your score as well.
The Weather
Southwestern Oklahoma, where the simulation is set, is in the heart of the infamous "Tornado Alley." More twisters drop out of the sky there than anywhere in the world. Thunderstorms tend to appear suddenly over Childress, Texas, between Lubbock and Amarillo and march in a northeasterly direction. Stay clear of these dangerous thunderstorms spawning tornadic winds, since their boiling, dynamic nature can destroy any aircraft.
Parting Thanks
I would like to thank my friend Jerry Bethel for writing and compiling the machine language subroutines for me and giving pointers on finding crashes, and my friend John Crowley for playing the role of the frustrated novice player and ergonomic-controls design consultant.
Finally, this program is dedicated to the real air traffic control specialists at the Army Radar Approach Control at Fort Sill, Oklahoma, who let me into their restricted world for dozens of hours as an observer.
Now let's get that program booted up, and start managing aircraft traffic. No smoking allowed!
Kevin Mason is a physician specializing in aerospace medicine and family practice in the US Army. He began hobby programming in 1980 on an Atari 800, which still runs next to his 1040ST. This is his first program for START.
|