BY THOMAS R. BURGLIN
Spencer for Higher Levels
In our January 1989 issue START published Slither, a fast-paced, high-action arcade game by Thomas Burglin. Slither came complete with 30 devilishly difficult levels, but now you can design your own doom-er, levels, with the Slither Screen Editor. The program runs in any resolution.
Give Spencer a new place to play with SSEDT.ARC on your START disk.
 Slither put you
in the role of Spencer the Snake. Your task was to guide Spencer through
30 levels, skillfully negotiating him through obstacles of increasing difficulty.
Spencer would eat the apples in his path, growing a little longer with
each apple.
Slither put you
in the role of Spencer the Snake. Your task was to guide Spencer through
30 levels, skillfully negotiating him through obstacles of increasing difficulty.
Spencer would eat the apples in his path, growing a little longer with
each apple.
The problem with Slither is that some may think it is too difficult, whereas the experienced arcade gamer might consider it too easy. To make things more challenging, Slither lets you load new levels into the game. The original Slither article describes the file format for alternate Slither levels, but these files must be bit-mapped and are difficult to create by hand.
 That's where
the Slither Screen Editor comes in. With it you can create your own levels
using a paint program-type interface. Copy SSEDT.ARC and ARCX.TTP onto
a blank, formatted disk and unARC SSEDT.ARC, following the Disk Instructions
elsewhere in this issue. If you'd like to start by warming up your Slither
fingers, we've included a sample file, SPIDER.TXT, which you can load into
Slither and begin playing new levels.
That's where
the Slither Screen Editor comes in. With it you can create your own levels
using a paint program-type interface. Copy SSEDT.ARC and ARCX.TTP onto
a blank, formatted disk and unARC SSEDT.ARC, following the Disk Instructions
elsewhere in this issue. If you'd like to start by warming up your Slither
fingers, we've included a sample file, SPIDER.TXT, which you can load into
Slither and begin playing new levels.
To start designing your own levels, double-click on SSEDT.PRG to run the program from any resolution. The file SSEDT.RSC must be in the same directory. The Screen Editor lets you have up to 10 sets of 30 levels each in memory at once; each level is divided into 40-by-40 units the width of the snakebody. You can cut and paste between levels and fields.
Once a set has been loaded or newly created, the screen work area will be opened as a window. There are four boxes on the left that indicate how many total sets of fields are currently in the computer memory the current set and field and name of the current set. New sets will be named UNTITLED.TXT.
The right side of the screen shows a Slither field; the field is made up as a grid to represent the units of the field. The two openings at the top and bottom of the field are the entrance and exit for the snake. Be sure not to block these, or else Spencer will get nowhere in a big hurry. Once you move the mouse cursor inside the field the shape of the cursor changes and you will see the coordinates of the current mouse position. Click the mouse on a unit to set a point; this point will be a barrier when you load the file into Slither. Keep the mouse button down as you move to draw continuous lines. To erase existing points, click on a point that is already set; again, hold the mouse button down to erase many points at a time. If any mirror planes have been set in the symmetry function (see below), the drawing will be symmetrical as chosen. The symmetry functions will work in the same way for erasing as for setting points. To draw perfectly horizontal or vertical lines, keep the [Shift] key pressed while drawing a line.
The window slider bars are used to move between sets and fields. Clicking on the horizontal arrows moves you by one field up or down. Clicking in the shaded area of the scroll bar moves you five fields up or down. The vertical bar moves you between different sets. Clicking on the vertical arrows or in the shaded area moves you up or down a set.
The File Menu
The menu bar gives you a wide range of editing commands:
- New [N]: creates a completely new set of 30 fields. A new editing window will appear
- Load [L]: loads a previously created and saved set of fields. Select the filename using the standard GEM item selector.
- Save [S]: saves the current set to disk. You can save the entire set or a subset; a dialog box asks you for the start and end level to save. Next, enter the destination level. This level serves as an offset; in this way you can save, for example, levels 1-10 as levels 16-25. Confirm your selection by clicking on OK (click on Cancel to go back to the program). Select a filename from the standard file selector box and click on OK. If it's a new file the default name will be UNTITLED.TXT
- Close [R]: closes the current set. An alert box will tell you if you have made unsaved changes to that set.
- Quit [Q]: leaves the program, notifying you if the sets in memory have any unsaved changes.
The Edit Menu
- Copy [C]: copies the current working field on screen into a buffer that can be pasted into another field later.
- Cut [U]: copies the current field into the buffer and erases the screen field.
- Erase [E]: erases the current screen field.
- Paste [P]: pastes the contents of the copy buffer into the current field by overwriting it.
- And [A]: performs a logical AND on the contents of the copy buffer with the current field. Points set in both fields will be set.
- Or [O]: performs a logical OR on the contents of the copy buffer and the current field. Points set in one or the other will be set.
- Xor [X]: performs a logical XOR on the contents of the copy buffer and the current field. Only points set in one but not the other will be set.
- Exchange [H]: This is a flag that determines the behavior of the Paste, And, Or and Xor function. If Exchange is checked, the original working field is put into the copy buffer, replacing the previous field in the copy buffer For example, using the Paste function with Exchange turned on is equivalent to swapping the working field with the buffer.
The Options Menu
- Goto [G]: a dialog box asks you which set and level you want to go to work. (This is an alternative to using the horizontal and vertical slider bars.)
- Copy set [T]: copies all 30 levels of a set into a buffer. This will overwrite the contents of the field buffer.
- Paste set [V]: pastes the 30 levels in the copy buffer into the current set.
- Symmetry [Y]: a dialog box lets you choose from several different arrangements of mirror planes for drawing. Click on the icon of the pattern you want to use.
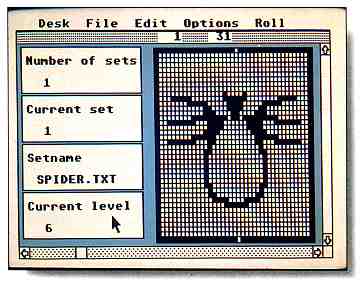
The Slither Screen Editor lets you create fiendish
new levels for Slither using an intuitive paint
program-like interface. This screen is from the
sample file SPIDER.TXT in the SLITHER.ARC file
on your START disk.
The Roll Menu
- Up [up arrow]: this rolls the contents of the current working field one unit up. Points on the top row will wrap around to the bottom.
- Down [down arrow]: this rolls the contents of the current working field one unit down. Points on the bottom row will wrap around to the top.
- Left [left arrow]: this rolls the contents of the current working field one unit left. Points on the leftmost column will wrap arount to the right.
- Right [right arrow]: this rolls the contents of the current working field one unit right. Points on the rightmost column will wrap around to the left.
Epilogue
The Slither Screen Editor was written in Laser C. Some of the drawing
functions use Line-A calls for increased speed. There is one flaw in Slither:
when I originally designed it, it did not use external levels. Thus the
field background of the title screen is actually the first level. If you
designed a new first level, don't be surprised to see your level in the
background of the title.
Well, I hope that you will be able to come up with lots of devious levels to chalenge yourself and your friends. Load the sample fields into Slither to get a feeling how nasty it can be.
Thomas R. Burglin is a research scientist in molecular biology. He is in the United States on a two-year stipend from Switzerland to finish his Ph.D.