ON DISK!
ST COLORING BOOK
by Richard Farrell
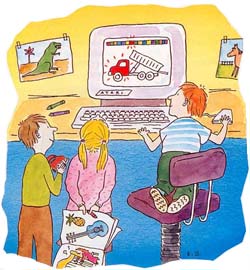
Let the ST unleash your child's imagination in a rainbow of colors. ST Coloring Book is a delightful draw-and-paint program that will entertain and educate your children as they add colors to existing pictures or create and color their own. It also makes for a fun and easy way to teach them some of the ways you can use a computer. A color monitor is required.
A coloring book that doesn't need crayons? See for yourself in the files COLRBOOK.ARC and SCREENS.ARC on your START disk!
Coloring books go a long way in aiding the intellectual development of your child. Whole new worlds are revealed as your son or daughter learns to distinguish various colors and shades, develop hand/eye coordination by learning to keep the colors within the lines and maybe even realize their own artistic talents. Besides, coloring books are fun!
ST Coloring Book is a draw-and-paint program that increases in complexity as your child is able to take on greater challenges. For the preschooler, the ST Coloring Book program contains a series of line drawings that can be colored easily with the smooth mouse interface. Primary school-age children will quickly discover the programs many functions, such as its ability to add lines to an existing drawing or to adjust the colors. ST Coloring Book runs in low resolution only and accepts NEOchrome or DEGAS picture files in compressed or uncompressed format. It was written in GFA BASIC.
ST Coloring Book comes with five black and white screens for you to color in. These screens are in a separate archive file, SCREENS.ARC, on your START disk. If you have a double-sided disk drive, format a double-sided disk and copy COLRBOOK.ARC, SCREENS.ARC and ARCX.TTP onto it. Un-ARC COLRBOOK.ARC and SCREENS.ARC, following the Disk Instructions elsewhere in this issue. If you have a single-sided drive, you must follow these special instructions: Format a new disk and label it "ST Coloring Book" Copy COLRBOOK.ARC and ARCX.TTP onto this disk and un-ARC COLRBOOK.ARC. Now delete (drag to the trash can) COLRBOOK.ARC to free up some space on your Coloring Book disk. (Do not delete this file from your START disk or START backup disk.) Now copy SCREENS.ARC onto the Coloring Book disk, and un-ARC it as usual. When the five PI1 files are on your coloring book disk, you may delete SCREENS.ARC; however, you will probably want to format a data disk for your new, colored pictures.
You can run ST Coloring Book without the PI1 screens; however, MENU.SCR and TITLE.SCR must be in the same directory as COLRBOOK.PRG.
Running ST Coloring Book
Set your monitor to low resolution and double-click on COLRBOOK.PRG. If SCREENI.PI1 is not in the same directory, you will start at the Menu screen. Otherwise SCREEN1.PI1, "DumpTruck," will automatically load. At the top of the screen is your palette of colors. Move your cursor to any color and click. A white line will appear underneath the color you choose. Now move the cursor to where you want the color to be and click again--the truck looks better already. You can change from color to color using the mouse or by pressing the plus (+) or minus (-) keys.
At the top right-hand corner of the screen is a button icon. Move your cursor there and click to return to the Menu screen. At the Menu screen click on DRAW. When you return to the truck, you can put buildings and cars behind it or draw people in the cab.
If you want to draw something from scratch, click on CLEAR at the Menu screen, then click on DRAW. This will take you to a blank screen where you're free to draw any image you can dream up. When you're satisfied with your artwork, return to the Menu screen and click on PAINT PICTURE. Now you can color your drawing. Also at the Menu screen, click on QUIT to return to the GEM Desktop.
The Menu screen gives you access to 10 functions that let you draw and color to your heart's content. In the accompanying sidebar, I've compiled a button-by-button description of each of the functions for fast and easy reference.
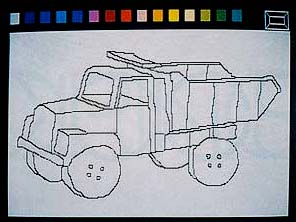 |
| Color me ST! SCREEN1.PI1, "The Dump Truck," is the first of five DEGAS pictures ST Coloring Book automatic- ally loads. At the Menu screen click on DRAW to add cars or buildings to the background. When you're finished draw- ing, click on Paint Picture and start coloring away. |
The Color Palette
From a base of three colors--red, green and blue--ST Coloring Book lets you adjust the palette at the top of the paint screen. Colors can be modified using the number keys. To see how this works, click on any color, then do the following to see how you affect that color:
Reds: Press 7 to lighten; 9 to darken.
Greens: Press 4 to lighten, 6 to darken.
Blues: Press 1 to lighten, 3 to darken.
To remind yourself which keys lighten or darken which color, press the Help key. A list of keyboard commands will be displayed. Press the Escape key to return to the workscreen.
To the right of the palette you'll see the letters R, G and B. Each letter has a corresponding number. The current setting of each color is displayed here. The numbers will change as you adjust the various colors. To toggle between an adjusted palette and the original one, press the letter C.
Changing the Automatic Picture Load
You can stop the ST Coloring Book from loading pictures in two ways. One way is to simply rename SCREEN1.PI1 to SCREENX.PI1. Another way is to delete the SCREENS pictures entirely (be sure that you delete this from your backup copy disk and not the original).
You can also create your own drawings and have them load automatically to ST Coloring Book. The picture must be in either NEOchrome or DEGAS format. Name the files in succession as SCREEN1, SCREEN2, etc., then save the files with either a NEO or PI1 extender, depending on the paint program used.
Wrap-Up
ST Coloring Book is an easy way to teach your child the fundamentals of color and coordination. It's also a way to introduce them to the complexities of a computer. And--who knows?--maybe there's a Picasso lurking within your son or daughter just waiting for the opportunity to show off.
Richard Farrell is a long-time Atari enthusiast who lives in Bloomington, Indiana. This is his first program published in START.
|