ON DISK!
Programming in BASIC
The GFA Menu Builder
by David Plotkin
Make building menus as easy as using them with MENUBILD.ARC on your START disk!
GFA BASIC gives you easy access to GEM drop-down menus. These menus make your programs easy to use and give them the "look and feel" of professional programs.
To include a menu in your application, you must build a special string array, for example Menu_bar$( ), which contains the menu information. Once the proper information has been placed in the string, putting the menu on the screen is simplicity itself:
Menu Menu_bar$( )
Unfortunately, the format of this array is very specific, and if you don't follow it exactly you'll get unexpected results. GFA Menu Builder frees you from the drudgery of setting up menu bars by letting you design your menus right on the screen. Menu Builder then writes the code you need to set up and handle your menu. With your menu bar out of the way, you can concentrate your efforts on the important aspects of programming.
Using GFA Menu Builder
Copy ARCX.TTP and MENUBILD.ARC to a blank, formatted disk and un-ARC the file, following the Disk Instructions elsewhere in this issue. The source code for Menu Builder is in the file MENUBILD.LST; you can print it out by double-clicking on it from the Desktop. To load it into GFA BASIC, run GFA and click on Merge. To run the program, doubleclick on MENUBILD.PRG in medium or high resolution.
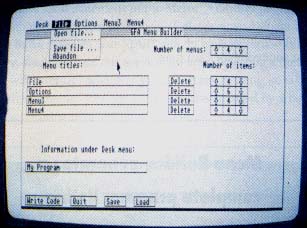
The words in the menu line at the top of the screen (initially Desk, Menu1, Menu2, Menu3 and Menu4) are called titles, while the items that drop down when you move the mouse up to each title are called items. Initially, each set of items under a title are Item1, Item2, etc.
At the top right side of the screen are the buttons that let you set the number of menus. Click on the Up or Down arrows to increase or decrease this number. (GFA BASIC limits you to six menus.)
Below this are the individual menu controls. There is one line for each of the menu titles at the top of the screen. The Menu title boxes show the current titles. To change a menu title, simply click in the box and type the menu name in the dialog box that comes up, pressing Return when you're done. If you type in more than nine letters, the title will be truncated. If you press Return without entering any information the title will not be changed.
You can also swap the positions of menus and their associated items. Point to the title box you want to swap and hold down the left mouse button. When a dotted box appears, drag the box so that the upper left corner of it is over the title box you want to swap with, then release the left mouse button. If the title box is dragged somewhere on the screen which is not over another title box, nothing will happen.
To the right of the menu title box is the DELETE button. Click on this button and the menu title (and all associated items) will be removed. On the right of the Delete button are the controls for the menu items. Click on the Up or Down arrows to increase or decrease the number of items. The maximum number of menu items is 10; the minimum is 1.
To change a menu item, move the mouse pointer up to the title and select the item you want to change just as you would select a menu item. Type in the new name and press Return; the longest the item can be is 15 letters.
You have access to desk accessories when using Menu Builder. However, you cannot change the item names in the Desk menu. To change the first item under the Desk menu (usually "About My Program"), click on the box under "Information under Desk menu:"
Click on Save to save your current settings, then type in a filename using the extension .MBX. This file is readable only by Menu Builder. To load a file, click on the Load button, then type in the filename. The Quit button exits the program. Finally, the Write Code button will write a GFA BASIC listing to disk that sets up your menu and calls a procedure to handle the menu. When you select this option, save the file with the extender.LST.
Using Your Custom Menu in a Program
To load the code into GFA BASIC, run GFA and click on Merge, then select the filename. If you already have a program in memory, the new code will be merged where your cursor is. Menu Builder creates two main subroutines: Build_ menu_bar and Menu_handler. Build_menu_bar kills any previous menu in memory, reads your menu titles and items from data statements and stores them in the array Menu_ bar$. Menu Menu_bar$( ) makes this list the current menu bar.
The procedure Menu_handler first puts the name of the item selected in Menu_option$; it then sets up a series of If . . . Endif statements to handle each of your menu bar items. For example, if one of your menu items is "Quit" the code to handle that item would be:
If Menu_option$="Quit"
  'put your code for Quit here
Endif
In effect, this is a shell for you to fill in; between each If . . . Endif statement you'll need to type in the action your program should take. Often you will want to replace the comment line with a Gosub statement; other times you will only need a few lines of code. This is how you might fill in the above example:
If Menu_option$="Quit"
Alert 1,"Really Quit?"1,"Ok|Cancel",B
  If B =1
    End
  Endif
Endif
Menu Builder also includes these statements at the top of the code:
Gosub Build_menu_bar
On Menu Gosub Menu_Handler
Do
  On Menu
Loop
Gosub Build_menu_bar initializes the menu bar; On Menu Gosub Menu_Handler tells GFA where to go when one of the drop-down menus is selected. On Menu enables event trapping; it is inside an endless loop because the message buffer is continually updated and we want to make sure the Menu_handler routine responds to the correct event. If you do not use the command On Menu, Menu_handler will never be called.
 |
| Menu Builder makes setting up a menu as easy as using one; simply click on a drop-down menu item and type in the name for your menu item. Menu Builder will create the program list- ing you need to set up and respond to the menu. |
The program listing that Menu Builder generates is complete and could even run as a standalone program. (However, if you do this, none of the menu items you click on will do anything so you won't even be allowed to Quit out of the program.) START recommends that you use Menu Builder before you do anything else and then use Menu Builder's code as a frame for your own program.
If you decide later to change the menu options, simply modify the data statements in the Build_menu_bar subroutine. The first word in a data statement is the menu tide and the last element in a data statement must be a null (""); everything between these two will be menu items. You can change the number of menus or the number of items in a menu without changing anything else in Build_menu_bar; the only restriction is that Data * * * must be the last Data line. You will need to modify Menu_handler to include If . . . Endif statements for any new items.
Multiple Menus
You may want to change the menu bar while the program is running, for example, to give users a submenu. Generalized Input Routines, this issue's companion GFA BASIC program, does this often.
Run Menu Builder as before, setting up the titles and items of the second menu set. Click on Write Code and then type in a new .LST filename. Quit Menu Builder and run GFA BASIC. Merge in the code you just created. Get rid of everything except the If . . . Endif statements and the data statements and then save what's left in ASCII format (GFA's Save,A option). Load your program and then merge in the new code. Use GFA BASIC's Block features to move the If . . . Then statements inside the Menu_handler procedure and the data statements right after the data statements in the Build_menu_bar procedure. Finally, insert a new label directly above the new Data statements, for example, M_data_2:.
You will also need to make a few modifications to the code. First, move the statement Dim Menu_bar$(150) out of the Build_menu_bar procedure to a place in the program that will be executed only once. This could be an initialization subroutine or simply one of the first lines in the program--as long as it's before Build_menu_bar is called. Next, get rid of the statement Restore Main_list_menu_data in Build_menu_bar. Now you can call Build_menu_bar as many times as you like. Simply Restore whichever dataset you want to set up before you call the procedure:
Restore Main_list_menu_data
Gosub Build_menu_bar
Notice that the procedure Menu_handler takes care of all menu bar activity, no matter which menu you are using. This won't cause you any problems unless two menus contain the same item name. If this is the case, you may want to set up another menu handler procedure, and invoke it with On Menu Gosub when you change menus.
Get Organized
The code for Menu Builder is highly structured and very well commented, so it shouldn't be too hard for you to follow. The whole program is driven by the On Menu command, jumping to the appropriate Procedure when necessary. This is pretty much the most straightforward way to write an application in GFA BASIC.
The use of branching to self-contained Procedures also makes it easy to follow. Now Menu Builder will make all your programs this elegant!
Dave Plotkin is an engineer for Chevron US.A., and is the author of START's "Mac and PC on the ST" column.Products Mentioned
GFA BASIC Ver. 2.0, $79.95. MichTron, 576 Telegraph, Pontiac, MI 48053, (313) 334-5700.