ON DISK!
ST MICROSCOPE
by Ron Shaefer, M.D. ond Kathy Shaefer, M.D.
ST Microscope simulates a real-world microscope--you can explore what's happening on the smaller side of life. Study the slides on your START disk of a neuron and a blood smear or create your own slides. ST Microscope works in low resolution only.
Zoom in on the unseen! Files MICRO1.ARC and MICR02.ARC on your START disk.
The idea for ST Microscope came from a visit I had with Kim Bridges at the University of Hawaii. He told me of his plans to create a computer-simulated microscope as a teaching tool. This program would be able to teach his introductory plant biology students the fundamentals of microscopy. Through a grant from Hewlett-Packard, Dr Bridges had available several of H-P's high-powered Bobcat work stations. But the idea intrigued my wife and me, so I decided to see what our ST could do. ST Microscope is the happy result.
Running The Program
The ST Microscope files are on your START disk compressed into two separate archive files. MICRO1.ARC contains the program, source code, title screen and neuron slide files. MICR02.ARC contains the blood smear slide files. UN-ARC these files onto separate disks, following the Disk Instructions elsewhere in this issue. Delete ARCX.TTP and MICRO1.ARC from the MICRO1 disk and then copy over the SMEAR files. When you're finished, set your ST to low resolution and double-click on MICRO.PRG. MICRO.LST is an ASCII listing of the program; to examine it, double-click on the file icon from the Desktop and then click on Show or Print. To load the file into GFA BASIC, run GFA and click on Merge, then select MICRO.LST.
ST Microscope reads simulated microscope files from disk. Each slide; requires a data file with the extender .LST and four low-resolution picture files, which can be in either compressed (.PC1) or uncompressed (.PI1) DEGAS format. I recommend that you create a folder called SLIDES and copy all of the picture files to it. MICRO.PRG and MICRO.LST can be outside this folder. ST Microscope will first look in the SLIDES folder for MICRO.PC1, its workscreen picture; if it doesn't find it there it will look for it in the same directory as MICRO.PRG. If it still can't find it, a file selector box will appear and you can then specify its path. Wherever ST Microscope finds MICRO.PC1 will be treated as the default directory for the slide files.
Getting Started
To use the program double-click on MICRO.PRG in low resolution. Now load a slide file with an .LST extender by clicking on the LOAD button found in the lower right portion of the screen. Choose a file with the file selector and the slide files will load into memory. Welcome to the microscopic world!
What You See. . .
The screen is divided into four major sections. The upper left section is the enlarged microscopic image and the upper right contains the microscope controls. Text is displayed in the lower left section and the lower right section contains the main program controls.
The microscope controls consist of the Move Buttons, Magnification Buttons and the Position Indicator. The Move Buttons control which portion of the slide is visible; this is analogous to adjusting the position of the slide under a microscope. Just click on the large arrow pointing in the direction that you want the microscope to move. The box in the middle of the arrows will center the image. These buttons will only work when they are highlighted in green--you can only move the slide around in magnifications between 250x and 1000x.
The Position Indicator shows a representation of the entire microscope slide and what portion of the slide you are looking at. A tone tells you when you reach the edge of a slide.
The Magnification Buttons (small up and down arrows) increase or decrease the magnification. The magnifications available are 5x, 250x, 500x, 1000x, 2000x, 4000x and 8000x. If you are at one of the extremes of magnification the appropriate arrow will turn red, indicating that you can't go any further. For magnifications over 1000x the computer pauses as it calculates the image. If you later return to the same magnification (without moving the slide) the computer will not need to redo the calculations.
Program Options
The HELP button gives you basic instructions on how to use the program.
The INFO button is a programming tool that will be of great use if you're creating your own ST Microscope slides. When you click on INFO, the mouse turns to an open crosshair and tells you the X and Y coordinates (SX,SY) of the upper left corner of the DEGAS picture file that's clipped and displayed in the microscope image area. If you click the left mouse button the coordinates of the mouse's pointer (MX,MY) and the Color Index Number of that position will be displayed. I'll explain what that means below.
The LOAD button allows you to select an index data file (with an .LST extender) for a set of slides. The program will then load the four picture files associated with the index data file; each picture shows a different magnification. For example, the slide set on your START disk called SMEAR consists of SMEAR.LST, SMEAR.PI1 (the lowest magnification of the picture and a small picture that displays the position indicator), SMEAR_l.PI1 (250x magnification), SMEAR_2.PI1 (500x magnification) and SMEAR_3.PI1 (1000x magnification). The ST will calculate higher magnifications.
The QUIT button ends the program.
X Marks The Spot
When the mouse cursor is on the image area it will turn from a pointing finger into a thin crosshair. If you left-click while using a magnification greater than 5x, the program will print the name of the object under the crosshair along with several lines of information about that object.
How To Make Your Own Slides
Now, on to the creative process. You can create a slide of any topic--for yourself, your students or just for fun. The first step is to decide what your slide will look like. (We suggest going to the library and checking out a book on microscopy for some inspiration.) Now sit down with paper and pencil and sketch out what you would like your four picture files to look like. Load the sample files on your START disk into your paint program to examine their format. You may use any paint program that will save your pictures as DEGAS files.
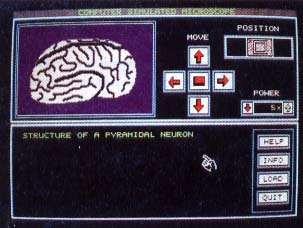 |
ST Microscope representation of a neuron, magnifica- tion 5x. ST Micro- scope works with any .PI1 ar.PC1 picture files. It could just as easily be used as an electronic telescope! |
When creating our slides we made extensive use of DEGAS Elite's block copying and sizing options. If you have access to a video digitizer or a printer scan digitizer you can speed this process up considerably. The magnification powers are somewhat arbitrary; don't feel you have to adhere to them exactly. For example, the program should work equally as well as a simulated telescope with pictures of a galaxy magnified into a star field, then a solar system and finally into a single planet. Pictures may be saved in either normal or compressed DEGAS format. The file names, however, must be consistent; the lowest magnification picture must have a file name of no more than six characters (e.g. NEURON.PIl); subsequent pictures in a set add an underscore and a number to the file name (ea. NEURON_l.PI1, NEURON_2.PIl, etc.).
Each object you wish to identify in your slides must have a unique color index, since ST Microscope uses the color index to identify different objects. The 16 colors in low resolution on the Atari ST are each assigned a different color index numbered 0-15; 0 is reserved for the background color of black. You can use the other 15 distinct colors in your slides. Because ST Microscope uses the color index and not the shade of color to identify objects, two colors can be set to the exact same shade and still be distinguished from each other by the program. For instance, in the human blood smear slide there are four reds in the palette of 15 colors, but only three different shades of red. Colors 7, 8 and 9 are different shades, but color 3 is the same shade as color 7. You can also have different color indexes represent the same object, for example, colors 3, 8 and 9 all represent a red blood cell.
| ||
|
Figure 1: A portion of the SMEAR.LST file. Each line begins with an apostrophe and a comma, followed by the Color Index Number, another comma and the text for that object. |
You can create your own ST Microscope color index file with any word processor that has an ASCII (text) mode; alternately, you can create one using the GFA BASIC interpreter itself. For an example of how to set up a data file, examine SMEAR.LST and Figure 1, which shows a portion of that file. The first characters of each line must be a single quote and a comma [',] and the first line of the file is the slide title. Following are three lines of color information and text for each object on the slide corresponding to that color. These lines also start with a single quote and a comma, followed by the color index number (1-15), another comma and the text to be displayed when you select that object. Keep your text less than 40 characters long, so that it will fit in the text box properly.
The first 45 lines after the title (15 colors by 3 lines of text each) are the color index and text for the pictures representing magnifications of 250x and 500x. The next 45 lines use the same format for the picture representing magnification of 1000x. Note: Each file must consist of exactly 91 lines--the title and two sets of 45 lines each of data. Because commas are used to separate the data, do not use them in your text or you will hopelessly confuse the program. If you don't want any text to be displayed with an object or if your text is less than three lines long, just put a period in place of the text [',5,.].
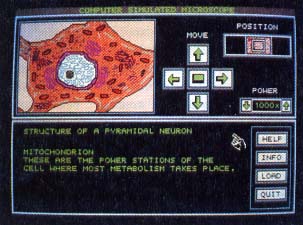 |
ST Microscope mag- nification of a neuron, magnification 1000x. You supply the pic- tures for magnifica- tions of 5x 250x, 500x and 1000x; your ST calculates the higher magnification images. |
Where To Get More Slides
We realize that the process of creating new slides is somewhat involved. We have created three slides--a human neuron, a human blood smear and a housefly. Due to space constraints only the first two of these are on your STARI disk, so we would like to offer our services as librarians and compile a collection of different ST Microscope slides. Send us a disk with your own slide pictures and data and a self-addressed, stamped disk mailer and we will send it back filled with the best slide pictures and data that we have received.
Please send your disks to: Schaefer Supergraphics, c/o Ron Schaefer M.D., 1201 Wilder Ave #1801, Honolulu, Hawaii 96822, phone (808) 523-3353.
Ron and Kathy Shaefer are M.D.'s specializing in internal medicine. They live and practice in Honolulu, HI.