Getting Started
A Primer On Hard Drives, Part II
by Scot TumIin
Last issue, we discussed hard drive basics and how to choose a hard drive for your ST system. In this issue, we'll explain how to install that hard drive and put it to work.
Getting It Going
Attaching a hard drive to your ST is simple--you simply plug the interface cable (included with the drive) into your ST's DMA port (identified with the icon shown in Figure 1) then plug the drives power cord into a 110-volt outlet or power strip. The drive should be located in a dust-free area, preferably out of direct sunlight.
The next step is to prepare the hard drive to store data and open a communications link between it and your ST. All commercial ST hard drives include a start-up-or "boot" --program either on a floppy disk or already installed on the hard drive. If the latter, then your drive is said to be "self-booting."
When booting your ST system with a hard drive for the first time, first turn on all of the hardware except the computer and then insert the disk that came with your hard drive into Drive A. When first turned on, a hard drive makes an unusual sound as its internal cooling fan spins and the platter gets up to speed. (Some liken it to a refrigerator or coffee percolator; to me, it sounds like the Tasmanian Devil from the Bugs Bunny cartoons.) Don't be alarmed--the sound will level off and you may then turn on your ST.
 |
| Figure 1. This icon on the back of your ST or Mega identifies the DMA (Direct Memory Access) port. Your hard drive cable will plug in here. |
After a few moments the GEM Desktop will appear on your screen. At this point your ST can communicate with your hard drive, but you cant. You'll probably see only the disk icons for the A and B drives, but none for the hard drive. Before you can use your hard drive, you have to format it (and partition it if you want to divide it up into separate sections).
Installation Programs
Every hard disk drive comes with its own formatting and partitioning program. The program for an Atari hard drive is named HDX.PRG. (Editor's note: As of press time, Atari has a revised installation program undergoing beta testing; it will probably have a different file name when released.) We'll use the Atari program as a model; although other programs will differ in details, the procedures are pretty much the same.
Formatting a hard drive means much the same as it does for a floppy drive--in simple terms, it organizes the magnetic surface into sections that the read/write heads can locate. A formatting program will be included with the floppy disk that comes with your hard drive--just follow the instructions and screen prompts that come with the drive. Once formatted, you can save and load files to and from your hard drive just as you would a floppy--but with much greater speed, of course.
After the drive is formatted, you have to decide if you want to partition it and if so, how. For example, you could divide your 20-megabyte hard drive into four separate five-megabyte storage areas, each with its own disk icon (C, D, E, F, for example). These electronic divisions of a single physical drive are called logical drives. To your ST's operating system, they appear to be four separate hard drives. This is useful for two reasons. First, searching for a single file through twenty megabytes of files in a single directory can be a chore. Second, it is useful to group applications and their associated files on a separate logical drive, such as word processing on drive C and graphics on drive D. Figure 2 shows one of the partitioning dialog boxes from the Atari installation program.
Follow the instructions for partitioning that came with your drive exactly and the program will make the appropriate magnetic divisions of your hard disk. Then you should use the installation program's Zero option (if it has one) to write zeroes into the hard disk's directories to clear out any garbage that may have snuck in during the earlier processes. (This can also be used to erase the directory of a partition later on without having to format the entire disk.)
Finally, the installation program will have a Mark Bad option that tests every sector of your newly formatted, partitioned and zeroed hard drive, just to make sure that everything's O.K. Any bad sectors the program finds will be marked as unavailable in the hard disk file allocation table and you will avoid writing good data to a bad sector later on.
Access From The Desktop
Once you've completed the installation program's procedures, you may think you are done, but you're not. In order for you to access your hard drive from the Desktop, you will have to install a disk icon for each partition. Highlight either the A or B floppy disk icon by clicking on it once and then click on "Install Disk Drive" from the Options drop-down menu. A dialog box will appear requesting the identifier for the drive and the icon label. Enter any capital letter between C and P as an identifier. This will be the drive identifier you use in specifying a pathname (i.e, C:\filename). Don't use lowercase letters; a lowercase "c" for example, is the system identifier for the cartridge port.
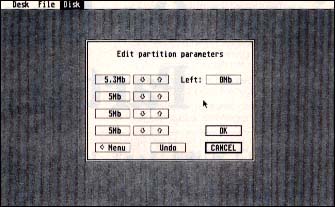 |
Figure 3. Periodically backing up your hard disk files is a neces- sity. It's not that hard disks fail that often-- it's just that the results of a single failure can be catastrophic! |
The Icon label is the line of text that will appear underneath the disk icon on the Desktop. Just type whatever words you want to use to identify this particular partition, such as "Hard Drive," "Work Disk" or whatever. Clicking on Install will close the dialog box and a drive icon will appear on the Desktop representing one partition of your new hard drive. Now repeat this operation for each partition you created, changing the drive identifier to match the partition. Each of these hard drive icons can now be accessed just like your floppy disk icons.
Your last step is to save your Desktop. You may want to rearrange your new collection of icons and windows into a more logical or pleasing arrangement before saving the Desktop. Unless your hard drive is self-booting, you will need to insert your usual floppy boot disk in Drive A and make sure that drive A's window is active (it has the shaded bar at the top). Go back to the Options menu and select Save Desktop. This will save your new set of icons in the file called "DESKTOP.INF" on your boot disk. If you don't save your Desktop with the hard drive icons, then the icons won't appear the next time you boot up your ST system and you'll have to install them all over again.
It is inconvenient to have to insert the same floppy disk to boot your computer every time; that's why self-booting programs were written. Depending on your make and type of hard drive, you may need to obtain another program from your dealer, the drive manufacturer or from an online service. Some manufacturer's installation programs have this option as part of their installation program. If it's there, use it. To selfboot a hard drive using the (current) Atari software, you have to run an additional program that does not come with the drive. Ask your dealer for help.
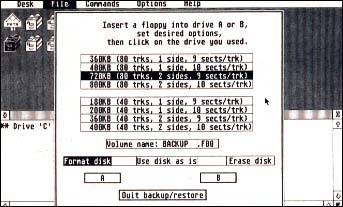 |
Figure 2. Partitioning your hard drive di- vides the single physi- cal drive into two or more logical drives. Only your computer can tell they're there. |
Parking Your Heads (Huh?)
For hard drive owners, there are two utilities that are priceless: a head parking utility and a hard drive backup program. The first of these will come with the hard drive (called PARK.PRG, SHIP.PRG or a similar name) and the second might. Before you leave your dealer with your new hard drive, ask for a recommendation and take a good backup program home with you that day!
A head parking utility allows you to park--or move--your hard drive's heads off the magnetic platter to a safe location. This prevents head crashes from moving your hard drive or even from bumping into your computer table. (Some hard drives are self-parking--they automatically park themselves whenever you shut off their power. Check your manual.)
You'll use a hard drive backup program to archive all the information you've saved on your hard drive by transferring it to floppy disks. Figure 3 shows a typical backup program dialog; this program is MichTron's Backup!. It may take dozens of doppies to save all of your files, but weigh this inconvenience against the altemative--if your hard drive crashes, do you really want to lose 20 or more megabytes of important (and possibly irreplaceable) information? I thought not!
Conclusion
To sum up, a hard disk drive is an excellent hardware addition for your ST system. Although they may seem some what expensive (they start around $600), once you buy one, you'll quickly become spoiled by their storage space, speed and convenience.
In fact, after using a hard drive for a few weeks, you'll wonder how you ever got along without it!
Scot Tumlin is in charge of Direct Mail Services and Software Technical Support for Antic Publishing.
Product Information
HDX.PRG and SHIP.PRG, free with purchase of an Atari hard drive. Atari , Inc., 1196 Borregas Ave., Sunnyvale, CA 94088, (408) 745-2000.
Backup!, $39.95. MichTron, Inc., 576 S. Telegraph, Pontiac, MI 48053, (313) 334-5700.