Atari unleashes four megabytes of power
by Jon A. Bell and Patrick Bass
They're here-Atari's new Mega personal computers! Join us as we take you on an indepth journey into the heart of the Mega. We'll reveal the inside story and clear up some misconceptions surrounding this long-awaited machine.
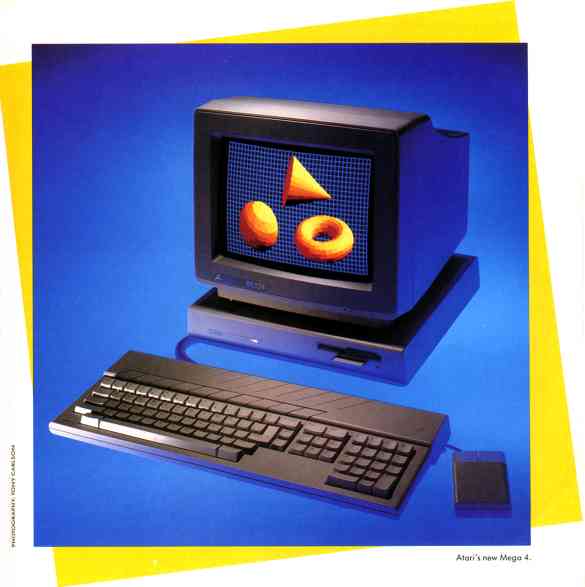
We caught our first glimpse of Atari's newest computer at the january 1987 Consumer Electronics Show in Las Vegas. There, sitting on a glossy black countertop, flanked by a prototype Atari Laser Printer and surrounded by an honor guard of Atari officials, was a Mega 4.
The Mega computers are the newest incarnations of Atari's two-year-old ST line. Atari listened to the criticisms many owners had with the original 520 ST and the later 1040 ST, and incorporated their ideas and suggestions into the design of the new Megas.
Since they first appeared in January, the Megas have been the focus of a storm of speculation and rumor-mongering. Anxious members of the Atari community have worried about just how much was new in the Mega. Would it run current software? What about the blitter chip everyone had heard about? And increased resolution? Would there be card slots? Most of all, would the Mega make a 520 or 1040 worthless?
Some things are still the same. The Megas still use the Motorola 68000 processor; GEM is still the operating system, and the Megas still run the entire range of ST software. You can still connect almost anything to a Mega-be it a mouse, modem, printer, joystick, hard disk or MIDI synthesizer. The Megas still offer Atari's crisp, clear color or monochrome graphics in the same low medium and high resolutions.
But there are changes-some subtle, some dramatic. A Mega has a detached keyboard with a better feel, it's got a lower profile, and there's the quiet but noticeable whir of a fan inside. Most significantly, a Mega has two or four megabytes of memory inside (far more than an ordinary 520 or 1040 ST), a battery-backed clock and a blitter-a custom-designed chip that can greatly speed up some graphics and text operations.
How new is this long-awaited addition to the ST line? Let's find out by taking a close look at the Mega- from the outside in.
FIRST LOOK
As you can see from the photo, the Mega is no longer a one-piece computer.
The computer itself is now a slim flat box, and the keyboard connects to
it with a coiled cable. It looks something like a sleek, trim version of
an IBM PC, in the same dove-grey plastic as the earlier STs.
The computer is less than three inches high and about 13 inches square -just the right size to support an Atari monitor. There's a double row of cooling vents on top, and the Mega's internal 31/2 inch double-sided disk drive opens conveniently to the front of the box.
(Also on the front of the box is a label that may change soon. Our review version is labeled MEGA ST4, but according to Neil Harris, Atari's director of public relations, in the future Atari will simply call these computers Megas, not Mega STs.)
As on the 520 and 1040 ST, there's cartridge port on the left side of the Mega. The keyboard's coiled cable connects right next to the cartridge port (which may make some cartridges unusable with the Mega, particularly the L-shaped cartridges favored by Navarone Industries).
There's also a small compartment near the cooling vents for a pair of AA batteries for the Mega's internal clock. Because it's battery-backed, the Mega's clock will remember the time even when the computer's power is off. AA batteries won't last as long as the rechargeable batteries used in some clocks. On the other hand, they're inexpensive and easily available-you'll never have trouble getting new batteries for your Mega.
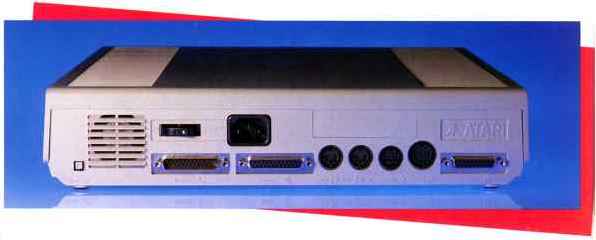
FIGURE 1. The back of the Mega. From left to right: the reset
button, exhaust port for the internal fan, On/Off switch (top), modem port
(below), power jack (top), printer port (below), expansion board cable
access (top), MIDI Out, MIDI In, monitor port, floppy disk port, hard disk
port.
THE BACK PANEL
On the back panel of the Mega, you'll find the ten connectors familiar
to every ST owner- ports for almost every purpose, as you can see from
Figure 1:
- The Reset button. Its positioning lets you reach around the right side of the Mega to do a warm boot.
- The On/Off switch.
- The Modem port. This is a standard RS-232C serial port, with a male DB25 connector.
- The Powerjack.
- The Printer port. It's an IBM-standard parallel printer port, with a female DB-25 connector
- The MIDI Out port. This lets you connect the Mega to a MIDI synthesizer or other musical instrument.
- The MID! In port.
- The Monitor port. A Mega uses an Atari SM124 monochrome or SC1224 color monitor (but not a composite video monitor).
- The Floppy Disk port. You can connect an external drive B, either single or double sided.
some changes in the
Mega-some subtle,
some dramatic.
- The Hard Disk port. Actually, it's for an Atari hard disk or any other Atari DMA port device-including the Atari Laser Printer
There are also two new items on the back of the Mega. One is the
exhaust vent for the onboard fan. Why a fan on the Mega, when the 520 and
1040 got along fine without one? Perhaps because the Mega has ample space
inside for additional hardware that could produce additional heat-including
special expansion circuit boards.
And just above the MIDI In and MIDI Out connectors is a removable plastic plate, with a removable metal plate right behind it. That's where the cable from an expansion board can leave the Mega to connect to the outside world. As you'll see in Figure 4, the opening is directly in line with a connector on the Mega's main circuit board.
THE KEYBOARD
The Mega's detached keyboard is approximately 20 inches wide and 71/2
inches deep. Since the keyboard itself has a minimum of electronic hardware,
there's no need for the diagonal cooling vents of the 520 and 1040. and
they've been eliminated on the Mega. The key arrangement, including the
function keys and keypad, is unchanged from earlier STs.
On the underside of the keyboard (see Figure 2) you'll find the mouse and joystick ports. The connectors are in recessed areas similar to the one on a 1040. Centered at the back is Port 0- the mouse port. A grooved slot runs from the port to the right side of the keyboard; if you're right handed, you can run the mouse's cord under the keyboard. The back of the port area is open, so if you're left-handed you can loop the mouse cord out to the left side.
Off to one side is another recessed area for Port 1, the joystick port. Since it sits so close to the left side of the keyboard, it's easy to run the joystick's cord out the back of the keyboard to either the left or right side.
The Mega's keyboard sports another useful new feature: legs. The legs are a pair of 21/2-inch wide plastic tabs, hinged at the back, on each side of the keyboard. You can rotate these down and out, locking them into place. This raises the back of the keyboard and changes the typing angle. The difference in angle is small, but if you're accustomed to an inclined keyboard, the change can be important.
When the legs are extended and the keyboard raised, it's a little awkward to reach over the keyboard to put a disk in the Mega's internal disk drive, In fact, if the keyboard sits too close to the computer it's hard to use the disk drive even without the legs extended. If you prefer sitting close to your monitor, one solution is to raise the computer by putting it on a platform- or by stacking it on top of Atari's new 20-megabyte hard drive, the SH205, which has a case the same size as the Mega.
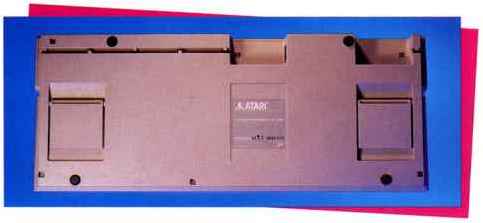
FIGURE 2. The underside of the Mega keyboard. At the top center
and right are the mouse and joystick ports. Below, at the sides, are the
keyboard feet.
KEYBOARD FEEL
Probably the most criticized aspect of the original STs was the feel
of their keyboards. Both the 520 and 1040 ST have keyboards with a very
soft, "mushy" feel. The reason? Instead of springs, these keyboards use
small rubber cups under the keys. The result is a spongy feel, with virtually
no tactile feedback.
Many ST owners clamored for a crisper feel, and for the Mega Atari listened to the criticism and changed the keyboard hardware. Gone are the mushy rubber cups; they've been replaced by the traditional springs of a standard computer keyboard. The difference in keyboard feel is dramatic. The keyboard is firmer, and gives a solid feel. Though it's not the "Selectric-style" keyboard that some typists prefer, it was still voted a welcome improvement by every member of the START staff who tried it.
Keyboard feel is highly subjective, of course. Some people like firm keyboards, some prefer soft, and some don't care. Most people can grow accustomed to any keyboard they have to type on. But the consensus on the Mega keyboard was clear: Use it for a week and you'll never want to go back to your original ST keyboard.
Unfortunately, Atari has no plans to offer an improved keyboard as an upgrade to 520 and 1040 owners. It's also not practical to acquire a Mega keyboard and install it in your 520 or 1040; the Mega's keyboard connector is different from the 520's, and the new keyboard simply won't fit in a 1040.
JUST THE FACTS, MA'AM
So much for the outside of the Mega. Inside -well, like all computers,
the Mega really has two insides.
The first inside is from the programmer's point of view- and here, there's nothing but good news. While the Mega has been completely redesigned, it's still basically an ST. It's completely compatible with existing software produced for the original 520 and 1040 ST computers.
The only exceptions are programs that don't follow Atari's software development guidelines. These mostly fall into two categories: programs that make "illegal" program calls to the TOS operating system, and programs that use special disk copy-protection schemes. Because there's a new set of ROMs in the Mega, some parts of TOS have changed, and programmers who improperly accessed ROM routines directly may find that their software will no longer work- or won't work correctly. However all hardware addresses have remained the same.
Some copy-protection systems depend on disk drives that can read more than 80 tracks. Atari has discouraged using those extra tracks, and programs that use that style of copy protection (most commonly games) may not work on some Atari disk drives, including the Mega's.
We tested the Mega 4 with a wide range of commercial software. Though some software couldn't take advantage of the full four megabytes of memory, we had no significant problem with any major software package.
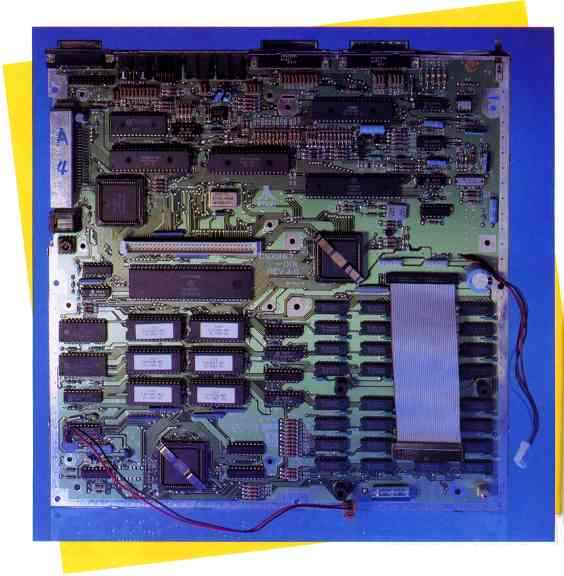
FIGURE 3. The Mega 4 motherboard.
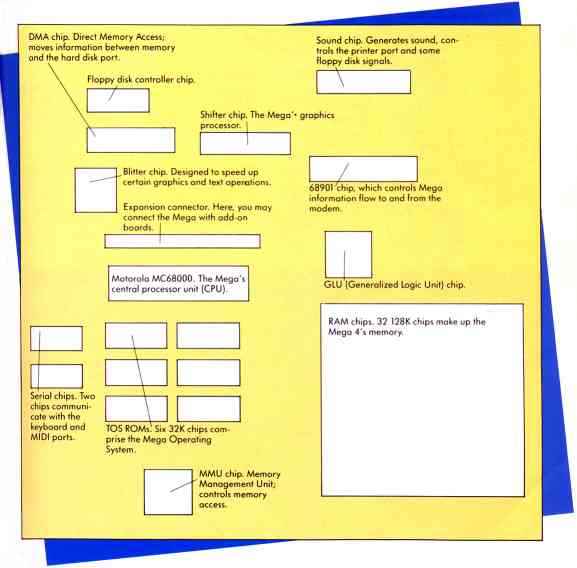
FIGURE 4. Mega 4 chip identification chart.
UNDER THE HOOD
The other inside of the Mega is what's physically inside the computer
Shortly after we received our Mega, the START staff put on our coveralls
and lifted the hood on this machine.
Warning: The following examination of the Mega's internal hardware is presented for your information only. We do not recommend that you open up your Mega. Unless you want to risk voiding the warranty on your computer,just read-please don't practice. START Magazine cannot be responsible for any damage you might do to your computer if you open it.
We began our dissection by disconnecting all the cables from our Mega. Nine screws hold the top and bottom shell together; when they're removed and the battery wire is disconnected, the top shell lifts off. Next we removed the metal radio-frequency shielding (required by the FCC for any electronic device that might interfere with radio or television reception), and the Mega's internal disk drive (which is held in place by three more screws and two connecting cables).
We also removed the two screws from the front feet of the power supply, disconnected the cord where it plugs into the motherboard and lifted the power supply out. The power switch and fan come with the power supply board.
That gave us a clear view of the Mega's main circuit board - the motherboard
in Figure 3. The Mega motherboard measures 12x12 1/8 inches, with 67 integrated
circuits- 32 RAM chips and 35 other ICs. Most of the components are soldered,
though some are socketed. The board on our Mega was identified as a Revision
4 board. We'll
travel around it, starting at the right front, using the Mega chip
identification chart in Figure 4. as our guide.
REMEMBER ME ONLY WITH THINE CHIPS
Taking up almost the entire right-hand front of the motherboard are
the 32 memory chips that make up the Mega 4's four megabytes of RAM. Each
chip holds one million bits of memory With eight bits to a byte, that means
each column of eight chips holds one megabyte, and four columns make four
megabytes. The next chip of any distinction is the square one at front
left center. This is the Memory Management Unit (MMU), which controls memory
access and what type of memory can live where. To its left is the section
of the motherboard where the real-time clock is located, discernable because
the wires from the battery compartment are connected here.
Directly behind the MMU is a bank of six rectangular ROMs-that's TOS, the standard 192K operating system the Mega powers up with. They contain everything that's not in a program, from system-level operating routines to graphics routines that support the blitter chip.
To the left of the ROMs are two chips almost as large. These are two identical serial communications chips, one for communicating with the computer in the keyboard, and the other for communicating with the MIDI port.
THE BRAINS OF THIS OUTFIT
Directly behind the ROMs is the largest chip on the motherboard. This
is the "brain" of the Mega, the Motorola MC68000. This is the nerve center,
directing the swarm of signals inside the Mega into a usable order, and
its 64 pins connect to virtually every function in the Mega.
Directly behind the 68000 is one of the more interesting things to appear on the Mega-an expansion connector. With this connector, it's possible to plug in cards or other enhancements that Atari or other developers may create for the Mega. Coprocessors, increased resolution graphics, and special interface boards are among the possibilities.
Notice that the expansion connector is right in line with the slide-out opening on the back of the Mega-it's designed to easily run an expansion cable to the outside world.
Behind and to the left of the expansion connector is the square Blitter
(Block-Bit Operator). The blitter is designed for quickly moving large
chunks of information from one section of memory to another It was specifically
created to speed up movement of screen images-although it can work with
any memory. With the blitter, everything from video games to GEM-based
text windows move faster The blitter chip will eventually be offered as
an upgrade for 520 and 1040 ST computers. In the meantime, Alex Leavens
takes a look at the blitter in the sidebar accompanying this article.
clock will remember
the time even when
the power is off.
Directly behind the blitter chip is the DMA (Direct Memory Access) chip. The DMA chip operates much like the blitter, but the DMA chip moves information between memory and the Hard Disk port as quickly as possible. How quickly? Atari claims up to a megabyte per second.
A COLORFUL, SHIFTY CHARACTER
To the right of the DMA chip is the video Shifter chip, the Mega's
graphics processor. which creates low, medium and high resolution graphics.
The Shifter creates the 640x 400 monochrome signal for the SM124 monitor,
as well as 640x 200 4-color or 320 x 200 16-color graphics on the SC1224
RGB monitor There's no composite video signal available on the Mega's motherboard.
In back of the DMA chip is the floppy disk controller- it's functionally identical to a Western Digital WD-1772. This controller gets instructions from the 68000, then tells the internal and external disk drives what to do. Just to the right and a little in front of
the Shifter is the rectangular 68901, a sort of traffic-cop chip that handles a multitude of special signals in the Mega. It can generate, enable or disable interrupts; contains countdown and event timers and bus converters; and controls all information flow into and out of the modem port.
THE GLUE FACTORY
Directly in front of the 68901 is the square GLU chip. GLU stands for
"generalized logic unit," but the acronym is appropriate-this chip contains
much of the logic hardware needed to electrically "glue" the other chips
together and provide the proper timing and sequence information.
And here's our last chip stop: Directly behind the 68901 is the Mega's sound chip, functionally identical to the General Instruments AY-3-8910. No, it's not a high-powered synthesizer chip, as some newer computers have. However, it is a proven, rock-solid performer that can reproduce sound from 30 cycles per second up to beyond the range of hearing. Besides, it also contains a pair of onboard parallel I/O ports, which are used in the Mega for controlling the printer port and certain floppy disk signals.
ANY PORT IN A STORM
Around the perimeter of the motherboard are the Mega's connectors and
ports. We've seen them from the outside, but they look a little different
from in here.
Starting in the left front of the motherboard, we find two wires leading from the board itself off into space. This is the power supply cord from the battery compartment to the clock section of the motherboard. Farther up the left side is the keyboard connector. This is a six-connection, crimp-plug-type connector where the coiled keyboard cable plugs in. It resembles a modular telephone plug, but please don't plug it into a telephone jack!
Next up the left side we find the cartridge connector. This 40-pin card connector brings out many address-bus signals- most notably missing is the signal to write to memory.
Working our way around the back of the Mega, we find the Hard Disk port. This port is also available on a connector on the motherboard itself, for an internal laser printer interface or (conceivably) an internal hard disk drive. The DMA interface is similar (but not identical) to the SCSI interface. and will support up to eight physical devices at once.
Next to the Hard Disk port is the connector for an external floppy disk drive. Next along is the connector for an Atari monitor. Actually, with the proper cables any good analog RGB monitor should be able to display pictures from the Mega. The new "multisync" monitors will even accept and reproduce the Mega's monochrome signals, but not as well as Atari's SM124 monochrome monitor.
To its right we find the two MIDI (Musical Instrument Digital Interface) ports, MIDI in and MIDI out. With the space saved by using the I/O ports on the sound chip, Atari included a MIDI interface with the STs; thus, the Mega can directly communicate with electronic musical instruments that also support MIDI. These ports communicate at about 32,000 baud, and may also be used for other functions, such as local area networks.
Next to the MID! ports is the printer port, a standard Centronics parallel port. It's a true I/O port, so it's possible to get information from this port (with handshaking) as well as send it out.
Finally, the modem port is a standard RS-232C serial communications port. Though it's specifically designed for use with a modem to communicate over telephone lines, it may also be used for computer-to-computer data interchange or communication with any standard serial device, such as a serial printer or speech synthesizer.
And that concludes our guided tour of the inside of the Mega.
THE FUTURE OF THE MEGA
The Mega 2 has two megabytes of memory and the Mega 4 contains four
megabytes. (Contrary to early reports, there are no plans for a one-megabyte
Mega.) But no matter how much memory you have in your personal computer,
you'll always find a way to fill it up. With the amount of high-powered
business and graphics software being released for the ST, Atari's decision
to offer multi-megabyte computers is welcome news indeed.
One reason Atari decided to create the Megas has to do with both business and graphics - the forthcoming low-cost Atari laser printer, the SLM 804. Laser printers have traditionally been expensive because they've had to be computers themselves, with a CPU and megabytes of memory inside to create each printed page. Atari's solution: Let the computer and laser printer share the CPU and memory. The plan is to sell a computer-laser printer combination at a lower price than other laser printers cost alone. Jack Tramiel and his business warriors hope to make as much a splash in desktop publishing as the ST has already made in the world of electronic music.
The Megas are clearly intended to help Atari shoehorn itself into the business world. With their vastly increased memory and serious, businesslike appearance, the Megas may help Atari shake its image as a company that manufactures game machines, and establish a place in corporate America.
So-how new is the Mega-and how old? It's certainly old enough that the design is well-tested- technologically, the Mega is rock-solid, based on years of experience with hundreds of thousands of computers and perhaps millions of users.
But the Mega is also as new as Atari's commitment to business products like the laser printer. Like the STs before it. the Mega is a lean, mean hot-rod of a computer, with plenty of memory a dynamite display and more power for a lower price than any other computer.
No other computer even comes close.
| The New TOS ROMS
by Alex Leavens In order for the Mega to take advantage of the new blitter chip Atari needed to make an extensive overhaul to the operating system. Thus, we now have a new version of TOSin-ROM, For you programmers out there, heres a list of things that were changed or fixed. Note: Atari has no plans at present to release TOS up grades for existing STs. First there's support for the blitter itself. One of the nicest features of the new ROMS is that they maintain all the old software calls and formats transparently. Thus, if a program is written properly, it will run correctly on either a blitter or non-blitter machine. The only difference will be a very noticeable speedup in graphics operations, including the desktop draw functions. However, this transparency can also have a side effect on badly-written programs: It can make them not work. For example. suppose I'm a programmer and I've figured out how long it takes a non-blitter machine to perform some graphic operation. I might tie how long it takes the machine to do that to how my program works. For example, I might figure out that it takes a 30th of a second to draw some enemy spaceships on the screen. Based on that I tune my game so that its neither too easy nor too hard to play. However, on a blitter-equipped machine, it might take only 120th of a second to draw the same enemy ships-one-quarter the time. Since I tied my game time to the screen-drawing time, my game will now be four times as fast as it used to be-and probably unplayable as well. Now, most programmers don't do this-they're smart enough to know that system timing isn't a fixed number, but can change, and so they base their timing on other things However there are always a few programs that ignore the rules and do things this way. To get around this Atari has put a switch on the desktop menu that allows you to turn the blitter on and off. If you can't get a program to run on your new Mega, try turning the blitter off. Other changes to the ROMS include:
|
| What's A Blitter?
By Alex Leavens With all this talk of the blitter in Atari's new Megas, maybe it's a good idea to sit down and look at what a blitter really is. First, let's look at where the word comes from. Blitter comes from the abbreviation Bit-BLT, which stands for Bit-BLock Transfer-a fancy way of saying "Move Memory" In essence, a blitter is simply a hardware device designed specifically to move chunks of memory (usually fairly large chunks) very, very quickly. In reality, blitters tend to do quite a bit more. The most common reason for wanting to move large chunks of memory around very quickly is graphics. The more quickly we can move memory around, the faster and cleaner our displays will be. Thus, blitters tend to be built around the even more specialized task of moving graphics memory. To this end, they often have built-in functions that are related only to graphics. For example, one of the most common things a blitter can do is draw lines. As a general purpose memory function, this may not be particularly useful-there aren't very many occasions when one wants to draw a line through a series of bytes located somewhere in a program's dataspace. As a graphic screen function, however, it's enormously handy. Instead of forcing the CPU to calculate how to draw the line, we can have the blitter do it, while the CPU is off doing something else-which can speed things up considerably. In addition to simple features like drawing lines, blitters almost always support much more sophisticated functions-such as the ability to take two pieces of memory combine them "on the fly" in any one of several different ways, and then save the result into a third section of memory With the new Atari blitter, basically all the graphic functions that used to be done in software (by the 68000), such as line draw, fill, and polygon fill, are now done by the blitter at a much higher speed. The difference onscreen is very noticeable, and quite dramatic. By designing the blitter as a specialized graphics processor, Atari has offered Mega users significantly better performance for graphics. But remember that's all the blitter does. It's not a miracle device- it won't magically enhance your screen resolution or give you more colors or speed up number crunching or automatically correct your grammar. It is simply a device for moving large chunks of memory around, very quickly. But after you've used a blitter-equipped Mega, I think you'll agree- it does that very well indeed. |