ICONOGRAPHICS
A Super Toolkit For DEGAS Elite
Exploring the built-in desk accessory hooks
by PATRICK BASS
START TECHNICAL EDITOR
Up to now, communication with DEGAS Elite has been limited to keystrokes, mouseclicks, and occasional moans of frustration. Continuing in a series of articles dealing with upgrading DEGAS Elite, Patrick Bass shows you how to construct your own desk accessories which capitalize on the built-in GEM message pipe to add your own features to this powerful drawing program.
File TOOLKIT.ARC on your START disk
DEGAS Elite is a program that could sell the ST series computer all by itself. It's one of the most powerful art programs available for any 16-bit computer. But, inevitably, after many hours of using it you'll find yourself saying, "Gee, if I could just. . .?', or "Golly, why can't it. . .?" or similar groans.
How would you like to be able to command DEGAS Elite to perform your own functions? Have you come up with something you need DEGAS Elite to do that it can't do now?
 |
 |
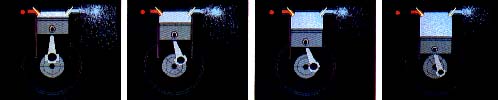
| The Page Flipper lets you perform simple eight-frame animation from within DEGAS Elite. |
In "Plumbing In GEM" in this issue of START, Tom Hudson describes a communications channel he has built into DEGAS Elite, which allows your GEM Desk Accessories access into the very heart of DEGAS. With this "pipeline," you may now create programs that access Elite's picture buffers, allowing you to apply your own favorite picture manipulation routines.
But just exactly how do you go about telling DEGAS Elite what to do? Nothing is better than an example, unless it's two examples, so that's what I've provided for you in this issue. First, we'll create the Page Flipper, which will allow easy page-flip animation from the DEGAS Elite main menu screen. Second, we'll build the Screen Operator, which will allow you to play "what if" with the many different writing modes the ST allows, or let you "add" or "subtract" one picture from another. Let's discuss them both in general first, before we get into the nitty-gritty of how and why they work. (Editor's note: For another program that allows you to do ST animation, see "Flicker" by Jim Kent, author of the Aegis Animator; in this issue of START)
FLIPPING OUT
There are basically two different ways to perform animation on a computer screen. One way is to erase the screen, then draw the first image onscreen, erase it, draw the second image, and so on ad infinitum. Done quickly enough, this may look perfectly acceptable, but if you don't increase the writing speed to the screen, as the image size grows larger it takes an increasingly longer and longer time to draw each image, until at some point the drawing process becomes visible to the observer. From that point on, the "animation" will appear to strobe, and lose its credibility as an animation system.
Another way is to draw every picture beforehand, and then flip through them at a fast clip. DEGAS Elite allows us to hold up to eight complete pictures, or workscreens, on a megabyte ST system, which is just enough for us to get smooth, cyclic motion. For example, you could draw a wheel, eight times, each time with the wheel rotated another 45 degrees. When you flip through these pictures quickly enough, the wheel appears to spin.
GRAPHICAL OPERATIONS--THE SCREEN OPERATOR
The ST computers allow about 16 built-in drawing logic operations. In other words, when you are moving bit-images around (or drawing lines, or whatever) you may specify a logical operation to be performed between what you're moving and where you're moving it to. By "logical operation" I mean the ability to apply the logic operators NOT, AND, OR, Exclusive-OR, or any combination of those, to bit-images you are moving. The old edit-compile-crash cycle gets in the way of playing "what if?" when experimenting with this effect, so this accessory will allow you to perform logical operations between entire screens, or between a source and mask, with a separate destination. Notice this will allow you to physically add or subtract one picture from another. It's actually quite simple. You can now OR one picture into another, or create entirely electronic matte shots for computer animation.
CREATION AND INSTALLATION
All the files you'll need are contained inside the file TOOLKIT.ARC on your START Disk. Copy TOOLKIT.ARC and ARCX.TTP over to a clean, fresh disk. Double-click on ARCX.TTP, and in the resulting "Open Applications" box type TOOLKIT.ARC and press the Return key. ARCX.TTP will reconstruct and uncompress all the available files from the original TOOLKIT.ARC file.
When ARCX is finished, you should find two reconstructed Accessories, their Resource Files and all source code written to your disk. Find, and copy, the four files PAGEFLIP.ACC, PAGEFLIP.RSC, OPERATOR.ACC, and OPERATOR.RSC over to a disk you will be booting from later. Insert this disk into your first disk drive, turn your ST computer off, count to fifteen (slowly), and then turn it back on.
Your ST will recognize and load the two Accessories PAGEFLIP and OPERATOR when it powers up. When your desktop appears, insert your DEGAS Elite disk and doubleclick on DEGAS Elite. Yes, it is possible to select the two Desk Accessories before DEGAS Elite is activated, but if you do they will simply scold you for trying to use them without DEGAS Elite being active. When DEGAS Elite powers up, the two Accessories are now available. Go up to the DESK menu item and check the drop-down menu. The two should be labeled there as "Page Flipper" and "Screen Operator."
FLIPPING THE FLIPPER
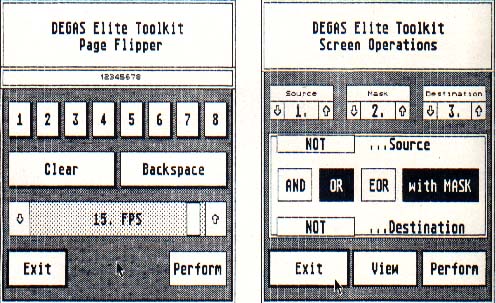
Let's explore the Page Flipper first. Before you activate it, draw eight simple frames of animation in DEGAS Elite. For my initial tests, I simply numbered each of the display screens. Now go up and click on "Page Flipper" from the DESK menu selection. You'll see a single Dialog Box pop up in the center of the screen. Refer to Figure 1 during the rest of the description of the Page Flipper Dialog Box.
Along the top you'll see the title. Below that, stretching full width across the Dialog is the Sequence Window, showing which frames you've selected, and in which order they will show. You have room for up to 44 frames in a sequence. Directly below the Sequence Window are eight buttons you use to select which frame to show. For example, when you press the [2] button, a "2" is inserted into the Sequence window at the first available space. If you have fewer than eight screens available, only the buttons corresponding to available screens will be active. Below the Frame selection buttons are two buttons to allow simple editing of the Frame Sequence. The [CLEAR] button erases the current frame sequence, and the [BACKSPACE] button erases the last entry in the frame sequence. Underneath the two editing buttons is the Frame Speed control slider, which allows you to control how long each individual frame is shown onscreen. Slide the control left or right, or click-hold on either slider "thumb" to increase or decrease display time. The resultant computed display time will be shown inside the track of the slider. Finally, below the slider are two buttons. The [PERFORM] button will actually perform the Page-Flipping animation routines, with the [EXIT] button dropping you back onto the DEGAS Elite desktop.
OPERATING THE OPERATOR
The Screen Operator is shown in Figure 2. As with the Flipper, the program title is along the top. Below the title box you'll find three screen selection boxes, each showing a single number with a "decrease" and "increase" thumb on either side. The left box shows the current selection for the SOURCE screen, the middle box shows the MASK screen selection, and the box on the right shows the current DESTINATION screen selection. Click on the Up arrow to increase these numbers, and click on the Down arrow to decrease them.
Below the screen selection boxes is a large box showing the logical operations you can perform. It's easy to follow the sequence of operations available. You may choose to NOT the source screen if you desire, then AND, OR, or EOR the screen against the DESTINATION, or against the MASK screen if you have the [With MASK] button selected. Finally, you may choose to NOT the destination screen before you set the result down. Right below the Operations Box there are three buttons, [EXIT], [VIEW] and [PERFORM]. [PERFORM] will actually do the operations between screens you've selected above. You'll see it perform right on the screen, but it goes fast, so if you miss it, and still want to see the results, point at the [VIEW] button, then press and hold the left mouse button for as long as you wish to view the results. The [EXIT] button will drop you back to the DEGAS Elite desktop.
THE BELLY OF THE BEAST
If you just want to use the Toolkit Accessories, and don't really care about how they're put together, you can skip the balance of this article. The rest of you, however, may read on.
Again, let's start with the Page Flipper. You'll need to refer to the program on your START disk called PAGEFLIP.C . The very top of the file has a block of comments showing the author's name and copyright information. Below that are #includes for five standard header files and one unique file, pageflip.h, which was generated by the Resource Construction Set when the resource file was created.
 |
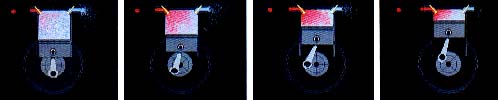
| Using the Screen Operator you can overlay one picture on another. |
Next, find a block of #define statements, to allow modification of the supporting language and the definition of constant values and constructions into meaningful names. In the variable definitions area, you'll first come across the only externally defined value you'll need to reference, called gl_apid, which stands for "global application ID," and represents the application's identification number. For integers, save space for box sizes, activity flags, and our message buffer.
There is only one warning string and space for the sequence buffer in the byte-sized declarations. Save space for three longs, including a single array of 15 longs to hold the screen pointers, and keep space for two floating point arrays, needed for the slider calculations. Oh, keep a single pointer to an OBJECT type, too.
A CODE IN THE NODE
In the main() function, first initialize the application, get the handle of the accessory from graf_handle(), and then register our accessory inside the menu_register() call. It returns to us the number of our accessory, and stores the result inside the variable called menu_id. Next, it tries to load the resource file for the page flipper. If for some reason it can't, it warns you of impending danger.
Otherwise, it loads the resource successfully, and finds out where it wound up in memory with the rsrc_gaddr() call, on the next line down. The address of the root of the object tree will be returned, and the program places it inside the variable dialog0. Since it's now gotten the resource file and is holding it in memory, it can find out how big some of the objects inside it are. It does that in the next block of code down, using objc_offset() to find the location and size of three windows you'll eventually need to redraw without disturbing anything else inside the resource. Then it erases the current queue for holding the frame sequence to show, and places a single default frame, number one, into the buffer.
ACCESSORIES NEVER QUIT
Here's where the main block of code is. Notice there is no exit from the next loop. Why? Accessories never finish (rather they're not supposed to), so they can have no exit. Anyway, here it just needs to do two things--one, wait for a message which says you have selected the accessory to operate, and two, wait for a message coming from DEGAS Elite which returns where the screens actually are.
The program waits for messages inside an evnt_multi() call. When one is received, it goes into msgbuff[], and falls down to the next available test, which decides if the message it received was from the screen manager telling it you have asked the accessory be opened. If not, it then tests if the message received was from DEGAS Elite telling it where everything is. If thatwasn't the message it disregards it.
If the message was from the screen manager, asking the accessory to open, it makes one further check to see if the message really is for the accessory, by comparing the menu ID number it received earlier. If they match, then open the virtual workstation, and then call the function inquire(), which will send a message to DEGAS Elite asking it to send the location where DEGAS Elite keeps its screen pointers. When it returns from that call, close the workstation, and fall back into the multicall, waiting for the answer from DEGAS Elite.
When DEGAS Elite responds to our request, it will send the accessory a message. The accessory will detect that message, open the workstation again, pick up the current horizontal and vertical resolution, and then call the function menu_ handle( ),which performs the main body of work here. When it finally does finish the work, it will return to this point when you click on the [EXIT] button located right on the dialog box.
INQUIRING MINDS WANT TO KNOW
The next function, inquire(),gets called when the accessory first opens up. It first decides if DEGAS Elite is even available, by testing for its application number. If the number can't be found, it will scold the user and drop out. If the number is found, inquire()will send a message to DEGAS Elite with the appl_write()call, sending it a string of sixteen characters containing the DEGAS00 instruction, asking for the pointer to the screen pointers.
A HANDLE ON THE SITUATION
The function here that performs the major body of work is called menu_handle(),which starts by dynamically determining the corners of a small centered box onscreen. Next, using the information returned to us from DEGAS Elite, we determine exactly where in memory the master pointer to the list of screen pointers is that DEGAS Elite keeps. We place the address of the master pointer inside the variable s_ptrs.Using that information, we then access and retrieve each available pointer and place them inside the long array screen[].
Next, execute wind_update( TRUE ), as we're about to start writing to the screen. The two form_dial() calls will reserve space for the dialog box and grow the expanding rectangle onscreen. Next, determine the condition of the graphic buttons inside the dialog box, and set them accordingly. Finally, draw the dialog box onscreen with the objc_draw() call, passing in the address of the root of the object tree, the maximum level of children to draw, and the box's clipping rectangle.
Before you actually interact with the dialog, you'll need to tidy up the displayed numbers and strings inside the box. The program will then encounter the DO loop, which takes on the task of interacting with the dialog box itself. Start by calling the form_do() function, which will handle button presses and so forth in the dialog box, and then return the number of the object which caused the exit from the dialog box. Put this number inside the variable key1.
Next, perform three tests. If the exit button pressed was BPERFORM, which is the [Perform] button inside the dialog box, perform the function flip_it(), and then reset the state of the [Perform] button. If the exit button was one of the sequence buttons, or one of the sequence editing buttons, drop through to the function filter_key(), which will perform any action requested by that particular key. If the exit button pressed was a key coupled with the slider function, then perform the function do_slider(). Continue in the DO loop for as long as the user doesn't press the BEXIT (the onscreen [EXIT]) button.
When the user really does wish to exit, redraw the dialog box without any selected buttons, drop through the two last form_dial() function calls to release the memory for the resources and draw the shrinking box outline, then reenable GEM drawing of the screen with wind_update( FALSE ), and return to the main multi loop.
THE STATE OF THE BUTTONS
The first section here will figure out how large sections of the dialog are, so the program may build a set of clipping rectangles for when it will need to update and redraw these objects. The second section sets the initial state of the sequence selection buttons, showing whether or not the screens they represent are actually available from DEGAS Elite. If the associated screens are available, then the buttons are drawn as SHADOWED; if not, they're drawn as DISABLED.
Next, in flip_it(), decide first if there are any frames to flip through. If there are, then point to each one in turn and display it onscreen. Once the frame is displayed, delay for the length of time the user has selected with the speed slider, synching to the vertical blank interrupt to get even timing. Continue to do this as long as the user hasn't pressed the buttons on the mouse. When a button is pressed, drop out of the display loop. Towards the bottom, if there are no frames to display, then ask the user to place at least one single frame in the sequence buffer.
The next function down, filter_key(), receives the keystroke pressed inside the dialog box and decides what to do with it. For example, if the key pressed was the B8 key (which corresponds to the [8] key onscreen,) the proper routine inserts the character "8" into the frame sequence, and then displays it onscreen.
The next two functions are related. The first, adjust(), takes as parameters the address of the dialog box, the number of the object holding the string to change, the address of the new string to use, and the corners of the clipping rectangle for that particular object. The second, set_text(), actually performs the work of inserting the address of the new string inside the object tree.
UTILITIES
To aid in moving strings around, two functions, strcat(), and strlen(), are provided to allow concatenation of strings and the finding of the length thereof. The next function, reset(), provides the initial settings for the horizontal slider which controls display speed, while the one below, do_slider(), performs the proper work when you press the slider "thumbs" or click-drag the slider button.
DOWSING THE OPERATOR
Now we get into the Screen Operator. Print out and refer to the program OPERATOR.C on your START disk. The top of the file has a block of comments showing who wrote the program and copyright information. Below that it #includes five standard header files and one unique file, operator.h, which was generated by the RSC when the resource file was created.
Next, find a block of #define statements, to allow modification of the supporting language and the definition of constant values and constructions into meaningful names. In the variable definitions area, you'll first come across the only externally defined value you'll need to reference, called gl_apid, which stands for "global application ID" and represents the application number. For integers, save space for box sizes, activity flags, and our message buffer.
We hold only one warning string and space for the sequence buffer in the byte-sized declarations. We save space for three longs, including a single array of 15 longs to hold the screen pointers, and we keep space for a single pointer to an OBJECT type.
| FIGURE 1 | FIGURE 2 |
 |
|
THE MAIN SECTION
In the main() function, we first initialize the application, get the handle of our accessory from graf_handle(), and then register the accessory inside the menu_register() call. It returns the number of the accessory, and will store the result inside the variable called menu_id. Next, try to load the resource file for the screen operator. If for some reason it can't, then warn the user of impending danger.
Otherwise, load the resource, and find out where it wound up in memory with the rsrc_gaddr() call, on the next line down. The address of the root of the object tree will be returned, and you'll need to place it inside the variable dialog0. Next, make sure all the button flags are turned off, and select the default settings for the source, mask, and destination pictures. Show the mouse, and then fall into the evnt_multi() loop.
THERE'S NO WAY OUT
Here's where all the work is done. Notice there is no exit from the next loop. Why? Accessories never ''finish" so they can have no exit. Anyway, here it just needs to do two things. One, wait for a message telling it you've selected the accessory to operate, and two, wait for a message coming from DEGAS Elite telling it where the screens are.
The accessory will wait for messages inside an evnt_multi() call. When one is received, it goes into msgbuff[], and it will fall down to the next available test, which decides if the message received was from the screen manager asking the accessory be opened. If not, test if the message received was from DEGAS Elite saying where everything is. If that wasn't the message, disregard it.
If the message was from the screen manager, asking the accessory to open, then make one further check to see if the message really is for the accessory, by comparing the menu ID number it received earlier. If they match, then open our virtual workstation, and then call the function inquire(), which will send a message to DEGAS Elite asking it to send the location where DEGAS Elite keeps its screen pointers. When the accessory returns from that call, close the workstation, and fall back into the multi call, waiting for the answer from DEGAS Elite.
When DEGAS Elite responds to the request, it will send the accessory a message. The accessory will detect that message, open the workstation again, pick up the current horizontal and vertical resolution, and then call the function menu_handle(), which performs the main body of work here. When the accessory finally does finish the work, it will return to this point when you click on the [EXIT] button located inside the dialog box.
JUST ASK DEGAS, HE KNOWS EVERYTHING
The next function, inquire(), gets called when the accessory first opens up. It first decides if DEGAS Elite is even available, by testing for its application number. If the number can't be found, scold the user and drop out. If the number is found, send a message to DEGAS Elite with the appl_write() call, sending it a string of 16 characters containing the DEGAS00 instruction, asking for the pointer to the screen pointers.
The function here which performs the major body of work is called menu_handle(), which starts by dynamically determining the corners of a small centered box onscreen. Next, using the information returned to us from DEGAS Elite, we determine exactly where in memory the master pointer to the list of screen pointers is that DEGAS Elite keeps. We place the address of the master pointer inside the variable s_ptrs. Using that information, access and retrieve each available pointer and place them inside the long array screen[].
Next, execute wind_update( TRUE ), as you're about to start writing to the screen. The two form_dial() calls will reserve space for the dialog box and grow the expanding rectangle onscreen. Next, determine the condition of the graphic buttons inside the dialog box, and set them accordingly. Finally, draw the dialog box onscreen with the objc_draw() call, passing in the address of the root of the object tree we wish drawn, the maximum level of children to draw, and the box's clipping rectangle.
Before the user actually interacts with the dialog, you'll need to tidy up the displayed numbers and strings inside the box. Next comes the DO loop, which takes on the task of interacting with the dialog box itself. Start by calling the form_ do() function, which will handle button presses and so forth in the dialog box, and then return the number of the object which caused the exit from the dialog box. Put this number inside the variable key1.
Next, perform three tests. If the exit button pressed was BPERFORM, which is the [Perform] button inside the dialog box, perform the function operate(), and then reset the state of the [Perform] button. If the exit button was one of the operation buttons, drop through to the function filter_key(), which will perform any action requested by that particular key. Continue in the DO loop for as long as you don't press the BEXIT (the onscreen [EXIT]) button.
When you really do wish to exit, drop through to the two last form_dial() function calls to release the memory for the resources, and draw the shrinking box outline, then reenable GEM drawing of the screen with wind_update( FALSE ), and then return to the main multi loop.
BUTTON INITIALIZATION
The first section here will figure out how large sections of the dialog are, so it may build a set of clipping rectangles for when it needs to update and redraw these objects. The second section sets the initial state of the operation selection buttons, showing whether or not the buttons they represent are active. If the buttons are active, they're drawn SELECTED, if not, they're drawn NORMAL.
The next function down, filter_key( ), receives the keystroke pressed inside the dialog box and decides what to do with it. For example, if the key pressed was the SRCDN key (meaning you want it to decrement the source picture number), the proper routine first makes sure the screen number is above one, and if it is, then decrements the number. It then converts the new screen number into a string, and calls a function which will insert the new string into the source picture number box. The AND, OR, and EOR buttons are mutually exclusive, meaning if you select one of them, it will make sure the other two are turned off.
The next two functions are related. The first, adjust(), takes as parameters the address of the dialog box, the number of the object holding the string to change, the address of the new string to use, and the corners of the clipping rectangle for that particular object. The second, set_text(), actually performs the work of inserting the address of the new string inside the object tree. To aid in moving strings around, two functions, strcat() and strlen(), are provided to allow concatenation of strings and the finding of the length thereof.
THE FAT LADY SINGS
Cleverly designed inside these two utilities is the method for installing your own GEM accessories. Throw most of my code away and build your own. I've only demonstrated one aspect of communication with the inside of DEGAS Elite. You have the ability to change and set colors, move, define, and manipulate blocks of graphics data, and more.
What can you do on your own? How about edge detection? Contrast stretching? I want somebody to write me a rubber-box source code generator for either C or assembly, or a way to combine two DEGAS pictures for a full page printout. Get to work--and soon we'll see a flood of Desk Accessories for DEGAS.