THE EASY WAY
A DEGAS PRINTER DRIVER
MAKER PROGRAM
by TOM HUDSON
Contributing Editor
Stuck with an oddball printer for your ST? Weep no more. If you're having trouble finding a DEGAS printer driver for it, then this program should cure your pin-head blues. Just open the folder marked PRINTER.ST on your START disk, and you'll soon be able to custom-design your own driver, no matter what printer you have.
If you've ever tried coding something as complex as a screen dump program in 68000 assembly language, you've probably come out of the experience with:
- Less hair on your head and fist-sized balls of same on the floor,
- A peerless command of four-character words,
- A familiarity with the little cherry bomb" icons that enables you to draw them perfectly, down to the last pixel, weeks later.
I know I have.
Writing screen-dump printer drivers is not fun. I don't like doing it. I'd rather be doing fun things like coding ray-tracing graphics demos. Really.
I know most START readers aren't thrilled with trying to write their own screen dump routines, either. Since writing the printer driver installer program in START (see "Stealing the ST Printer Driver" START #1, Summer 1986), I keep getting calls from the technical staff saying, "Hey, somebody with a Froon 2000 printer with a 19-pin printhead wants to know how to modify the Epson driver ." I usually crackle cellophane over the phone mouthpiece to simulate a bad connection and pull the cord from the wall.
After I plug the phone back in several hours later, the technical staff at Batteries Included will call. "Customer Support says people are asking for a printer driver for the Froon 1999 printer (which, incidentally, is completely different from the Froon 2000). Want to write one?" I feign ignorance of the ST altogether (520 what?!"), tell them my name is Attila Freen and that they have the wrong number, and hang up.
You can only run for so long before the inexorable forces of the universe catch up with you.
I was in the mood to buy something one day recently, and that something was a 24-pin NEC P6 printer. Of course, what good is a 24-pin printer without screen dump software? Naturally, none of the previous printer drivers I had written could be easily modified to work with 24 pins, so I was stuck. I was going to have to sit down and write a driver for it. Not only was I going to have to write one driver, but since I wanted printouts in six different sizes, I had to write three (two sizes per driver)! That meant lots of hair to vacuum, neighbors complaining about the noise, and literally hundreds of cherry bombs! Yucch!
Reluctantly, I sat down and started flowcharting the driver code. Suddenly, and without warning, it became readily apparent that the code could be set up so, with changes to appropriate constants throughout the code, it would work with just about any printer. I was saved! I could have all three of my drivers with a miniumum of effort. Batteries Included Customer Support would get off my back. The guys at START would do flip-flops!
The code sprung from my brain and into the computer and worked the first time.
Actually, I pulled out my hair and cursed and watched a lot of cherry bombs dance across my screen for the next few days, but it was worth it. (Editor's note: The following program can be used in conjunction with Darrel Anderson's "Black And White In Color: Capturing Your ST'S Graphics On Print And Film.")
THE PROGRAM
What we have here is a program that writes printer drivers for you. The novice computer user can probably do all the necessary research on the desired printer and create a working driver in half an hour. I personally know of computer experts who have done it in five minutes. These are estimates only; your actual time may vary.
The program works with any printer having from 1 to 24 pins in the print-head (I probably would have just taken the easy way out and done it for 8-pin printers, but hey-my printer had 24. And I wasn't about to custom-code three drivers. No way.).
It will build drivers that will print screen dumps all the way up to 4160 printer pixels wide, if you have a wide-carriage printer. (Posters, anyone?)
The main limitation is it works with printers which use an Epson-style command format. That is, for each pass of the print head, you tell it how many bytes there will be in the graphics data, then send that number of data bytes. Printers like some members of the Okidata Microline series, which use strange and bizarre control codes that can't be included in the graphics data, won't work. Back to hair-pulling. Most printers these days use the Epson method, so that isn't a huge limitation.
You can customize your drivers to do just about anything. If you want a form feed before the dump, you can do it. If you want a form feed after the dump, you can do that, too. Want funny spacing? You've got it. It won't paint ceilings. It won't wash windows.
GET IN AND DRIVE
To make your own drivers just double-click on the PRNTMAKE.PRG icon while running in medium or high resolution. Low resolution does not allow the large dialogs to fit on the screen, and if you try running in low-res, you'll get a rude message.
You'll soon be greeted by a dialog box which gives the program credits and gives you the option of continuing or bailing out. You can quit if you want, but I'm clicking on the "Continue" button.
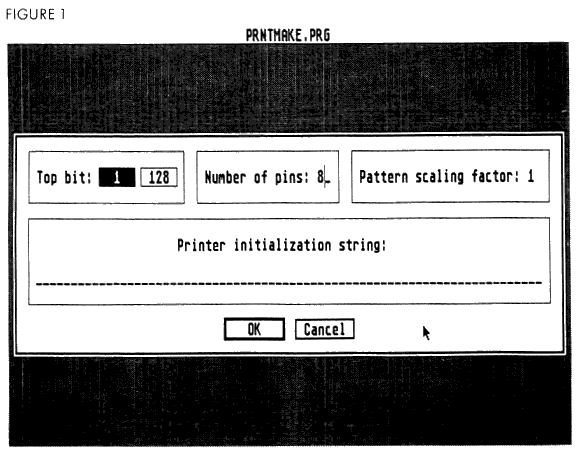
The first dialog you'll see is shown in Figure 1. This is general data for the printer and information it needs to initialize itself.
Now is a good time to get out your printer's manual. A short prayer wouldn't hurt, either.
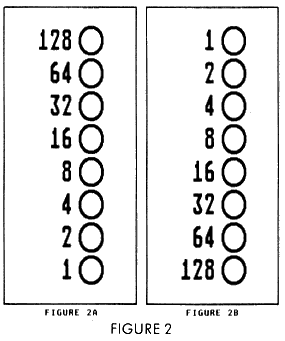
The first section of the dialog, which lets you tell the program about the orientation of your print head (actually, the printer's), is the trickiest part of this dialog. Your print head can have one of two orientations, with the 128 bit on the top, or the 1 bit on the top. Take a look at the "Graphics" section of your manual, and look for a diagram similar to that in Figure 2. Figure 2a has the 128 bit at the top, and Figure 2b has the 1 bit at the top. With your mouse, click on the appropriate button to select the top bit of the head. Most printers I've used (Epson, NEC, etc.) have a head with a top bit of 128. Printers like the C.Itoh/Prowriter 8510 series have a top bit of 1.
Next, you need to set the number of pins in the print head. Once again, consult your printer manual. This will usually be 8,16 or 24 pins. Just type in the number of pins (the default is 8).
only run for so
long before the
inexorable forces
of the universe
catch up with you.
You can use any number up to the maximum used by the printer, but the program is most efficient if you use all of the pins in the print head.
The next data field in the dialog, "Pattern scaling factor," allows you to change the size of the pattern used to represent gray-scale in color printouts. I recommend leaving this value at one, but if you have a 24-pin printer which runs its pixels together at small scaling factors, you can increase this value. Simply move the cursor to the field with the up- or down-arrow keys or by clicking the mouse on the number This value can range from one to nine.
Finally, you need to input a string of numeric values necessary to initialize the printer and set the line feed length. This string is simply a group of decimal numbers (not hexadecimal or binary) separated by commas, like so:
27,64,27,51,24
This is the initialization string for the NEC P6. The 27,64 is an [ESC] @, which initializes the printer to its power-up settings. The 27,51 is an [ESC] 3, which is the linefeed setting command. This is followed by a 24, which is the number of pins to advance the paper every time the printer receives a line feed code. Enter the appropriate values for your printer here. The only values permitted are numeric values from 0-255, separated by commas. Spaces are ignored, but not recommended.
You can put other things in the initialization string, as well. Some people might want a form feed before a screen dump to place it on a new piece of paper. If so, you just need to add a 12 (ASCII form feed) to your init string, like so:
27,64,27,51,24,12
After you set all four fields to the desired values, click on OK or press [RETURN]. The program will examine the data and report any errors. If you made a mistake (by entering non-numeric data or an out-of-range value), the program will tell you and let you try again.
THE SECOND DIALOG
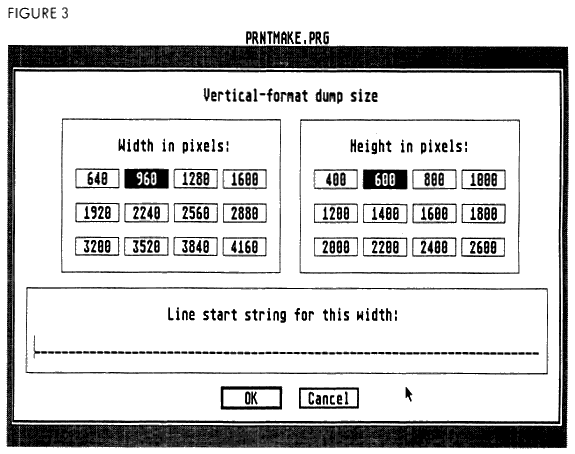
This is another large dialog shown in Figure 3. It lets you tell the driver the size of the vertical-format screen dump, which you get when you activate the printer driver with the Alternate key pressed. This is a right-side-up printout (i.e. it looks correct coming out of your printer).
In this dialog, you must tell the driver how many printer pixels wide and tall the printout is to be by clicking on the appropriate numeric box. The numbers you choose will depend on the printer you're using. Printers which have a one-to-one aspect ratio (that is, 10 pixels aligned vertically are the same length as 10 pixels aligned horizontally) use the numbers which are in the same position in the width and height selections (640/400, 960/600, etc.) There's no good way to determine this beforehand, so I suggest setting the width and height to the same positions initially, then adjusting the height up or down if the printout is too short or tall.
Once you've determined the width of the printout, you need to set up the line start string for that width. This is the information which tells the printer the number of pixels wide the graphics dump will be. You'll have to consult your manual again for this string. In most cases, you'll have to send an escape code followed by a pixel count indicator, like so:
27,42,39,128,2
This is the NEC P6 graphics start string for a 640-pixel line. The 27,42,39 (ESC *') places the printer into the triple density graphics mode, and the 128,2 tells it there are 128+(2 * 256), or 640 pixels in the print line. For a typical Epson printer, this string would be:
27,76,128,2
The 27,76 (ESC L) selects double-density graphics mode, and the 128,2 once again represents 128+(2 * 256) or 640 pixels. Check your manual for the proper start string. Be sure the number of pixels matches the width in pixels you have selected, or the driver will do funny things, like lots of random form feeds. Take it from me-you don't want that to happen.
When you have completed the vertical-format dump dialog, click on OK or press RETURN. The program will check your work and report any errors.
DIALOG NUMBER THREE
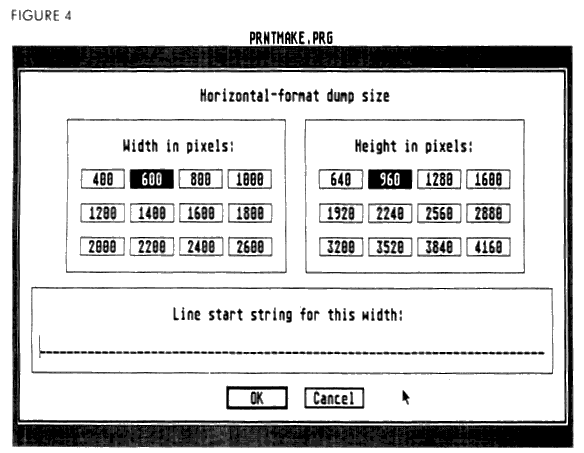
The next dialog box is almost identical to the vertical-format dialog, but is used to set the values for a horizontal-format screen dump. This is the default dump that the driver will produce, and is oriented sideways on the paper. If you size it properly, you can just about fill an 8.5 x 11-inch page.
Like the vertical-format dialog, you must click on the appropriate width and height for the printout, in printer pixels. You'll usually want to make the horizontal-format printout a different size than the vertical-format dump, just for a little variety The aspect ratio rule mentioned earlier still applies here: Select the width you need, then adjust the height accordingly after testing the dumper.
The line start string is just like the vertical-format start string, except that the pixel count must match the width of the horizontal printout. For an 800-pixel-wide horizontal dump on the NEC P6, the start string would be:
27,42,39,32,3
Once again, the 27,42,39 is an ESC * ' , which places the printer in graphics mode. The 32,3 is the pixel count, which works out to 32±(3 * 256), or 800.
After completing the dialog, click on OK or press [RETURN[. Your work will be checked. If it passes inspection, you move on to the next dialog.
THE NEXT DIALOG
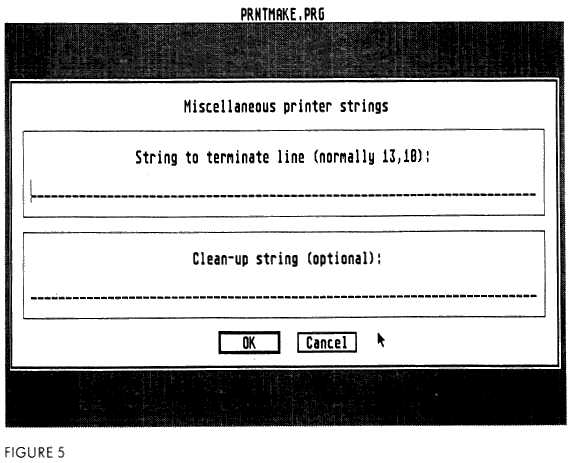
Well, here we are at the next dialog This is shown in Figure 5, and is a very simple format.
This dialog allows you to input two miscellaneous strings. The first is the string used to terminate each graphics line. Normally, this will be:
13,10
which is the ASCII carriage return/linefeed sequence. This returns the carriage and advances the paper one line (be sure you set the linefeed to the proper length in the initialization string!) You can set this string to whatever is necessary to terminate the graphics line on your printer. If you just need a linefeed, you would just enter:
10
The last string you can enter is the clean-up string. This is an optional entry, and if you enter it, it is sent after the screen dump is complete. If left blank, nothing happens, and the printer is left as it is right after the dump is completed. It's a good idea to at least reset the printer to its power-up state at the end of the dump so that you can return to normal printing after doing the dump. For the Epson and compatible printers, this would be:
27,64
This is an ESC *, which resets the printer to the power-up state. You can add other things to this string, such as carriage returns, form feeds, and so on, if the mood hits you.
Click on [0K] or press [RETURN] to exit the dialog.
TESTING THE DRIVER
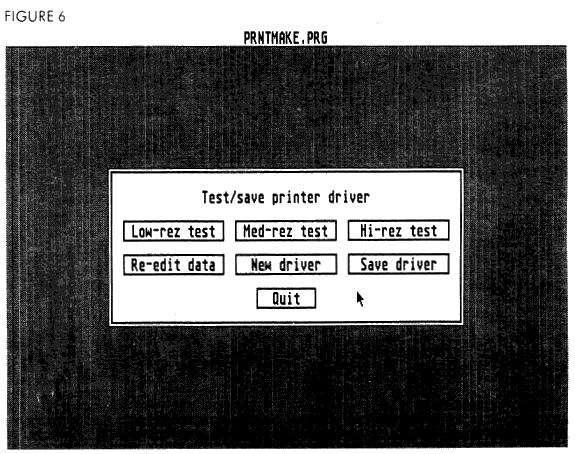
Now comes the moment of truth. Your palms are sweaty, your heart races. Will it work? Well, it probably won't cause the screen to fill with cherry bombs, which is at least something. You should now see the test/save dialog on the screen, shown in Figure 6.
This dialog box lets you test fully the printer driver in all three resolutions, regardless of the resolution being used. If you have properly entered the information, your eyes will be greeted with startling images that virtually leap off the paper. If not, your eyes will be greeted by pixel-ized garbage. Well- think positive.
It may be a good idea to run back through the data you entered before resting the driver. To do this, click on the 'Re-edit data" box. You will be returned to the first dialog box. Check over the data you entered, and click on the OK boxes to advance through the dialogs. If you spot something wrong, you can easily correct the data.
Once you're ready to test the driver, click on either the 1ow, medium or high resolution test buttons. A file selector dialog will appear and you can select a DEGAS normal or compressed picture to use as the test image. The picture will not be displayed on the screen, so you can test any resolution regardless of the monitor you're using. After you select the picture to print, a small box will appear prompting you to press the [Alternate] key if you want a vertical format dump, or just click to do a horizontal format dump. It's a good idea to test the driver in both horizontal and vertical format, in all three resolutions.
After you start the printout, your printer should start dumping the image. If it looks OK, let it continue to completion. If something looks wrong, or you're just getting a page full of garbage, press the UNDO key. The printout will stop and you'll return to the test/save dialog. Use the "Re-edit" button to re-check your data. Most often, the problem will be with the line start string for the format being tested, in the numbers which tell the printer the number of pixels in the graphics line.
If the printouts are OK, you can save the driver to a .PRT file. Use the "Save driver" selection to do so. Be sure to use an extension of .PRT on the file. After saving, the printer driver is ready to be used by DEGAS, DEGAS Elite, the START printer driver installer (START #1), or any other program using DEGAS-format drivers.
Got more drivers to build? No problem. You can use the Re-edit button to change the data for another driver to use with this printer, or you can use the "New driver" button to start over with a clean slate. You can also return to the desktop by using the "Quit" button.
TROUBLESHOOTING
If your printer driver does nor produce a proper image, with garbage characters mixed with graphics, re-check the graphics start command and make sure the number of pixels in the start command match the width value you have specified for the two dump formats. The start string for each of the formats will be different, so be sure to check them!
It's more than likely that you'll need to fine-tune your printer driver. This will usually be an adjustment of the width or height of the printout to make it appear to be the same aspect ratio as the screen. Most printers will allow you to get close to the screen's aspect ratio, but won't look exactly correct. This is normal.
To adjust the aspect ratio to be as close as possible, most printers have several different horizontal resolutions. 60 dots per inch (DPI), 120 DPI, 180 DPI and so on are common. You can adjust to the different settings offered by your printer to get a good image.
As an example, the Epson series (such as the MX-80) uses the following settings:
Top bit: 128This should be a good starting point if you have a printer that can emulate the Epson series.
Number of pins: 8
Pattern scaling factor: 1
Initialization string: 27,64,27,65,8Vertical format width: 960
Vertical format height: 400
Vertical format start string: 27,76,192,3Horizontal format width: 800
Horizontal format height: 640
Horizontal format start string:
27,76,32,3Line termination string: 13,10
Clean-up string: 27,64
WHAT TO DO WITH IT?
Once you've made your own printer driver, now what? Well, using the printer driver installer from START #1, you can install your new driver as the system's driver, and print just about any ST screen. If you're a member of a telecommunications network, such as CompuServe or GEnie, you can upload your driver so that others can share it. You can also hang around on street corners: "Psst! Hey mac, wanna Froon 2000 printer driver?"
And best of all, you didn't have to touch one line of 68000 assembly language code. Your scalp, the neighbors and the RESET button on your system will all thank you.
THE GORY DETAILS
If you don't need to know how the printer driver maker works, don't read any further. Go play with your printer driver and have fun. The rest of you read on.
This program is composed of two primary sections. The first is the main user interface module, which is written in C. The second is the printer driver skeleton, an assembly language routine which has a number of "slots" which have the various parameters and printer codes inserted into them. Once the driver skeleton is "fleshed out" with the appropriate information for the printer and printout size, it is written to disk in a 2000-byte printer driver file. This file is then ready for use. The driver code is position-independent. That is, it can be loaded at any point in memory and it will operate without modification. For information on how the printer driver is called, see "Stealing the ST Printer Driver" in START #1.
THE USER INTERFACE
The user interface of the program was written in C to make programming it easy. It is written so that the GEM resource data for the dialog boxes could be included (via the .RSH file output by the GEM Resource Construction Set). This lets the program be set up as a single .PRG file without requiring a separate resource file. Because the resource data is not loaded with the rsrc_load() function, the locations of the objects must be calculated. This is done right before the workstation is loaded.
The C source file, PRNTMAKE.C on the START disk, starts with a list of externally-defined labels. These are defined in PMASM.S, the printer driver skeleton source file.
This is a mostly straightforward GEM application, so I won't go into a lot of unnecessary details. Most of the program is dedicated to the actual dialog box processing, which handles the input of the strings from the user. After being entered, the strings are processed by the "nparse( )" function. This is a handy routine which converts the ASCII strings of numbers separated by commas to actual strings, ready for use.
To test the driver, the program uses the "inst_codes( )" function to plug the various values into the printer driver skeleton. Once these values are loaded into the skeleton, the driver is ready to go.
To load a DEGAS normal or compressed picture, the program uses the DEREAD.C source file. This is a set of routines that will load a DEGAS picture whether it is compressed or not. The "get_pic( )" function, documented in DEREAD.C, does the loading of the image. The DEREAD.C routines require the use of an assembly-language memory mover, "movem()", which is defined in the PMASM.S assembly-language source file. Savvy programmers will notice some of the routines used in the DEREAD.C file are the same as those in the IFF loader routines from START #2 ("Swapping Art With Other Computers"). That's because the DEGAS Elite compressed format is the same as the IFF compression scheme. It basically makes life a little easier and avoids duplicating code when doing IFF and compressed DEGAS file reading in the same program.
THE SKELETON
In order to allow the printer driver maker to create printer drivers that will work with many types of printers, it was necessary to allow a great deal of flexibility. This causes printer drivers created with this program to operate somewhat more slowly than those which are hard-coded for a particular printer but the speed difference is nor extreme.
The printer driver skeleton is in the PMASM.S file. As expected, the skeleton has a large number of globally-declared locations used by the C program to store the various parameters for the driver. The parameter values are immediate-format 68000 instructions, and when the C program stores the values, it replaces the dummy immediate values in the skeleton with the actual values. Throughout the skeleton code, you'll see immediate values that are #$1111 or #$1l111111. These will be replaced.
To provide the ability to produce 16 sizes of printouts, the printer driver sets independent repeat values for the odd and even screen pixels of both X and Y axes. On a high-res screen, for example, the width can be 640 (odd repeat=1, even repeat= 1), 960 (odd repeat=1, even repeat= 2), and so on. The various odd and even repeat values are found in the inst__codes() function in the PRNTMAKE.C file.
computer user can
probably do all
the necessary
research on the
desired printer and
create a working
driver in half
an hour.
The main body of the skeletal printer driver processes each pixel on the screen with the proper repeat values first in the Y direction, until the print head is filled. The print head data is then dumped, and the program advances to the next X pixel (or repeats the current X pixel if necessary), returning to the top of the print head. When an entire line of data is printed, the end-of-line string is printed and the program moves to the next line.
Separate X and Y coordinate values are kept for the printer, allowing the shading pattern to maintain the highest resolution of the printer, even though a screen pixel may take up as many as 169 (13 * 13) printer pixels. The printer X and Y coordinates are used to index into the grey-scale pixel table, and by dividing the printer coordinates by the pattern scaling factor, the patterns can be made larger or smaller.
The data sent to the print head is held in the LONG variable BUFFER until it is ready to print. The HEADMASK variable holds a LONG mask with one bit on which is ORed with the BUFFER contents when the corresponding pin in the print head should be fired. The HEADMASK variable is shifted right or left, depending on the orientation of the print head (1 bit/128 bit up). The shift instruction (left or right) is grabbed by the C program from either the __lshift or _rshift labels and is plugged into the. skeleton at the __SHIFT label. When the HEADMASK is at the end of the shift range, the BUFFER is sent to the printer (only the proper number of bytes for the print head size are sent), the BUFFER is cleared, and the HEAD-MASK is reset.
Once parsed from the strings of numbers separated by commas, the various strings used by the program are stored in order at the _STRINGS label, and their offsets from the _STRINGS label are stored in various places around the program (_VSOFF (vertical start offset), _HSOFF (horizontal start offset) and so on). Their lengths are also stored similarly. When they need to be printed, the program BSRs to the gettab routine, which points register A3 to the _STRINGS label. The offset of the required string is added to the base address, the length of the string is placed in register D2, and the string is printed using the "printit" subroutine.
THAT'S ALL, FOLKS
That just about covers the printer driver maker. C purists are probably gasping in horror at the GOTOs in the C section, but I'm not going to make any apologies. The program does what it should, and is still readable. The various routines included on the START disk, such as the DEREAD.C file, will probably come in handy for many readers.
If you have any questions on the program or lavish praise, I can be reached on CompuServe. My user ID is 76703,4224.