In Color
Capturing your ST's graphics on print and film
BY DARREL ANDERSON
Saddled with a black and white printer but desire color graphics? Let professional artist Darrel Anderson teach you how to produce beautiful color printouts with your ordinary dot matrix printer. Also, check out his tips on capturing spectacular ST graphics with a 35mm camera.
A sad truth-not everyone owns an ST. The excellent graphic capabilities of these computers would be of very limited value if they only took the form of on-screen images. Fortunately, there are many ways to transform those images into more widely accessible media. The most commonly available output devices offer not only the ability to capture your screen images, but also the opportunity to enhance the color and resolution capabilities of the ST. The techniques described here even allow those working with monochrome monitors to produce high resolution, full-color graphics.
One of the primary uses for my ST is producing illustrations for publication. It joins an array of other tools, mostly traditional, that can be used in combination to create visual art in many different forms. Some type of "hard-copy" is usually the link required to make the images transferable to other media, and available to people without computers.
In this article I discuss two forms of graphic output: standard (single color) dot matrix printers, available to most users and capable of producing surprising results when used creatively, and screen photography, the easiest and least expensive way to capture the true color and luminous quality of screen images.
PRINTERS
While not the purpose of this article to review or recommend specific printers, I thought it might he helpful to provide a brief overview of printer types and their respective advantages and disadvantages re: graphics. Please look at the REFERENCE section at the end of this article for additional information.
There are five basic types of commonly available printers: plotters, ink jet, thermal, laser, and impact. Let's take a look at each type.
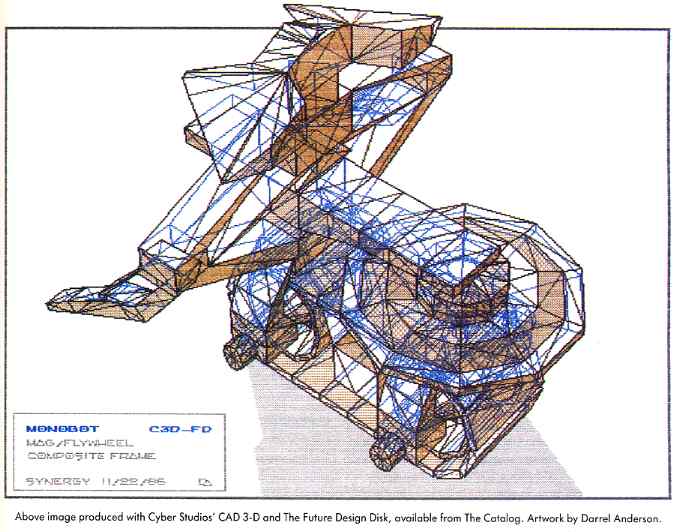
Plotters transfer computer generated images to paper by literally drawing on the paper with ordinary ink pens attached to mechanical arms. They are especially useful for technical illustrations or drafting applications. Any linear-based graphics, or vector-based software (such as Tom Hudson's CAD-3D), can produce impressive plotter output. Most quality plotters are expensive and have very limited text capabilities.
Ink jet printers spray liquid ink onto paper through tiny "jets" or nozzles. They produce a very clean, "tight" image, and many are capable of very high resolution output. Again, quality models tend to be expensive, inexpensive ones tend to be troublesome and difficult to maintain.
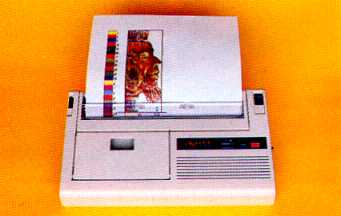
Thermal printers come in two types: those that use heat-sensitive paper (usually expensive, and it fades rapidly), and the more practical and versatile thermal transfer type, that can print on any paper, using heat-activated ribbons. Of particular note to ST users is the Okimate 20 (see the sidebar), an inexpensive machine with good graphic capabilities.
Laser printing is the state-of-the-art technology. These printers are clean, quiet, and produce very sharp, high-quality output. Currently they are very expensive, but look for prices to drop as these machines vie to become the new standard.
Impact printers transfer ink to paper by striking an inked ribbon. These printers come in two basic types: daisy wheel and dot matrix.
Daisy wheel printers use raised letter-forms, like those in typewriters, to impact the ribbon. Dot-matrix impact printers, the most common, use groups of small wires or pins that can be fired in any sequence, forming a variety, of graphic patterns including, but not limited to, letter-forms. The number of pins in the printhead determines the tightness or resolution of the dot patterns. The more pins, the better Most printers fall in the range of 8-24 pins. Some have color graphic capabilities, usually involving a multicolored ribbon that lays down each of 3 or 4 colors with repeated passes of the printhead. Price is often linked to these two features: number of pins and color capability
MULTI-PASS PRINTING
I've never been truly impressed with the output of any color impact printer. Inherent printing limitations make these printouts very unsatisfying, especially when compared to the on-screen source images. This limitation set my innovative gears in motion. I developed some special techniques that utilize various single color ribbons and a standard one-color dot matrix printer to create very pleasing full color graphics. These methods can also be used to improve the quality of black and white graphics.
Anyone who has tried to use printouts as originals for further reproduction, by photocopying or offset printing, knows the problem. After only one or two full-page printouts the ribbon develops weak spots. This causes grey areas in subsequent prints, which in turn leads to a broken-up image when reproduced. By reprinting the entire image, reproduction quality prints can be made from an otherwise worthless ribbon. Therefore, don't throw away any ribbon, black or color, no matter how tired it is. They're all useful in multi-pass printing.
These techniques don't overcome all of the limitations causing printouts to fall short of the brilliance of screen images. If that's really what you want to capture, look at the screen photography section in this article. If, however, you are interested in producing quality color graphics on paper with your simple printer, and are willing to do a bit of creative work to achieve those results. . . stay tuned.
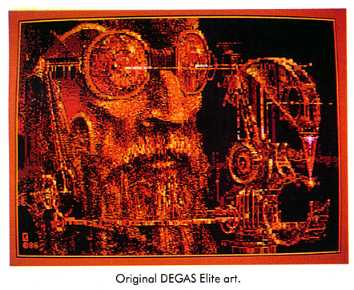
The examples shown here are produced with the Epson LX-80 using DEGAS Elite and its Epson black and white driver. The techniques should work with just about any dot matrix printer/graphics program/driver combination. (For more information on how to use your particular printer with DEGAS Elite, see Tom Hudson's "Printer Drivers The Easy Way: A DEGAS Printer Driver Maker Program," in this issue) Exact methods will vary with different systems. The basic idea is to run the same sheet of paper through your printer several times (once for each color) using the various single color ribbons available for most printers.
SETTING UP AND TESTING
The first step in this process is testing. By determining the capabilities of your printer you'll be better able to design graphics for print. A selection of color ribbons (see REFERENCE section), some good continuous feed 91/2x 11" paper, and your favorite drawing or paint program are needed to run these tests. Any good black and white graphic printer driver will do the job. I've included a special DEGAS test picture file, TESTPRNT.PQ2 in the COLORPR.ST folder on your START disk.
Since we want to overprint several colors, we need a registration system (a way of aligning the paper with the printhead for each successive color pass). Most printers have a form feed function that makes this fairly easy to set up.
With an Epson LX-80 equipped with tractor feed it's possible to set up a continuous paper loop, providing excellent registration. Registration without tractor feed is possible, however the inaccuracies of friction feed make it a touchy and less consistent prospect.
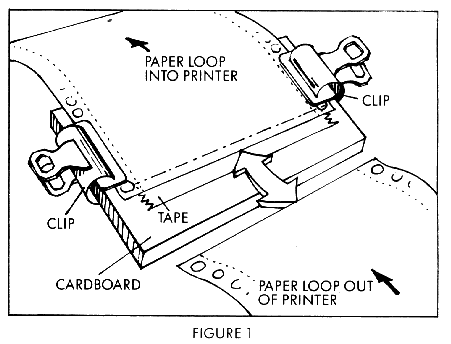
THE PAPER LOOP
Tear off three sheets of good quality, continuous feed paper (I've been using a 20 lb. 25% rag bond). Apply a strip of transparent tape to the back side of the bottom sheet of your paper loop (see Figure 1), so that half of the tape strip is exposed. Now load the paper as you normally would, feeding ,the un-taped top sheet into the paper slot. Feed the paper through until about half of the top sheet extends beyond the tractor pins. Join the loop by aligning the edge of the top sheet with the taped edge of the bottom sheet. I use a simple little device made of two bulldog clips and a piece of cardboard to make this easier (see Figure 1). Align the edges carefully so they touch but don't overlap. After you have the paper positioned, tack it in place, using light pressure. If it looks good, secure the splice using firm pressure.
graphic capabilities of
these computers would be
of very limited value
if they only took
the form of
on-screen images.
With the printer off use the manual feed knob to align one of the paper separations with the top of the printhead. Turn on the printer and try three successive form feeds. If the paper ends up exactly where you started, you're in great shape. The Epson form feeds are very precise, making registration a snap. Manual adjustment may be necessary if your form feed is not exact. The real test of accuracy will come when we do the color test. if you are unable to set up a paper loop on your printer you can still create multi-pass prints by manually backing up the paper to a predetermined position prior to each pass.
PRINTING
Now we're ready to print. Unsqueeze and load the TESTPRNT.PQ2 file into DEGAS in medium resolution mode. The vertical bar of empty labeled boxes is designed to show a few of the possible colors using yellow, red, and blue ribbons. These primary pigments offer the greatest range of color mixes. Other colors are certainly useful. There are at least eight available (counting black) for the LX-80.
To achieve color mixes we're combining several screen images, one for each color ribbon used. Each screen image is done in shades of grey representing the value or darkness of a particular color. In print terminology these images are called "overlays." A sample set of overlays is included in the TESTPRNT.PQ2 picture.
The standard DEGAS black and white printer driver for the Epson has an eight level grey scale. A color ribbon, say red, translates to eight shades or values of red. Multi-pass printing allows us to combine any of those reds with any of eight values of up to seven other ribbon colors. Theoretically this gives us thousands of colors to choose from. When printed out, however, many are indistinguishable shades.
To simplify things 1 usually work with color mixes composed of solid (0,0,0 palette setting on screen) and one or two values or halftones. I prefer the printer pattern generated by a palette setting of 3,3,3, which produces a smooth dot pattern on the Epson. Sometimes the 4,4,4 and 5,5,5 settings are useful. If you're using a different printer or driver do a simple test print consisting of small boxes of each of the eight grays (palette settings 0,0,0; 1,1,1 etc.) to determine which print patterns are best suited for color mixing.
The best sequence for multi-pass printing is to work from the lightest to darkest colors. This prevents contamination of the lighter ribbons like yellow, with ink from the darker colors such as blue. Before printing with color, clean the printhead. Next, turn off the printer, remove the ribbon cartridge and pass a strip of paper or cloth between the print-head and the ribbon guide. Load the yellow ribbon and we'll be ready to start.
With the printer off, manually feed the paper to the desired starting point. Turn on the printer Before we start printing a little trick is necessary to insure proper registration. If the TESTPRNT picture is on screen, erase it, or if you're using a program that has multiple screens, switch to a blank (white) screen. Now select Print Pic to start the printer (Yes, I'm asking you to print a blank screen.) After a couple of passes of the printhead press [UNDO] to abort the printing process.
ends up exactly
where you started, you're
in great shape.
Notice that the printhead stops in the far right position. This is where it will stop after printing each color. Now press the "on line" button once (taking the printer off line) followec by the "FF" (form feed) button. By doing this "mock" print we avoid a small register shift that occurs if we start with the printhead in the far left position it assumes on power-up. This may not be necessary for all printers and is definitely not needed if you must turn off your printer to change ribbons. The important thing is to insure that everything is in exactly the same state prior to each pass.
Re-select or re-load the TESTPRNT pic. The labels next to each of the boxes indicate the color mixes we're creating in this test. Y=solid yellow, y=halftone yellow, R=solid red, r=halftone red, B=solid blue, b=halftone blue. Since we are printing yellow first, fill all of the boxes containing a "Y" in their label with black using the solid fill pattern. Fill those containing "y" with the halftone grey (palette setting 3,3,3).
Now put the printer back on line (make sure that you peformed a form feed after the mock print). Select PRINT PlC from the DEGAS menu. After the printer has made enough passes to print the color bar, labels, and the first of the three overlays, abort the print process. Three off-line form feeds will bring the paper back into position for the next color (red).
Of course, three copies of this print can be made using this paper loop, but let's just make one this time. If this or any of the subsequent ribbons are weak you can reprint the image before changing ribbons. Double printing every color will produce a very vivid print.
If you're careful it's possible to change ribbons without turning off the Epson LX-80. Do not try to move the printhead with the printer on. This will damage the printer. Simply lift out the yellow ribbon and replace it with the red.
Repeat the steps we used to print the yellow. (There's no need to repeat the mock print.) Start by clearing the color-bar boxes (by filling with white) and filling those with "R" or "r" in their labels using solid black and grey fills respectively. Then, using the OPAQUE block mode, (BLOCK COPY in DEGAS, Blocked, Edge Stop in DEGAS Elite), move the RED OVERLAY into position exactly over the YELLOW OVERLAY eliminating the latter I've included vertical and horizontal registration lines to aid in positioning. When defining the block clip the overlay off just below its title so that you can use the vertical registration line.
After printing the red and re-aligning the paper loop, repeat the above steps with the blue ribbon in place. Be sure to clear and refill the color-bar and replace the RED OVERLAY with the BLUE OVERLAY.
The final result should be a color bar with a full range of hues, and a rather colorful drawing. This color bar doesn't show all of the possible combinations using these three colors in two shades, let alone those possible with additional ribbons and shades. If you're feeling ambitious, you might try creating some more complex color palettes.
DESIGNING GRAPHICS FOR PRINT
Now that we have a system for printing color graphics, some general theory and methods to aid in their design are in order. The color theory applies to all types of printout. Variations of the overlay techniques can be used for special effects with screen photography.
COLOR
Some limitations are imposed by the particular pigments and hardware used to print our graphics. After all, mixing the three primary pigments (yellow, magenta, and cyan) can theoretically yield any desired hue. All of the color pictures in this magazine are composed of mixes of those three colors (plus black in some cases). So, using three color ribbons with multi-pass printing, or the three color ribbon supplied with color printers, we should be able to print any desired hue. Unfortunately, that's not the case.
The offset printing technology used to print this magazine benefits from two important advantages over most computer printers. One is resolution. Very precise color mixes are possible because many thousands of tiny dots of varying size are combined in each square inch. The second is pigment transparency Offset pigments are very transparent, while ribbon ink tends to be a little less so. This diminishes the influence of the underlying colors on those overprinted.
Those are fairly unavoidable shortcomings. Even 24-pin machines can't come close to the resolution of offset printing. The requirements of impact transferable inks preclude perfect transparency In addition, good primary colors are not available for all printers. The only blue ribbon I've found for the Epson is not a true cyan. Cyan, in printing, is actually a blue-green. The blue ribbon is a bit off to the red side of the spectrum and incapable of producing certain hues when combined with other pigments.
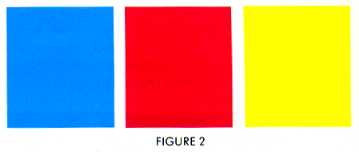
For some printers the primaries are not available, forcing you to design graphics around palettes like blue, brown, and purple. When shopping for ribbons look for a bright yellow, true magenta, and true cyan (see Figure 2 ) for maximum color range and flexibility Other colors are useful. For the Epson the green ribbon gets around some of the blues' failings, and the brown has good mixing potential. Whatever your printer/ribbon situation is, the trick is to learn limitations through testing and design graphics around them.
Some things, easy to create on-screen, are difficult to capture with most color printers. Pastel colors, subtle color shifts, luminous effects, and large areas of smooth color, all tend to lose something in the translation. Faded ribbons are very handy for solving some of these problems. They work like transparent inks and can be printed as solid patterns for very smooth color mixes and subtle tints.
If you're working with a color printer, print some sample palettes comprised
of small color boxes labeled with their respective RGB palette settings.
You'll discover, while a few of the printed colors approximate their on-screen
sources, many don't. Quite often an unexpected RGB setting will produce
a desired print color. Try creating your graphics on-screen first and then
change the RGB settings using the printed palette as a guide. This special
print version of your drawing may have to look quite odd on-screen to produce
the desired output.
| OKIMATE 20
If you want easy, inexpensive color printout capability, it's tough to top the Okimate 20 printer. At about $220 retail (including the required "Plug 'n Print" interface package), it is widely available and can be purchased at discount and department stores for substantially less. The Okimate 20 uses thermal transfer technology, requiring special heat sensitive ribbons. It will print on all types of paper but achieves optimal results with glossy thermal transfer paper (also commonly available and inexpensive). The three-color ribbons produce vivid full color prints with bright saturated colors. A color ribbon runs about $5.50 and is good for 7-10 vertical (half page) printouts. It's a one-use ribbon. The Okimate also offers excellent black and white capabilities. The black ribbon lays down a very sharp, dark, consistent image. These printouts are excellent for reproduction by photocopying or offset printing. It also prints NLQ text at 100 cps because only one pass of the printhead is required. The black ribbon is a little more expensive ($6.00) and also good for only one-time use. The printhead itself is a replaceable ($20.00) dollar item. I bad some bad experience with it burning out very quickly (twice), although, strangely enough, other Okimate owners I've talked to haven't had the same problem. Okidata informed me that the expected printhead life is 10 million characters, and that it is covered under the 90-day factory warranty
|
OVERLAYS
If you are using the multi-pass print techniques described above you'll need to develop a good sense of color mixing as well as an understanding of the concept of color overlays. Some form of overlays or color plates are used in the production of most forms of color printing.

Creating overlays for multi-pass prints is directly analogous to techniques used by artists to produce multicolored etchings, wood-blocks, or silkscreens. One plate, block or stencil is created for each color to be printed. The term overlay comes from the process of using a transparent material, laid over a master drawing, to design the individual color plates. The ability to easily make duplicates of our on-screen images aids in the creation of overlays. Similar techniques can be used to create multicolored images using a monochrome monitor and color filters when photographing the screen. (See the Screen Photography section).
To help design the overlays the artist usually creates a color sketch. This is a rough version of what the final art will look like. There are two methods that I use to create color sketches and overlays for multi-pass prints.
METHOD ONE
The first method works best in the low resolution mode. Set your background color (far left position on the DEGAS palette) to white and place your darkest color in the far right palette position. If you can get by without it, don't use the far right color in your picture.
Creating overlays in this first method is mostly a matter of elimination. I'll use the yellow, red, and blue ribbon system as an example. With a low resolution picture as a starting point, create the yellow overlay using the following steps. Make sure you have saved your picture to disk before creating the overlays.
First, eliminate all of the colors that don't contain yellow. This includes most blues, pinks, and purples. All such colors are removed from the image by changing their palette settings to match the background color (white 7,7,7).
Next, determine how much yellow is present in each of the remaining colors. A bright fire engine red, for example, needs solid (100%) yellow; change that color's palette setting to black (0,0,0). A blue-green might need about 25% yellow, so set its palette to light grey (5,5,5). Knowing how much of each primary to include in each color mix is tricky The surest method is to use a printed, annotated palette as a guide.
After setting all of the yellow-containing colors' grey values, save this altered image to disk. I use the last two letters of the filename to identify overlays (i.e. DUCKS_0Y.PI1). Now reload the original and repeat the process for each additional color you wish to print.
This is a fairly straightforward process. A clever programmer could probably write algorithms to create these overlays automatically. Doing them by hand offers the opportunity to customize them to suit the peculiarities of your printer. With some experimentation you'll learn to go beyond the mechanical interpretation of colors. Adding or subtracting pixels and creating special screens for additional colors produces enhanced results.
METHOD TWO
This method is not as simple as the first, but has the capability to produce exceptional color printouts. The sample overlays in the TESTPRNTPI2 are examples of this approach. One advantage is its use of the highest resolution available to you (medium-res with color monitors; high-res with monochrome). The sample includes only three overlays, but as many as desired can be used in the production of a single print.
The starting point is a medium or high-res "master" picture. Copies of this picture are then changed into overlays. DEGAS Elite is an excellent tool for this process. The multiple work-screens allow simultaneous creation and comparison of the individual overlays. The CHANGE function is very valuable for altering the master drawing. The difficulty is in knowing what the overlays should look like to achieve the desired result.
A simple example may help de-mystify the procedure. Color charts or graphs can be created easily with the methods used to print the sample color-bar. In fact, any master drawing composed of outlined shapes can be transformed into overlays by simply filling those shapes with greys (or various fill patterns in monochrome). The outlines, if present in each overlay will end up black after printing several colors.
Since the final print can contain many more colors than the chosen resolution accommodates, a separate color sketch is needed. One approach is to use a regular black and white printout of your master drawing colored with any traditional media, such as markers or colored pencils. A selection of colors that closely match your ribbons will make the sketch very useful.
Creating color prints with these methods is as much art as science. This is part of its appeal to me - it pushes the hardware beyond its expected performance. Take the time to discover the particular quirks of your printer. Anything from simple color text and graphics to full-blown fine art computer prints can be produced with the simplest hardware.
SCREEN PHOTOGRAPHY
The best way to capture the true color and feel of ST on-screen graphics is to photograph the screen. Often the screen images seen in this and other computer publications are reproduced from photographs. You can do your own screen photography with great success using relatively simple equipment.
The essential elements include a 35mm (or larger) format camera with a manually controllable shutter and aperture (lens opening), a cable release, and a tripod. It helps if the camera is a "single lens reflex" (SLR) type. This type of camera uses the same lens for viewing and placing the image on film, making it easier to accurately position the screen image on film.
The manual shutter cable release, and tripod are necessary because of the long exposures (1-7 seconds) required. For this same reason most simple snapshot cameras, including some of the all-automatic 35mm cameras are not suitable. Slide or negative film can be used. Film speeds (ASA) in the 100-200 range seem to work well. Higher speed films, while reducing exposure times, tend to lose some of the clarity and color fidelity. The standard lens (49mm) on most quality 35mm cameras will work for full screen shots. Good close-up lenses or "macros" (not to be confused with computing macros) will reduce distortion and allow you to photograph small sections of the screen.
SETTING UP
Find the proper distance from the screen by viewing it through the camera. Set up your tripod, taking care to adjust the height and angle of the camera perpendicular to the screen. This can be checked with SLR cameras by viewing through the lens. Make sure the edges of the screen, or those of a box drawn on the screen, are parallel to the edges of the view finder
away any ribbon,
black or color,
no matter how tired
it is.
Screen reflections are a major concern. If possible, take the pictures in a completely darkened room. If this isn't possible, it's necessary to set up a black backdrop. A large black cloth suspended from the ceiling is a good solution. It should be placed just in front of the camera and have a small hole through which the lens is inserted.
Exposures are based on three factors: shutter speed, aperture (the size of the lens opening), and film speed (sensitivity to light). I prefer an aperture (often referred to as the "f-stop") of f.8. Wider lens openings (lower f-stop number) increase distortion and make focusing more critical. Higher f-stops require very long exposures. In photography "bracketing" refers to taking a range of exposures to test for the optimal one. Always bracket your shots when photographing the screen. Prior to any serious photo sessions shoot a couple of widely bracketed test rolls to find the best range of exposures.
Most built-in light meters are incapable of giving readings for the
long exposures we're using. If you have a separate light meter you should
be able to get some idea of exposure settings. Hold the meter close to
a screen filled with a medium grey (3,3,3 or 4,4,4 palette settings with
a color monitor, or a 50% fill with monochrome). This gives you an average
reading. Actual exposures will vary depending on the overall darkness or
lightness of the image you're photographing. If you are unable to get a
meter reading, the following chart will help you get started.
|
(ASA) |
|
|
|
|
|
|
|
|
|
|
|
|
|
|
These exposures are based on tests done with Ektachrome slide film. Other films may vary. The times represent a range for bracketing. As a general rule the more white or light color a particular image contains, the shorter the exposure.
SHOOTING
Set the monitor's brightness control to its halfway notched position. This is a good brightness for photography and assures consistency from one shoot to the next. Check carefully for screen reflections. (This is best done with a black screen.) If the camera is properly aligned, film loaded, aperture & ASA set, and shutter set to manual, you're ready to shoot.
Since most cameras don't have shutter speeds greater than one second, some form of timing is needed. A friend pointed out to me that an audible source works best. Try a watch or clock that ticks, or a metronome. Some manual shutters must be held open for the duration of the exposure, while others require one push to open and a second push to close. Check your camera's manual and synchronize your clicks with the audible timer.
Bracket the exposures and keep careful notes with the pictures title, frame number, and exposure/film information. Large changes in exposure times are required to show significant differences on film.
SPECIAL EFFECTS
Screen photography opens up the entire world of photographic effects. Double exposures can be used to fuse computer graphics with other artforms, real-life images, or other computer images. Time exposures can capture the movement of on-screen animation. Special filters, lenses, and processing techniques add a new dimension to ST graphics. Perhaps in a future article I'll explore some special effects in greater detail. For now here are a couple of ideas.
By using color filters, you can transform monochrome images into color photographs. A series of overlays, photographed through color filters onto one piece of film can produce multicolored, high-resolution images. The color theory is different because we are mixing light. We divide shutter times so that several exposures can be combined.
Transparent images such as film negatives/positives or photocopies on acetate can be placed in front of the screen, colored in using a paint program, then photographed as a unit. This creates an interesting effect that transcends the resolution limitations of the screen.
These effects require a fair knowledge of photography and a good amount of experimentation to perfect. Simple screen shots however, are quite easy. Experiment and keep good records of your tests. The results are worth the effort. All of the rich color and luminous qualities of your ST graphics can be captured with photography.
THIRD GENERATION
The computer is just one of many tools that can be used to produce graphics. When combined with other media or manipulated by other devices, these graphics enter a new dimemsion. The methods I've described provide a hard-copy bridge between computer graphics and other art forms.
overlays for multi-pass
prints is directly
analogous to techniques
used to produce multicolored
etchings, wood-blocks, or
silkscreens.
Try experimenting with your photos and printouts. Your local copy shop is a good place to start. Modern electrostatic copiers have the ability to enlarge, reduce, color and copy your graphics onto a variety of materials. This is especially valuable if you wish to alter or enhance your work with traditional media. Photo labs also offer a number of options. See the REFERENCE section for the name of one mail order lab that offers some interesting services, including huge enlargements at relatively modest prices.
Also included in the REFERENCE section is the address of a place that does laser transfer images of computer graphics (i.e. the March 1986 ANTIC fractal cover). This is not an inexpensive service but it offers impressive results.
That's it for now. So. crack your knuckles, grab a fresh ribbon, fire up your printer, and let the glories of color computer graphics wash over you.
REFERENCE
PRINTER DRIVERS
- Stealing The ST Printer Driver by Tom Hudson START #1 Summer 1986 pp. 20-27
- Printer Drivers The Easy Way by Tom Hudson START #4 Spring 1987
- Compuserve SIG Atari 16
-
Ribbon Land
P.O. box 506
Exton, PA 19341
1-800-221-4892
CIRCLE 155 ON READER SERVICE CARD -
American Ink Products
27 Howard St.
San Francisco, Ca 94105
415-982-0161
CIRCLE 156 ON READER SERVICE CARD
-
ABC Photo Service
9016 Prince William St.
Manassas, Va 22110
CIRCLE 157 ON READER SERVICE CARD -
ImagesetTM
555 19th Street
San Francisco, CA 94107
(415) 626-8366
CIRCLE 158 ON READER SERVICE CARD
-
Epson America Inc.
23155 Kashiwa Court
Torrance, CA 90505
(213) 534-0360
CIRCLE 159 ON READER SERVICE CARD -
Okidata
532 Fellowship Road
Mt. Laurel, NJ 08054
(609) 235-2600
(800) OKIDATA
CIRCLE 160 ON READER SERVICE CARD
SOFTWARE
-
DEGAS and DEGAS Elite
Batteries Included
30 Mural Street
Richmond Hill, Ontario L4B 1B5, Canada
(416) 881-9941
Telex: 06-986-266
CIRCLE 161 ON READER SERVICE CARD -
Tom Hudson's CAD 3-D
The Catalog
544 Second Street
San Francisco, CA 94107
(415) 957-0886
CIRCLE 162 ON READER SERVICE CARD