MEDIUM OR HIGH RESOLUTION
THE ST DATE PLANNER
by David Plotkin
The ST Date Planner will generate a calendar for any month and year, print that calendar out and allow you to enter appointments for any day of the month. It is completely GEM-driven and easy to use.
Listing 1 is the GFA BASIC source code for ST Date Planner. If you do not have GFA BASIC, both the source code and the GFA BASIC run-only program (a program that allows people who don't own GFA BASIC to run programs written in that language) are available on this month's disk version or in the databases of the ST Users' Group on DELPHI.
USING ST DATE PLANNER
When you first start the program, the calendar for the current system month and year will be presented on the screen. This will be November 1985 for those without clock cartridges. To set any date, drop down the Selection menu and click on Select Date. A window will open in which you can type in the year you want. If you just press Return, the currently selected year will be used. Next, click on the month you want. The calendar for that year and month will appear.
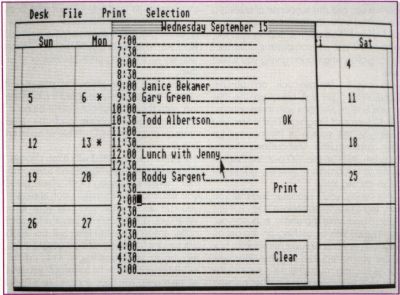
To enter appointments, click on any day of the on-screen calendar. A window for the day you choose will open, providing you a form on which to enter your appointments. Each half-hour time slot from 7:00 a.m. to 5:00 p.m. has a line, and you may type in just about anything you choose. The cursor arrows will move the cursor around the window, as will the mouse pointer. The backspace key moves the cursor to the left, erasing each character it passes over. The return key moves to the beginning of the next line.
Editing is done in "replace" mode; so just type over any mistakes you make. The delete and insert keys also work. Pressing the "Clr" key will clear the line on which the cursor rests. There are also three "buttons" in the window. The OK button returns you to the calendar. (You may also press the escape key to exit to the calendar.) Click on the same day again, and you will find that your entries are still there. However, you must save the file before selecting another month and year (and generating another calendar), or you will lose your entries. The Print button will print the current day's appointments on the printer.
(Programming note: Notice the strings Bon$ and Boff$ in the procedure Initialize. These are the printer codes for Epson and Epson-compatible printers that turn on and off bold printing. Substitute the codes from your own printer here if they are different.)
The Clear button will clear all the appointments entered for the current day. You are not asked to verify this selection, so be careful about choosing it! After you return to the main calendar, you will notice that any day where you have made at least one entry will be marked with an asterisk.
The File menu is for saving and loading calendars. Save File is important, since all data is lost whenever you select a new month or year. If you have chosen Select Date and realize that you haven't saved your file, just choose the same month and year you were working on, and the data will still be there. When you save a file, the program will prompt you for a filename, using the standard GEM file selector box. It will even construct a filename for you to use if you wish, consisting of the month and year.
Load File will load a file of previously saved data, and the calendar for the month and year of the loaded file will be presented after the file is loaded. Again, remember that you must save your data before you load a new file or you will lose the old data. Save Screen will save the current screen in DEGAS format. This is so you can embellish the screen or use DEGAS' printouts to get better results. Quit will take you back to GFA BASIC.
The Print menu allows you to Print File (dump all of the days for the currently selected month to the printer) and Print Screen, which will send a copy of the calendar to the printer. To allow for different types of printers and for daisy-wheel printers without graphics, I have kept the printing simple and used only widely available characters. You can replace the characters, if you like, with something that looks better on your printer.
THE PROGRAM
GFA BASIC is a remarkably easy language to program in, both due to its power and because it is interpreted. If you just want to use ST Date Planner, you can stop here; but if you would like to learn some GFA BASIC programming tricks, read on.
WINDOWS, DIALOG BOXES AND THE MOUSE
GFA BASIC has two windowing systems, and the beginning of the program demonstrates the more versatile of them. The built-in system allows you to set the center-point on the screen, then open up to four windows—one in each corner of the screen, with the center-point determining the size and shape of the four windows. This system also allows you to use such commands as FULLW, which calls up a full-screen window.
The second windowing system uses a table of window properties. The table starts at WINDTAB (a predefined variable). The first ten positions of the table (WINDTAB to WINDTAB + 10) define window 1, the next ten (WINDTAB + 12 to WINDTAB + 22) define window 2, and so on. The table is constructed as follows:
TABLE 1
| Window 1 | Window 2 | Window 3 | Window 4 | Property |
| WINDTAB | WINDTAB+12 | WINDTAB+24 | WINDTAB+36 | Handle |
| WINDTAB+2 | WINDTAB+14 | WINDTAB+26 | WINDTAB+38 | Attributes |
| WINDTAB+4 | WINDTAB+16 | WINDTAB+28 | WINDTAB+40 | X-pos |
| WINDTAB+6 | WINDTAB+18 | WINDTAB+30 | WINDTAB+42 | Y-pos |
| WINDTAB+8 | WINDTAB+20 | WINDTAB+32 | WINDTAB+44 | Width |
| WINDTAB+10 | WINDTAB+22 | WINDTAB+34 | WINDTAB+46 | Height |
Each item in the table consists of two bytes. The "handle" is the GEM identification for the window, and you would not normally mess with this (unless you like system crashes). Attributes set window properties such as Full Box, Title Box, Size Box, Sliders and such. The new version of GFA's documentation shows which numbers correspond to which attributes. The X-pos and Y-pos refer to the upper left corner of the screen, and the width and height determine the size of the window in pixels.
The two windowing systems do not get along well. If you use the built-in system, you may not use the WINDTAB system because you will get a system crash. So if you need to overlap windows, use the WINDTAB system, as I have in this program.
GFA BASIC has no easy way to use Dialog Boxes. By using a small window, you can simulate a Dialog Box, enabling the user to type in information and click on buttons. When you open a window, GFA automatically makes such commands as Print at work relative to the upper left corner of that open window. Further, the mouse information commands Mousex and Mousey return coordinates which are relative to the upper left corner of the window, not the screen. This is convenient when you don't know exactly where the window will be, such as when you allow the user to move the window. Since opening one window on top of another will erase what is underneath the new window, you can temporarily store a picture of the hidden portion by using the GET command; then PUT it back after you close up the top window.
The construct DO ON MENU LOOP is one of the most powerful in GFA. To use it, you would previously write procedures which define what you want to do when the user clicks the mouse button, moves the mouse in or out of a predefined rectangle on the screen, selects a menu item, presses a keyboard key or takes some action which causes GEM to send a message. These messages are such things as clicking on the CLOSE box, moving a slider or resizing the window. The new GFA documentation tells you how to retrieve the appropriate information for each type of message. After writing the procedures, you would have a series of lines such as:
ON MENU GOSUB RESPONDMENU
ON MENU KEY GOSUB RESPONDKEY
ON MENU BUTTON 1,1,1 GOSUB RESPONDBUTTON
These lines tell the program that you want it to branch to the routine when the proper action is taken. Then you just put the program in the DO LOOP shown above and wait for the user to do something. This is exactly how ST Appointment Calendar works (check the listing).
There is one difficulty with this, however. Once you have turned these commands on, there is no way to turn them off. For example, let's say that if the user presses the mouse button, and the program branches to RESPONDBUTTON, you temporarily want the program to ignore keyboard input even after the program returned to the DO ON MENU LOOP. The way to accomplish this is provide an empty procedure and reroute the keyboard command to this procedure (which does nothing except return):
ON MENU KEY GOSUB DUMMY
PROCEDURE DUMMY RETURN
Nothing more elaborate is needed.
When a mouse button is pressed, the program needs to respond. The procedure Menubutton reads the system variables Menu(10) and Menu(11) to get the location of the mouse pointer. It then converts the coordinates of the mouse pointer to figure out which day was selected, and then brings up the appointments for that day. This gets a bit complicated because the mouse pointer coordinates are relative to the upper left corner of the screen. (I could have used Mousex and Mousey, which are relative to the upper left corner of the window, but I didn't know about that at the time.) The conversion depends on whether you are running the program in high or medium resolution.
WHAT'S ON THE MENU?
The main action of this program is its response to menu selections. This is handled by the procedure RESPONDMENU. It tests to see which menu item was selected, then takes the appropriate action. The menu choice is returned as a number (Menu(0)). This number is an index into the string array that holds the menu items, and can thus be compared with each item in the menu:
IF Strip$(Menu(0)) = "Select Date" THEN....
Notice, though, that you need to match exactly the elements of the string, including any leading or trailing spaces.
One of the more interesting menu selections is the one that saves the calendar as a DEGAS format file. These files have 34 bytes at the front, followed by 32000 bytes of picture data. Saving the picture data is easy, you can do it in one command:
BPUT #1, Xbios (3), 32000
You must have previously opened channel 1 for output. Xbios(3) returns the address of the screen, and 32000 is the number of bytes to save. You can read the picture data just as easily:
BGET #1, Xbios(3), 32000
The 34 bytes mentioned earlier are arranged as follows: The first two bytes are the resolution. The resolution is returned by Xbios(4) and is 0 for low resolution, 1 for medium and 2 for high. To put this information into the first two bytes of a string which will be written to disk, you must first make sure the string is empty and available:
DEGAS$ = STRING$(34,"")
Then, you put the bytes in:
MID$(DEGAS$, 1, 1) = CHR$(0)
MID$(DEGAS$, 2, l) = CHR$(Res)
The other 32 bytes are the color palette. You start with element 3 of your string (DEGAS$ in this example). You can then DPEEK the hardware registers that hold the palette data. These registers run from &HFF8240 to &HFF8260. Of each two-byte number, only the lower three nybbles are valid—the highest four bits contain garbage. Thus, you need to mask the high four bits:
Dumn = (DPEEK(&HFF8420) AND &HFFF)
Then you need to turn the result into two one-byte numbers:
Dumhi = (Dumn AND &HFF00)/256
Dumlo = (Dumn AND &HFF)
MID$ (DEGAS$, 3, 1) = CHR$(Dumhi)
MID$ (DEGAS$, 4, 1) = CHR$(Dumlo)
Once you have loaded all the palette colors into DEGAS, you can just write it out to the disk:
BPUT #l, VARPTR(DEGAS$),34
and retrieve it just as easily:
BGET #1, VARPTR(DEGAS$),34
One of the things we don't do in this program, but you might want to do, is to reload the palette data and picture. I've shown you how to put the picture data back on the screen, but you can't just DPOKE the palette data back into the memory; it won't work. (They are hardware registers, which can be read, but not written to.) The first thing is to pull the character data out of DEGAS$ and back into numbers:
Dd$ = MID$(DEGAS$, 3, 1)
Dumhi = ASC(Dd$)
Dd$ = MID$(DEGAS$, 4, 1)
Dumlo = ASC(Dd$)
Dumn = Dumhi*256 + Dumlo
Dumn now contains all the color data for one color register, with the red, green and blue data in each group of four bits (the high four bits are empty). This is exactly the format for one of the forms of the SETCOLOR command; so you can now set the color:
SETCOLOR 0, Dumn
FAKING THE CURSOR
When you open an appointment window on the screen, you need to do several things. First of all, of course, you need to allow the user to enter information from the keyboard. But you must also respond to clicks of the mouse button, so that the user can indicate a cursor position and click on one of the three buttons. This presents something of a problem. The normal mechanism for getting user input from the keyboard would be with something like the INPUT command, which provides a cursor and full-editing capabilities on the chosen line. However, while the program is waiting for INPUT, it won't respond to mouse clicks. Using INPUT also precludes moving up and down the window with the arrow keys.
"THE SCAN CODE IS HOW THE ST DISTINGUISHES BETWEEN SUCH KEYS AS THE NUMBERS AT THE TOP OF THE KEYBOARD AND THE NUMBERS ON THE NUMERIC KEYPAD."
The way to accomplish fully flexible input is to once again use DO ON MENU LOOP and respond to mouse clicks and keystrokes. When a key is pressed, you can see what key it was by looking at Menu(14). Menu(14) is actually a two-byte number with the ASCII code of the selected key in the low byte and what is called the scan code in the high byte. The scan code is how the ST distinguishes between such keys as the numbers at the top of the keyboard and the numbers on the numeric keypad. You also need to look at the scan code for such keys as the arrow keys.
Once the program has figured out which key was pressed, it can act on that information. For example, if a letter key was pressed, then the letter can be printed on the screen. If an arrow key was pressed, you can move the position of the cursor. Just one little problem with that—there is no cursor! The program can easily keep track of the "cursor" position and print information in the correct place, but the cursor itself really doesn't exist and is not visible. This makes it very hard for the user to keep track of things.
The answer lies in the ability of GEM to print letters on the screen in a mode called "reverse transparent," which looks like nothing so much as a cursor. Say, for example, the left arrow key was pressed. What you do is print the proper character in the old position of the cursor in regular (or "replace") mode, move the cursor one space to the left and print the character in that position in reverse transparent. This is accomplished by the Procedure Prntit. GFA has no easy way to switch printing modes; so we resort to generic GEM calls, just like ST BASIC:
DPOKE Contrl,32
DPOKE Contrl + 2, 0
DPOKE Contrl + 6, 1
DPOKE Intin, 4
When you are done with reverse transparent mode, you can switch back just by:
DPOKE Intin, 1
There is one final thing you should know about setting an onscreen character to reverse transparent. You must erase the character first (while still in replace mode, just print a space in its place), switch to reverse transparent mode, then print the character. Otherwise, instead of a character printed in reverse, you will get only a solid rectangular cursor.