GRAPHICS
ALL RESOLUTIONS — TOS IN ROM
Mouse-Ka-Mania!
A SPECIAL INCLUSION

Replace the arrow cursor with any shape you desire... and animate it too!
by Charles F. Johnson
Charles F. Johnson is a professional musician and, now, a semi-professional computer programmer/reviewer/author. He lives in Los Angeles with his wife Patty and Spike, the world's most intelligent (and gluttonous) cat. Charles is a SYSOP on the Analog Publishing Atari SIG on Delphi; his user name is CFJ.
How would you like to be able to change the shape of the GEM mouse cursor, customize it with a sophisticated editor, and install the new mouse cursor as the GEM default in place of that omnipresent arrow? Would you like to run your favorite GEM programs with your custom mouse in spite of their (and GEM's) best efforts to reset it to the arrow? And what if I threw in the ability to have mice in two colors in medium and low resolution? Then, for the piéce de résistance, how about if I let you animate those customized mice—up to thirty-two frames, each with its own color information? If all this sounds like fun, read on... Mouse-Ka-Mania is for you!
Mouse-Ka-Mania is a GEM desk accessory written entirely in 68000 assembly language. The program grew from a suggestion that Maurice Molyneaux (author of the "Step 1" series) made to Clayton Walnum, ST-Log's Technical Editor. Clay passed the suggestion on to me (an "accessory that lets you edit the mouse shape," he said) and the rest is, well, history, kind of. (See Maurice's "Mice-Conceptions" accompanying this article, for some excellent tips on creating your own mice.)
Mouse-Ka-Mania is a mouse editor that can be run from within any GEM program that allows a menu bar; but it also has several capabilities that set it apart from other mouse editors. It lets you replace the system's arrow cursor (you know, the one you see every time you turn on the ST) with any mouse-begotten shape you can dream up. And, it lets you design an animation loop of up to thirty-two frames, which will cycle at any speed.
The mouse editor part of Mouse-Ka-Mania works in medium or high resolution. However, in low resolution you can still load a custom mouse shape (single-frame or animated) from disk, install or remove it as the default, and adjust its colors.
How to work this thingie.
The Mouse-Ka-Mania accessory is included on this month's disk edition of ST-Log, under the filename MOUSE-KA.ACC. You can also find the program on the ANALOG Publishing Atari SIG, on the Delphi information service. Simply copy this file to the main directory of your boot disk. (If you have a hard disk, you'll probably want to copy it to drive C.) And remember, GEM only allows you to install six accessories at a time.
Now, turn off your computer and reboot with the disk containing MOUSEKA.ACC. When the GEM desktop appears, you'll find Mouse-Ka-Mania listed among the accessories in the "Desk" drop-down menu. Click on its name and the editor will appear.
An ST mouse cursor is composed of two elements: data and mask. The data is the actual shape of the cursor (usually in black or the same color as the text). The mask is used to ensure that the cursor is still visible if it passes over an area of the same color as the data. For example, examine the standard ST "arrow" cursor as it passes over a selected object, and you'll see a 1-pixel-wide area of white space surrounding the cursor. This is the mask.
The Mouse-Ka-Mania editor lets you edit both data and mask for the mouse cursor on the same screen (see Figure 1). The left button turns on the squares in the grids, and the right button erases them. You can hold the button down and drag the mouse to draw continuous lines and other shapes. When you draw on either data or mask grids, it shows up on both. If you're drawing on the data side, you'll see a solid fill pattern on both grids; if you're drawing on the mask grid, the cells will be filled with a different pattern (and a different color in medium resolution).
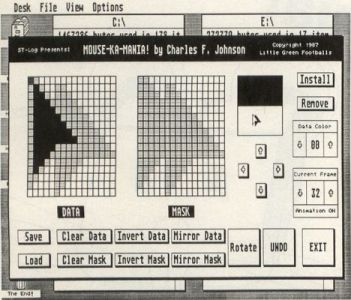
To understand how the editing grids work, picture them this way: each one consists of the grid itself, with two transparent plastic eels laid over it. The shapes of the data and mask are drawn on these transparent cels. On the data grid, the data is drawn on the top cel, overlaying the mask underneath. On the mask grid, the mask overlays the data. Hence, if you draw in the same place on both data and mask grids, then erase the mask, you'll see the data appear from underneath the mask as if it were being uncovered.
The "hot spot" is the active point of the mouse cursor. On the system's default arrow cursor, it's located at the tip of the arrow. (Makes sense, I guess.) This is how GEM knows what you're pointing at as you move the mouse around the screen and select objects by pressing the buttons. Mouse-Ka-Mania lets you move the hot spot to any point in the data grid, allowing you to construct odd shapes like upside-down arrows. The hot spot is set on the data grid only, by one of two methods. The first method is to hold down the CONTROL key on your ST's keyboard and click the left mouse button on the square where you want the hot spot to appear. The second method is to press both mouse buttons at once, but there's a trick to this. If the square you want to move the hot spot to is already turned on, you should first press the left button (so Mouse-Ka-Mania doesn't turn the square off), then tap the right button and release it. If the square isn't selected, first press the right button, then tap the left button. Doing it this way will insure that you don't accidentally draw or erase squares in the data grid.
Just to the right of the editing grids is a rectangle with the top half filled in. This is the "change box." Whenever you move the mouse cursor into this box, it will instantly change to the form you're currently editing, giving you an easy way to see what your mouse is up to.
Down the right side and along the bottom of the editing box are rows of objects which can be selected with either mouse button. These button objects provide the editing commands to manipulate your rodent in lots of ways, including inverting, mirroring and clearing either data or mask. There's a "Rotate" button which causes the mouse form (both data and mask together) to rotate 90 degrees in a clockwise direction. There's even an UNDO command which will reverse your last action. UNDO only works on the very last thing you did, whether drawing or using an editing button.
The SAVE and LOAD commands call up the dreaded GEM file selector, to enable you to store your mouse shapes or animation sequences on disk. Mouse-Ka-Mania uses default extensions of .DAT for single-frame mouse data files and .MKM for animation data files. When you type in a filename you don't need to add the extension; just type the first eight characters and Mouse-Ka-Mania will automatically tack the .DAT or .MKM onto the end. Of course, if you want to type .DAT, or use some other extension, you can still do that. If the filename you use already exists on the disk, Mouse-Ka-Mania will warn you with an alert box that asks if you want to overwrite the existing file.
Underneath the change box are four small buttons containing up, down, left and right arrows, in a diamond formation. These buttons allow you to scroll the mouse shape 1 pixel in any of those directions. If the shape scrolls off the editing grids, it will wrap around to the other side.
In the upper right corner, next to the change box, are two buttons labeled "Install" and "Remove." "Install" lets you install the current shape on the grids as the system mouse cursor, replacing the default arrow pointer entirely. Your mouse will stay installed no matter which program you run. Anytime a program or the desktop tries to change the mouse to the arrow form, Mouse-Ka-Mania will intercept and replace it with the cursor you want. "Remove" unhooks the custom mouse from the system and lets the arrow reign supreme once again in the mouse kingdom.
Underneath these two buttons is the color box. This box lets you adjust the color of either the data or the mask. When you first summon Mouse-Ka-Mania from the desk menu, the top line of this box will display the words Data Color. Clicking on this top line will toggle it between Data Color and Mask Color, and the color value below will be displayed accordingly. Click on the up and down arrows on either side of the current color value to raise or lower the value, and move the mouse into the change box to see what it looks like. If you find a color combination you like, install it as the system default...and presto! Colored mice, flying around your ST's screen!
Go ahead and play around...draw some shapes on the editing grids; try clicking the different editing buttons and notice their effects. Alter the colors for data and mask, and move the mouse into the change box to check out your creations. Install it and you can use your mouse shape to draw with. When you've got a feel for how Mouse-Ka-Mania works, come back to this article and we'll dig into the subject of animation.
Okay, now that you're a maestro of mouse manipulation (I make no apologies for my shameless alliteration), let's examine the animation control box, located just underneath the color box. When Mouse-Ka-Mania first appears, the top line of the animation control box should display the words Current Frame. If you click on this top line, you'll advance through the other two animation options: "# of Frames" and "Delay." The up and down arrows change the values displayed in the center of the box.
"Current Frame" is the mouse shape you're presently editing, which can be a value from 1 to 32, and "# of Frames" is the number of consecutive frames that define an animation "loop." This will usually be set to the same number as the last frame in an animation sequence. "Delay" is the number of vertical blank interrupts (about l/60th of a second) to wait between frames of an animation sequence. The bottom line of the animation control box toggles between "Animation OFF" and "Animation ON" when you click on it. Note that, if a mouse shape isn't installed, turning animation on will have no effect.
If you hold either SHIFT key while clicking on the up or down arrows to change the "Current Frame," the shape that's on the editing grids will be copied into the new frame. This lets you easily generate variations on a shape. If you want to copy a shape to a nonconsecutive frame, you should save it to disk first, then load it into the new frame. (A RAM-disk is ideal for this purpose.) You'll also notice that the data and mask colors are remembered for each frame of an animation sequence, allowing you to create fancy color cycling effects.
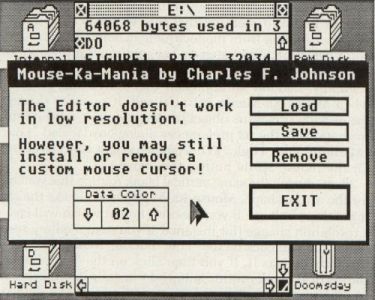
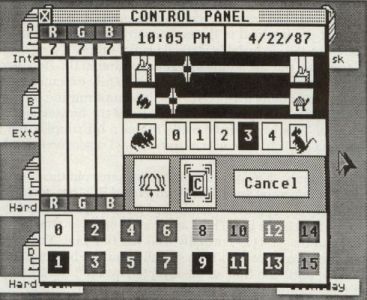
In low resolution, Mouse-Ka-Mania works somewhat differently. To be more specific, the editor doesn't work at all...there simply isn't room on the low resolution screen to do it justice. Instead, you'll see the dialog box in Figure 2, which allows you to load, save and remove a mouse form, and also change the colors in much the same way you do with the editor in medium resolution. In low resolution, changing the colors instantly changes the mouse's color; there's no need to install it after a color adjustment. The color numbers used by Mouse-Ka-Mania correspond to the colors in the control panel in the manner shown in Figure 3.
You can load an animated mouse file in low resolution, but you can't edit it in any way. If you want to adjust the colors for the individual frames of a low resolution mouse animation, you must do it in the medium resolution editor and save it to disk. This isn't too much of a problem, especially if you use a RAMdisk. Some impressive color cycling effects are possible in low resolution, with sixteen colors to choose from.
Boot up with a custom mouse.
This handy-dandy little accessory will also allow you to install a custom mouse (single-frame or animated) when the accessory is loaded, at boot time or after a resolution change. Since the number of colors you can work with is different in low, medium and high resolution, you may install different mice for each resolution.
To install a mouse as the boot default, copy the mouse data file you've saved with Mouse-Ka-Mania to the main directory of your boot disk, and rename it either MOUSELOW.DEF, MOUSEMED.DEF, or MOUSEHI.DEF, depending on which resolution you want to use it with. Alternatively, you can just save the mouse shape or animation sequence to the main directory under one of those names.
The little mouse who could.
The ST's "desktop" program is really in love with that arrow cursor; it tries to keep setting it back every chance it gets. You may occasionally notice the arrow cursor appear for a brief flickering moment, but, once you've installed a Mouse-Ka-Mania mouse, the ST will never be able to totally replace it with the arrow again—at least until you remove it.
Mouse-Ka-Mania performs this feat of legerdemain by stealing the ST's vertical blank interrupt vector, at location $70 in the zero page. Sixty times a second (seventy in monochrome), the system's sprite buffer is checked to see if something (either GEM or an application) has put that old arrow cursor in there, and, if so, it's replaced with your custom mouse. This sprite buffer isn't a documented location, so Mouse-Ka-Mania uses a trick to find it. In its initialization phase, immediately after loading, Mouse-Ka-Mania calls the AES function graf__mouse, to set the mouse to the arrow cursor. Then it searches memory for the word values that define the arrow shape. When it finds all thirty-two words, it has found the place where the ST keeps its mice.
Those of you with some ST programming knowledge may be wondering why I didn't use the vertical blank queue list, instead of stealing the main VBLANK interrupt vector. The vertical blank queue contains a list of routines which the system will call on a vertical blank interrupt. A pointer to this list is contained in the system variable__vblqueue, located at $456. To install a vertical blank routine of your own, you simply put the address of your routine in the first zero entry in this list. The OS then automatically executes your code as part of its main VBLANK interrupt routine, saving all registers and generally taking care of the housekeeping for you. This would have made things a bit simpler, but I didn't use this list because of something I discovered while testing Mouse-Ka-Mania.
Apparently, there are quite a few programs out there (even some commercial ones, like Word Writer ST) that don't use the "officially approved" method of installing a routine into the vertical blank list. There are usually eight vectors in the list, and the ST's OS normally uses the first one. The legal (and sensible!) method is to search from the beginning of the list, until you find an open vector, and put the address of your routine there. The offending programs simply use the second vector, assuming it will always be open—and clobber anything else that happens to be there. Needless to say, this kind of sloppy programming can wreak havoc on the system if some other program has already installed a routine into the second slot in the VBI list.
Therefore, since Mouse-Ka-Mania is an accessory—and must be able to peacefully coexist with as many different types of applications as possible—I decided to install my routine by plugging its address into the main vertical blank interrupt vector at $70, and then having my code fall through to the normal VBI routines. So far, I've found no programs incompatible with this approach.
Problems, problems.
As is often the case, I programmed the main routines of Mouse-Ka-Mania very quickly (actually, in less than a day), then spent three more weeks tracing down problems like the one above. I discovered another interesting quirk in the ST's operating system while developing Mouse-Ka-Mania. ("Interesting quirk" is a nice euphemism for "bug," don't you think?)
When you do a resolution change from low to medium, or vice versa, using the desktop's set preferences menu, the interrupt vectors in page 0 are not reinitialized—although accessories and the DESKTOP.INF file are reloaded, and the memory they used previously is cleared. Sooo...if I installed a custom mouse with Mouse-Ka-Mania, then changed resolution, the vertical blank interrupt vector I had stolen was suddenly pointing at empty memory. This led to some very picturesque system crashes.
This problem had me stumped for almost a week. How could I tell if the user was changing resolutions from the desktop? I tried using the vector at location $46E, about which Abacus's Atari ST Internals says: "Vector for changing the screen resolution. A branch is made via this vector when the resolution is changed." Sounds like it should work; I just steal this vector too, and turn off my vertical blank if a resolution change is in progress. Unfortunately, Abacus forgot to mention that this vector is only used if you're switching from monochrome to color, or vice versa, not when switching between low and medium resolution on a color monitor.
Finally, I found an approach that solved the problem: when Mouse-Ka-Mania is initialized, it searches through the desktop program's object trees in memory, until it finds the buttons in the set preferences dialog box labeled "Low," "Medium" and "High." (This happens right after the search for the mouse sprite buffer; see above.)
Then, during the same vertical blank routine that watches for the arrow shape, Mouse-Ka-Mania also checks the status of these buttons. If you choose a button which will cause a resolution change (for instance, if you're in medium resolution and you click on the "Low" button), Mouse-Ka-Mania instantly detects it. If you then click on the "OK" button, the vertical blank routine simply de-installs itself, preventing the resolution change from upsetting the ST's delicate temperament.
This method—in programmer's lingo—is a "kludge" of the first water. It irks me to use it, but in this case I had no choice, because GEM does not inform accessories of a resolution change!
The defeat of an old adversary.
In the course of developing Mouse-Ka-Mania, I discovered a way to get around one of the most frustrating programming problems I've encountered on the ST: mouse button bleed-throughs. This problem occurs when you're using VDI to check the mouse position and button states, then call some AES function (such as the file selector box).
The AES part of GEM seems to "remember" some button presses, even though they've already been accepted by the VDI. So, if you call an AES function to get input from the mouse, the AES will occasionally react as if you had pressed the button—even though that was ages ago. Real trouble is in the works if you happen to be over the spot where an application's "Exit" button will be when the AES grabs that spurious button press. You may find yourself suddenly returning to the desktop! What we have here is a communication failure between the AES and VDI parts of GEM.
Official GEM doctrine says, "Don't mix AES and VDI input." When writing a GEM-based program that depends on user input, you're supposed to stick with one or the other. Well, for several reasons (the foremost being speed), that was an unacceptable solution to use in Mouse-Ka-Mania. The AES function for reading the mouse, graf__mkstate, is sluggish in comparison to VDI's vq__mouse.
In the Mouse-Ka-Mania editor, VDI routines are used to track the X/Y position of the mouse and read the state of the mouse buttons. The AES form__do call, which manages input in dialog boxes, is not used. But, when you save or load a mouse shape, I call the GEM file selector, which uses AES input routines. When the AES took over at this point in early versions of Mouse-Ka-Mania, strange things would happen. Files would be selected by accident, or the console bell would ring endlessly as the stupid (pardon me; it's really just ignorant) AES thought the mouse button was being pressed outside the file selector's dialog box area. This drove me to distraction, and after quite a bit of experimentation, I came up with old Doc Johnson's prescription for VDI/AES mouse button bleed-throughs.
Before doing any VDI mouse input, use the VDI call vex__butv (exchange button vector) to point the system's mouse button interrupt routine to an RTS, and save the original address of the button routine. While this vector points at the RTS, the AES remains blissfully ignorant of any and all mouse button presses. What's more, the VDI function for checking the mouse position and buttons (vq__mouse) still works! Then, before calling any AES functions which read the mouse (like form__do, fsel__input, graf__mkstate, or evnt__button, just to name a few), replace the original button vector that was saved after the first vex__butv call Then the AES input functions work fine again, with no button bleed-throughs. I've run a lot of tests, and, so far, this fix has worked 100 percent of the time.
Mega-mania.
I recently had the chance to test an early version of Mouse-Ka-Mania on a new Mega ST4 (the 4-meg model). Of course, it didn't work. In the original version, I was using some undocumented memory locations which changed in the new TOS ROMs. Luckily, I was able to spend enough time with the new machine to analyze the problems, and the fixes I came up with will work on both of the current versions of ROM TOS. (Mouse-Ka-Mania doesn't use undocumented variables anymore, except when searching for them.)
Enjoy Mouse-Ka-Mania—you'll never have to look at that drab, dull arrow pointer again!