Mastering Coleco

|
By Owen Linzmayer
After buying your new ColecoVision, you plug in the free Donkey Kong cartridge and confidently sit back, expecting a few hours of whimsical electronic enjoyment.
"Wait just a minute, my patterns don't work on this game," you whine after losing a man on the first screen. In the transition from the arcade to home, Donkey Kong has gone through some overhauls which void the old coin-op patterns. But fear not, we at Creative Computing have devised trustworthy patterns for the ColecoVision version of Donkey Kong. Follow them to higher scores.

|
The keypad on the joystick is used to select the difficulty level of the game. Since you want to see all three screens and rack up high scores, choose option 1, the easiest. Pushing the joystick right or left causes Mario to move in that direction. To make Mario climb a ladder, push the joystick up when he is at the bottom of it. Pressing the left button on the joystick controller makes Mario jump in the direction he is moving.
Below the score indicator is the bonus timer. When the timer hits 1000 points, a warning is sounded. If it reaches zero, you die. If you complete the screen with time remaining, you are awarded bonus points.
|
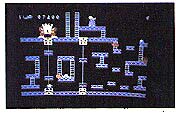
Our hero, Mario the jumpman, is dressed in red overalls topped with a matching cap. If you select game option 1, you begin the game with five men. You can lose a life if you fall too far, run out of time, get crushed, touch a barrel, or run into a fireball. You win one free man when you reach 10,000 points.
On the first screen, Kong has an endless supply of barrels which he rolls down the ramps. These barrels can fall off the edge of a ramp or roll down any ladder. Contact with a barrel is deadly, but luckily Mario can destroy them if he is holding a hammer. Barrels can be jumped from a standing position, but a running jump is safer.
The hammers that hang in mid-air provide temporary immunity to barrels and fireballs. When he grabs a green hammer, Mario swings it wildly overhead for 13 seconds. If a fireball or barrel makes contact with his body while he has a hammer, it is destroyed. Unfortunately, he cannot climb ladders or jump while holding a hammer. On the first screen, to release a hammer before the 13 seconds expire, walk off the end of a ramp.
|
There are two types of ladders that you encounter, broken, and unbroken. The unbroken ladders are used to climb from one level to the next. To avoid a barrel that is rolling in your direction, you can choose to climb a broken ladder. You cannot move to a higher level, but you can get out of the way of danger.
Fireballs are found on the second and third boards. These guys are tricky because they act in a random manner. When they come to an intersection, they may or may not change direction. Because they are slow, Mario can jump over fireballs only if he has a good running start. As with the barrels, touching a fireball is deadly.
The object of the second board is to remove all six rivets by walking over them. These yellow plugs are found on the three upper platforms. When Mario crosses over a rivet, it disappears, leaving a small gap in the framework that he must jump over.
Littering the second and third boards is a variety of women's accessories including hats, purses, and umbrellas. Pick these up for bonus points.
|
The only new things on the third screen are the two fast-moving elevators. The left one moves up, and the one on the right goes down. Your timing must be pretty good if you plan to ride these with success.
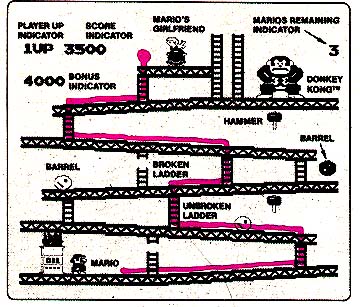
First Screen--Ramps
This screen is the easiest. Even so, many players have problems completing it. Follow the illustrated pattern without hesitating for a second. If you successfully jump barrels when necessary, you should have no problem completing this screen.
Never grab a hammer. Although it is tempting to start smashing things with a hammer, you are really putting yourself in unnecessary jeopardy. Hammers last for 13 seconds, but there is no color change to indicate when one is about to disappear.
You must learn how to climb ladders quickly. If you simply walk over to the base of a ladder and point the joystick in the up direction, you slowly plod up the ladder. To shoot up a ladder, jiggle the joystick between up and the center "off" position. For a reason we have yet to determine, Mario seems to slide up ladders like lightning when you use this technique.
|
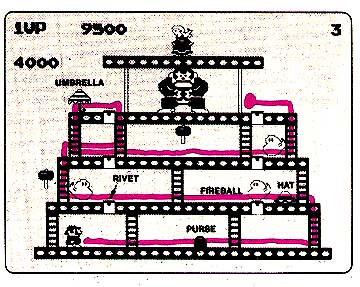
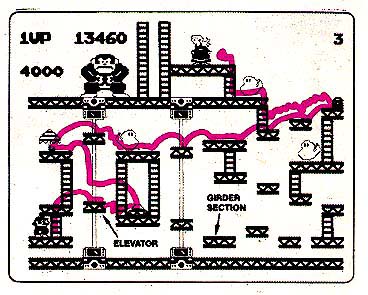
Second Screen--Rivets
The pattern shown in the picture was designed with two things in mind: to break up the three fireballs so that they don't gang up on you all at once, and to allow the player to grab all three accessories. Because the fireballs act randomly, you have to be more careful as you proceed through this section of the game.
As on the ramps, ignore the hammers on this screen. Unlike the first board, here you must hesitate at times, waiting for a fireball to get out of your way. Don't be afraid to stand around waiting for a while.
|
Third Screen--Elevators
If you see that you will definitely lose a man by staying in one place, then by all means move. You probably took too long doing something, thereby upsetting the delicate timing required to complete this board.
This is the hardest screen, but don't let that scare you. If you are skilled enough to reach this board, you have enough talent to complete it.
Although the accessories are out of the way, this pattern was designed to let you acquire all three of them. If you would rather take the easy way out, feel free to follow a more direct path to the final ladder.
|
As on the second screen, avoid the fireballs at all costs. Again, don't feel bad about waiting for a fireball to get out of the way. You have more than enough time to complete this screen.
The wiggly lines on the picture illustrate a fall. There are certain distances that you can safely fall, but most people don't know about this. Wherever you see the wavy lines, that means you should walk in that direction, allowing yourself to fall. Avoid the temptation to jump.
The wiggly lines on the picture illustrate a fall. There are certain distances that you can safely fall, but most people don't know about this. Wherever you see the wavy lines, that means you should walk in that direction, allowing yourself to fall. Avoid the temptation to jump.