Block PEEK And POKE For Atari
Ronald P Lambert
Here is a convenient way to eliminate long initialization delays caused by POKEing large amounts of data into memory. It works entirely in BASIC and works very fast. The demonstration program moves the entire character set in an instant and redefines the keyboard as a Dvorak layout. This technique can be used on all Atari 400/800, XL, and XE computers and is recommended for intermediate to advanced BASIC programmers.
PEEK and POKE are among the fastest commands in BASIC. But because they handle only one byte at a time, it can take a while to transfer large blocks of data from one area of memory to another. We've all waited while programs with long loops PEEK a series of memory locations, or READ numbers from DATA statements, and then POKE the numbers into memory somewhere else. Perhaps the program is redefining the character set, or setting up player/missile graphics, or building a machine language subroutine, or creating a new keyboard definition table. Whatever's happening, it slows things down.
Lengthy FOR-NEXT loops with PEEK and POKE or READ and POKE are the primary cause for tedious delays while these programs initialize. No one likes to sit staring at a blank screen for very long. The program usually prints a message like "Please wait while I initialize," but isn't there a better way? Sometimes a machine language subroutine can help speed things up, but if you can't write in ML yourself, finding a routine exactly suited to the needs of your program can be difficult.
Fortunately, Atari BASIC's flexibility provides a solution. It's possible to transfer large blocks of data from Read Only Memory (ROM) or program lines to any area of Random Access Memory (RAM) virtually instantaneously--with BASIC commands only. The secret is called the string offset technique. By modifying the variable value table (a section of memory which keeps track of BASIC program variables), you can redefine any string and relocate it anywhere in memory.
Here's a quick overview of how the technique works. Suppose you set up a string called ROM$ which contains a block of data found in ROM--the character set data, for instance. Next, you set up another string called RAM$ in the area of RAM to which you want to move the data contained in ROM$. To copy the data from ROM to RAM, then, all that's required is the simple statement RAM$ = ROM$. Is that easy enough? Using the string offset technique, any portion of ROM--or all of ROM, if you make the strings big enough--can be copied into RAM in the blink of an eye.
The Variable Value Table
To use the string offset technique, you have to learn how to modify the variable value table and the string offset pointers. This isn't too difficult if you tackle the job one step at a time.
The first step is to make things easier for ourselves by insuring that ROM$ and RAM$ are the first variables found in the table. We can do this by making ROM$ and RAM$ the very first variables defined in the program. Enter NEW as a direct command before typing the first program line containing these names. Then dimension the variables in this order:
10 DIM ROM$(length),RAM$(length)
where length is the length of each string in characters as required by your program. If you're moving character set data, for instance, you'd dimension these strings to the number of bytes in the character set--1024 bytes in graphics mode 0 or 512 bytes in modes 1 and 2. (Usually you'll dimension ROM$ and RAM$ to the same length if you're transferring a block of memory.)
However, if you are using an Atari 400 or 800 with the old BASIC revision A, a major caveat applies. You cannot move blocks of memory that are exact multiples of 256 bytes. Attempting to move blocks of this size will trigger the infamous BASIC lockup bug, freezing your computer until you turn the power off and back on--which will, of course, result in the loss of your program. [For more information on the lockup bug, see this month's "Readers' Feedback" column. -Ed] You can determine your version of BASIC by entering PRINT PEEK (43234). If the value returned is 162, you have revision A. If 96 is returned, you have revision B (built into most 600XL and 800XL models), and 234 indicates revision C, available on cartridge from Atari and built into the XE models.
The string offset technique will work as described with revision A as long as you make sure your block length is not an exact multiple of 256. So for this example you should substitute 1025 instead of 1024. This will transfer an extra byte of memory following the character set, but that doesn't cause any problems and it prevents the lockup bug from biting.
The second step is to make BASIC think that ROM$ is actually 1024 bytes long (remember, use 1025 for revision A BASIC). The DIM statement reserves memory for the string but doesn't actually define the string. Use a line like this:
20 ROM$(length) =" "
By defining the last character in the string as a space, BASIC is forced to treat ROM$ as a 1024-character-long string, even though no other characters have been defined.
The third step is to calculate the location of the variable value table in memory, with a statement like this:
30 VT=PEEK(134)+PEEK(135)*256
The variable VT equals the starting location of the variable value table. Each string which is declared in an Atari BASIC program has eight bytes in this table. We'll see the significance of these bytes in a moment.
After these variables are set up, the first eight bytes in the variable value table (VT to VT + 7) contain information for ROM$, and the next eight bytes (VT+8 to VT+ 15) contain information for RAM$.
Locating The Strings
To use the string offset technique, we're primarily interested in the third and fourth bytes for each of these two variables in the variable value table. The memory locations for these bytes can be expressed as VT+2 and VT+3 for ROM$, and VT+10 and VT+11 for RAM$.
What do these bytes signify? Briefly, each pair of bytes is a low-byte/high-byte combination that indicates the relative displacement of each string from the starting location of the first string in the program. Since we've made sure that the first string in the program is ROM$, the values stored in VT + 2 and VT+3 for ROM$ will both be zero. And since we've also made sure that RAM$ is the second string in the program, the values stored in VT+10 and VT+11 for RAM$ depend on the length of ROM$
For instance, if ROM$ is dimensioned to 1024, then the memory which BASIC sets aside for RAM$ must begin 1024 bytes after the start of ROM$ to leave room for ROM$. Therefore, the value stored in VT+ 10 is zero, and the value stored in VT+ 11 is four. (Since VT + 11 is the high byte of the offset, it's multiplied by 256, which equals 1024.)
Actually, the memory for ROM$ and RAM$ does not begin at these locations. Instead, you have to add another value indicated by the string offset pointers at memory locations 140 and 141. If you use this statement:
40 SF =PEEK(140)+ PEEK(141)*256
then the variable SF returns the number that should be added to the relative displacement values given in the variable value table. (Since the relative displacement of the first string is zero, this means that SF always equals the address of the first string.)
The reason for this seemingly complicated arrangement, incidentally, is that the computer can now easily relocate strings as the program length changes simply by altering the offset pointers.
Setting The Table
Now it's clear how the string offset technique works: We can relocate a string anywhere in memory by merely POKEing different values into its relative displacement indicators in the variable value table.
For example, suppose we want to move ROM$ to the starting memory address of the standard character set in ROM, which is location 57344. We subtract the amount of the string offset (SF) from 57344, and convert the remainder into low-byte/high-byte numbers. Then all we have to do is POKE LS into VT+2 and POKE HS into VT+3, and ROM$ is moved to the proper location. The statements might look like this:
50 S=57344-SF:HS = INT(S/256):LS=S-HS*256
60 POKE VT+2,LS:POKE VT+3,HS
Now we can turn our attention to RAM$.
The usual place to set up a new character set is below RAMTOP-- the memory location returned by PEEK(106)*256. Some people prefer to move RAMTOP down by POKEing a lower number into register 106, issue a new GRAPHICS command to set up a new display list and screen memory below the altered RAMTOP, and then put the new character set above the new RAMTOP. There are advantages and disadvantages to each method, including a "RAMTOP dragon" to watch out for. We'll stick to the easiest method for this example. Let's simply put the new character set eight pages (2048 bytes) below RAMTOP. This leaves enough room for the 1024-byte character set, plus another 1024 bytes for the display list and screen memory in graphics mode 0.
We move RAM$ to this location by figuring the proper values and POKEing them into VT+10 and VT+11:
70 RAMPAGE = PEEK(106)-S
80 S = RAMPAGE*256-SF:HS = INT(S/256):LS=S-HS*256
90 POKE VT+10,LS:POKE VT+11,HS
Finally, all that remains is one simple step:
100 RAM$=ROM$
Instantly, the character set in ROM is copied into RAM, where it can be customized to suit our purposes.
Two Potential Problems
There are two things to watch out for when using the string offset technique. First, if you set up a string in a section of RAM where vital tables or pointers are stored, then do anything to change the contents of the string, or press BREAK and enter a direct command (which causes BASIC to shift strings and all their contents in memory), the computer may behave very strangely. You'll probably have to turn the machine off and on again to regain control.
Second, you cannot POKE a negative number into the variable value table without getting an error message. How, then, can you move a string to a location in memory lower than the value (SF) indicated by the offset pointers? Simple. POKE the offset pointers to zero, and POKE memory locations 140 and 141 to zero. (Make sure you do this before relocating any strings, or they'll all be moved again when you change the offset pointers.) But don't leave zeros in locations 140 and 141. Save the original values and POKE them back in when you're finished transferring the data.
A Dvorak Demo
The program following this article demonstrates the string offset technique and accomplishes several things. First, it copies the standard character set from ROM into RAM (eight pages below RAMTOP) and modifies it so that the CTRL key characters can be recognized more easily. If you press CTRL-A, for example, you won't get the usual graphics symbol; you'll get an underlined A, so you can see at a glance which keys to press to type that character. This way, you can enter ATASCII (Atari ASCII) characters directly into memory from statements in program lines without using DATA statements and slow, one-byte-at-a-time POKEs, because all the characters are immediately recognizable. This character set modification is accomplished in an eye-blink.
Second, the program copies the keyboard definition table from ROM and loads it into memory page 6, a normally unused portion of RAM from locations 1536-1791. Then the program modifies the keyboard table to create a Dvorak keyboard layout. Designed by August Dvorak after 20 years of scientific study and testing, the Dvorak keyboard makes things as easy as possible for typists, in contrast to the conventional QWERTY keyboard, which doesn't put the most frequently used keys on the home row. Many typists are able to convert from QWERTY to Dvorak touch-typing within a few days, and often find they can type faster with substantially fewer errors.
The Dvorak keyboard portion of the program will not work with the older 400 and 800 models because it relies on the KEYDEF pointer at locations 121-122. This pointer was added to the improved operating system in the XL and XE models, and is not implemented in the original Atari operating system ROMs. Owners of 400s and 800s can still use the redefined character set portion of the example by simply omitting all lines numbered higher than 215. If you are using revision A BASIC, you'll also need to change the 1024s in lines 10 and 20 to 1025s.
Notice that this program must deal with the problem mentioned above: The memory address 1536 is lower than the value for SF, so the string offset pointers at locations 140 and 141 have to be changed.
A FOR-NEXT loop is used to enter ATASCII characters 0 through 26, so this part of the program takes a little longer--almost a whole second. You could make it run even faster by typing the CTRL key characters directly in string assignment statements, as seen in lines 140 to 170. This is where the new character set could come in handy.
As a final bonus, the program demonstrates a customized keyboard entry routine that works faster than the GET function. It does this by reading a hardware location (53769), then using the keyboard conversion table located in ROM (64337 to 64592) to translate the keyboard codes into ATASCII codes the same way the operating system does.
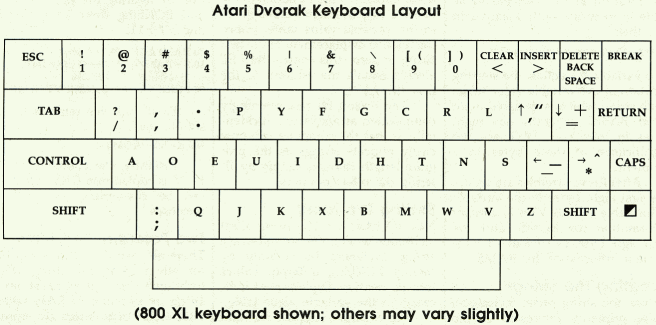
When the program runs, it lets you toggle back and forth from QWERTY to Dvorak, just like on an Apple IIc. Press SHIFT-ESC to toggle. If you become a real Dvorak fan, you can even find keycap stickers at many office supply stores to modify your keyboard. The accompanying figure shows the Dvorak layout.
Additional Notes
A few modifications to the standard Dvorak layout were necessary because of the special functions and extra keys on the Atari keyboard. The seldom-used brackets may be typed with CTRL-9 or CTRL-O. The + = key, normally located at the upper right of the Dvorak keyboard, has been moved down. The * \ key has been retained in its standard Atari position because these characters have extra use as arithmetic functions in programming. Since the Atari has no cent symbol, this has been replaced with the vertical line as uppercase 6. In place of the asterisk (uppercase 8 on the Dvorak keyboard) is the backslash. The ` " key has been exchanged with the ; : key to avoid conflict between the CTRL-up arrow and CTRL-semicolon.
The Atari logo key is the inverse video key on the Atari 400/ 800, and it is reversed with the right SHIFT key on those models. Regrettably, the Atari has no dash in its character set. While the useless underline could be redefined as a dash for screen display, most Atari printers also lack the dash.
If you enter NEW or load a new program after this one is run, the new character set with readable CTRL key characters remains active (as long as the new character set is not overwritten). Press SYSTEM RESET or POKE 756,224 to restore the old character set. The following POKEs switch on the Dvorak keyboard even after a NEW command: POKE 121,0:POKE 122,6. To switch back to QWERTY, use POKE 121,81:POKE 122,251.
The next time you need to transfer large blocks of data from one portion of memory to another, try using the string offset technique. It gives you the best of both worlds: the convenience of BASIC and near-machine language speed. Never again will you have to sit staring at a blank screen waiting for your programs to move large amounts of data in memory.