SpeedScript 3.0
All Machine Language Word Processor For Apple
Charles Brannon, Program Editor
Apple Adaptation By Kevin Martin, Editorial Programmer
COMPUTE! concludes its SpeedScript 3.0 series this month with a version for Apple II-series computers with DOS 3.3 and at least 48K RAM. Originally written for the Commodore 64 and VIC-20, SpeedScript has also been adapted for Atari computers (COMPUTE!, May 1985) and has become extremely popular. It compares favorably with commercial programs and has some features never seen before in an Apple word processor.
SpeedScript 3.0, though compact in size (5.5K), has most of the functions you expect in a full-featured word processor. SpeedScript is also very easy to learn and use. You type in everything first; preview and make corrections on the screen; insert and delete words, sentences, and paragraphs; then print out an error-free draft, letting SpeedScript take care of things like margins, centering, headers, and footers.
|
The Apple version of SpeedScript 3.0, and all other Apple programs in this issue, may be ordered on disk directly from COMPUTE! Publications. Call TOLL FREE 1-800-334-0868 (in NC 1-919-275-9809) to charge your order 8:30 a.m.-7:00 p.m. Eastern Time, Monday through Friday. Or send check or money order ($12.95 plus $2.00 shipping and handling) to: COMPUTE! Publications, Inc. Readers outside the United States and Canada add $3.00 shipping and handling. All orders must be prepaid in US funds. |
Special Typing Instructions
Apple SpeedScript is the longest Apple machine language program we've ever published, but COMPUTED new "Apple MLX" entry system helps you type it right the first time. MLX can detect most typing errors as they happen. (See the Apple MLX article elsewhere in this issue.) MLX also lets you type SpeedScript in more than one sitting. Although the program listing is lengthy, we guarantee the effort will be worthwhile. If you prefer, you can order Apple SpeedScript 3.0 (and all other Apple programs in this issue) on disk directly from COMPUTE! Publications at a nominal cost (see box).
To begin entering the data for SpeedScript, boot up your Apple with a DOS 3.3 startup disk in the drive. As the MLX article states, programs entered with MLX must be saved to a disk with the same operating system format as the disk from which MLX was loaded. Since this version of SpeedScript works only with DOS 3.3, you must load Apple MLX from a DOS 3.3 disk. If you have a He or lie that came with the ProDOS operating system, you must obtain a copy of DOS 3.3 before entering SpeedScript.
Because the machine language data for SpeedScript resides in the same area of memory where BASIC programs are normally loaded, it's necessary in this case to reconfigure memory before loading MLX to enter SpeedScript. Otherwise, the SpeedScript data you enter with MLX will overwrite the MLX program itself as you type. To reconfigure memory, type the following line in direct mode (no line number) and hit RETURN:
POKE 104,32 : POKE 8192,0 : NEW
You must always enter this line before loading MLX to enter SpeedScript data. It is, however, not necessary to enter this line before loading the completed SpeedScript program.
Now load and run Apple MLX. Answer the first two questions that MLX asks like this:
STARTING ADDRESS? 0800
ENDING ADDRESS? 1E45
An options menu appears next. Press E to Enter the program. Now type the address at which you'd like to start typing. If you're just beginning to type the listing, you'd enter 0800. The screen then shows the first prompt, the number 0800 followed by a colon (:). Type in each two-digit number shown in the SpeedScript listing (some of the digits are letters, because the numbers are in hexadecimal). You don't need to type the spaces shown in the listing, but you can for the sake of readability. MLX does not let you type illegal characters.
The last number you enter in each line is a checksum. If you type the line correctly, the checksum calculated by MLX should match the checksum number you typed in. If it doesn't match, MLX makes you retype the line. MLX is not foolproof, though. It's quite rare, but it's possible that an error in one number could be offset by an error in another. MLX will help catch your errors, but you still must be careful.
Typing In Multiple Sittings
If you want to stop typing the listing at some point and pick up later, press RETURN at the address prompt without typing anything. Write down the address number you stopped at. The options menu reappears, and you can save your typing at this point. To continue entering data the next time, boot your system, enter the direct-mode line given above to configure memory, and load MLX. Answer the STARTING ADDRESS? and ENDING ADDRESS? questions with the same values you used the first time, 0800 and 1E45. Then select Load from the options menu, then press E to enter data. Give MLX the address number you previously stopped at. Now continue typing as before.
Apple SpeedScript 3.0 Keyboard Map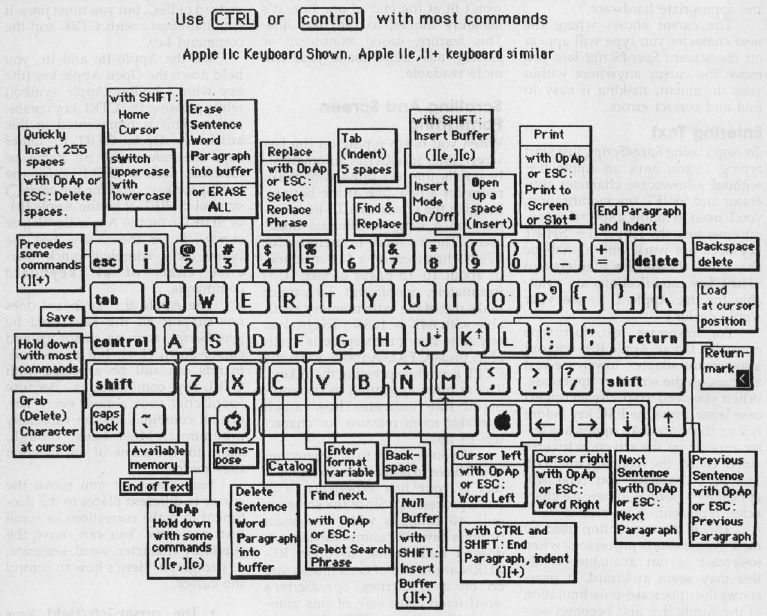
When you finish all typing, MLX returns you to the options menu, where you can save the finished program.
MLX has now created a binary file on disk. To run it, reboot the machine to clear out memory, then from BASIC type BRUN filename, where filename is the name you specified when saving SpeedScript on disk with MLX. SpeedScript automatically loads and runs. If you prefer, you can write a short program:
10 PRINT CHR$(4);"BRUN filename"
and save it as the HELLO file on the disk (INIT HELLO to format and set up a blank disk). This makes SpeedScript load and run automatically when you boot up.
Do you Have Lowercase?
When you BRUN SpeedScript, you'll first be asked, LOWERCASE? [Y/N]. If you are running SpeedScript on an Apple IIe or IIc, or have a lowercase character generator in your Apple II+, press Y for Yes. Otherwise, press N. This adjusts SpeedScript for your machine.
After you've answered the prompt, you'll see a blank 40-column screen with a blinking underline cursor. The first line on the screen is in inverse video, white with black letters. SpeedScript presents all messages on this command line. The remaining 23 lines of the screen are used to enter, edit, and display your document. You cannot enter text in 80 columns, although you can print the document to the screen in 80 columns, if you have the appropriate hardware.
The cursor shows where the next character you type will appear on the screen. SpeedScript lets you move the cursor anywhere within your document, making it easy to find and correct errors.
Entering Text
To begin using SpeedScript, just start typing. If you have an Apple II+ without a lowercase character generator and SHIFT key modification, you'll need to follow a special procedure because the Apple II+ SHIFT key does not work with alphabetic characters. (Lowercase adapters and SHIFT key modifications are available for the Apple II+; see your Apple dealer.)
For lowercase text, just type normally. On an Apple II+ without a lowercase adapter, lowercase text appears on the screen as uppercase. When you need to specify an uppercase letter, press the ESC key before typing that letter. An uppercase letter appears on the screen in inverse video (with the colors switched). The next character you type will appear as a normal uppercase character, representing lowercase.
This is the convention used by most Apple word processors when lowercase is not available. While this may seem awkward, it overcomes the uppercase-only limitation of the Apple II+ and becomes second nature after a while. For example, to enter:
Who won the World Series?
you'd type:
ESC WHO WON THE ESC WORLD
ESC SERIES?
which appears onscreen as:

With an Apple II+ with the SHIFT key modification or an Apple Ile/IIc, you type as you would on a typewriter, holding down the SHIFT key while typing the uppercase letter. Be sure to disengage the CAPS LOCK key if you want to type lowercase.
When the cursor reaches the right edge of the screen, it automatically jumps to the beginning of the next line, just as in BASIC. But unlike BASIC, SpeedScript never splits words at the right edge of the screen. If a word you're typing won't fit at the end of one line, it's instantly moved to the next line. This feature, called word-wrap or parsing, also helps make your text more readable.
Scrolling And Screen Formatting
When you finish typing on the last screen line, SpeedScript automatically scrolls the text upward to make room for a new line at the bottom. Imagine the screen as a 23-line window on a long, continuous document. There's room in memory for 27904 characters on a 48K machine, or about 10-15 pages of text. (Unfortunately, SpeedScript 3.0 cannot make use of the extra memory available with 64K or 128K.) To check at any time how much space is available, press CTRL-A (hold down the CTRL key while pressing the A key). The number appearing in the command line indicates how much available room remains for characters of text.
If you're used to a typewriter, you'll have to unlearn some habits if this is your first experience with word processing. Since the screen is only 40 columns wide, and most printers have 80-column carriages, it doesn't make sense to press RETURN at the end of each line as you do on a typewriter. SpeedScript's word-wrap takes care of this automatically. Press RETURN only when you want to force a carriage return to end a paragraph or limit the length of a line. A return-mark appears on the screen as an inverse less-than sign (<).
Using The Keyboard
Most features are accessed with control-key commands—you hold down CTRL while pressing another key. In this article, control-key commands are abbreviated CTRL-x (where x is the key you press in combination with CTRL). An example is the CTRL-A mentioned above to check on available memory. CTRL-E means hold down CTRL and press E.
Some commands have special options. On the Apple II+, you'll sometimes need to press ESC before the CTRL key, as in ESC-CTRL-E. You first press ESC, then release it and press CTRL and E together. If your Apple II+ has the SHIFT key modification, you can press SHIFT instead of ESC, but you must press it simultaneously with CTRL and the command key.
On the Apple He and lie, you hold down the Open Apple key (the key with a hollow Apple symbol) while pressing the CTRL key combination. This is represented in this article as OpAp-CTRL-E. Other keys are referenced by name or function, such as DELETE for the backspace key, carat for the carat (ˆ) symbol (SHIFT-N on the Apple II+ or SHIFT-6 on the Apple Ile/IIc), or cursor-left for the ← key. See the figure for a complete quick-reference chart of all keyboard commands.
The Apple II+ keyboard does not support all the keys used by SpeedScript, such as cursor-up and cursor-down (↑ ↓), but these commands can still be accessed with CTRL-key combinations. Because SpeedScript uses almost every key, not all combinations are especially mnemonic. Most keys, though, stand for the name of the function they perform.
Some keys let you move the cursor to different places in the document to make corrections or scroll text into view. You can move the cursor by character, word, sentence, or paragraph. Here's how to control the cursor:
• The cursor-left/right keys (←/→) move the cursor a single space in either direction. By preceding this key with ESC on the Apple II+, or by holding down the Open Apple key while pressing the key on the Apple IIe/IIc, you can move the cursor to the beginning of the next (→) or previous (←) word.
• The cursor-up/down keys (↑/↓ on the IIe/IIc, CTRL-J/CTRL-K on the II+) move the cursor to the beginning of either the previous or next sentence. On the IIe/IIc, hold down the Open Apple key as you press the arrow to move to the beginning of the next (↓) or previous (↑) paragraph. On the Apple II+, press CTRL-K to move the cursor to the beginning of the next sentence, and press CTRL-J to move the cursor to the beginning of the previous sentence. Press ESC-CTRL-K to move the cursor to the beginning of the next paragraph, or ESC-CTRL-J to move the cursor to the beginning of the previous paragraph. (A paragraph is defined as any sequence of characters ending in a return-mark.)
• Pressing CTRL-@ (CTRL-SHIFT-2 on the IIe/IIc, CTRL-SHIFT-P on the II+), puts the cursor at the top of the screen. If the cursor is already at the top of the screen, CTRL-@ moves the cursor to the top of the document. So to quickly move to the beginning of the document, press CTRL-@ twice.
• CTRL-Z moves the cursor to the end of the document, scrolling if necessary. It's easy to remember since Z is at the end of the alphabet.
Making Corrections
Sometimes you'll have to insert some characters to make a correction. Use CTRL-O to open up a single space. Merely position the cursor at the point where you want to insert a space, and press CTRL-O.
It can be tedious to use CTRL-O to open up enough space for a whole sentence or paragraph. For convenience, SpeedScript has an insert mode that automatically inserts space for each character you type. In this mode, you can't type over characters; everything is inserted at the cursor position. To enter insert mode, press CTRL-I. To cancel insert mode, press CTRL-I again. To let you know you're in insert mode, the cursor changes from a blinking underline to a blinking inverse underline (which looks like a solid square). The cursor changes back to a blinking underline when you exit insert mode. Because of keyboard redundancy, the TAB key on the Apple IIe/IIc works just like CTRL-I.
Insert mode is the easiest way to insert text, but it can become too slow when inserting near the top of a very long document because it must move all the text following the cursor position. So SpeedScript has even more ways to insert blocks of text.
One way is to use CTRL-T (tab). It is programmed in SpeedScript to act as a five-space margin indent. To end a paragraph and start another, press RETURN twice and press CTRL-T. A shortcut for this is CTRL-] on the Apple IIe/IIc and CTRL-SHIFT-M on the Apple II+; these keystrokes automatically insert two return-marks and indent the margin. CTRL-T always inserts; you don't need to be in insert mode. You can also use CTRL-T to open up more space than CTRL-O. (You cannot set or clear tab stops in SpeedScript as you can with some word processors.) No matter how much space you want to insert, each insertion takes the same amount of time. So CTRL-T can insert five spaces five times faster than pressing CTRL-O five times.
There's an even better way, though. Press CTRL-Q to quickly insert 255 spaces (it does not insert a line; use RETURN for that). You can press it several times to open up as much space as you need. And CTRL-Q is quick indeed. It inserts 255 spaces as fast as CTRL-O opens up one space. Now just type the text you wanted to insert over the blank space. (You don't want to be in CTRL-I insert mode when you use this trick; that would defeat its purpose.)
Since DELETE (backspace) is also slow when working with large documents (it, too, must move all text following the cursor), you may prefer to use the cursor-left key to backspace when using this method.
After you're done inserting, there may be some inserted spaces left over that you didn't use. Just press ESC-CTRL-Q on the II+ or OpAp-CTRL-Q on the IIe/IIc. This instantly deletes all extra spaces between the cursor and the start of following text. It's also useful whenever you need to delete a block of spaces for some reason.
Erasing Text
To erase the character on which the cursor is sitting, press CTRL-G (to grab the character). The character highlighted by the cursor is removed, and all following text is moved toward the cursor to fill the empty space.
Press CTRL-B (backspace) on the II+ or the DELETE key on the IIe/IIc to delete the character to the left of the cursor. All the following text is moved with the cursor to fill the empty space.
These keys are fine for minor deletions, but it could take all day to delete a whole paragraph this way. So SpeedScript has two commands that can delete an entire word, sentence, or paragraph at a time. CTRL-E erases text after (to the right of) the cursor position (and can also erase all text), and CTRL-D deletes text behind (to the left of) the cursor.
To use the CTRL-E erase mode, first place the cursor at the beginning of the word, sentence, or paragraph you want to erase. Then press CTRL-E. The command line shows the message "ERASE (S,W,P,A): RETURN TO EXIT." Press S to erase a sentence, W for a word, or P for a paragraph. Each time you press one of these letters, the text is quickly erased. You can keep pressing S, W, or P until you've erased all the text you wish. Then press RETURN to exit the erase mode.
You also use CTRL-E to erase all text from memory when you want to start a new document. To erase all text, press CTRL-E, then press the A (all) key. A prompt appears: ERASE ALL TEXT: ARE YOU SURE (Y/N). Press Y to perform the irreversible deed. You cannot recover any text erased this way. Press N or any other key to cancel this function.
The CTRL-D delete mode works similar to CTRL-E, but deletes only one word, sentence, or paragraph at a time. First, place the cursor after the word, sentence, or paragraph you want to delete. Then press CTRL-D. Next, press S, W, or P for sentence, word, or paragraph. The text is immediately deleted and you return to editing. You don't need to press RETURN to exit the CTRL-D delete mode unless you pressed this key by mistake. (In general, you can escape from any function in SpeedScript by simply pressing RETURN.) CTRL-D is most convenient when the cursor is already past what you've been typing.
The Text Buffer
When you erase or delete with CTRL-E and CTRL-D, the text isn't lost forever (unless you've performed an Erase All). SpeedScript remembers what you've removed by storing deletions in a separate area of memory called a buffer. The buffer is a failsafe device. If you erase too much, or change your mind, just press CTRL-carat (CTRL-SHIFT-6 on the IIe/IIc, CTRL-SHIFT-N on the II+) to restore the deletion. However, be aware that SpeedScript remembers only the last erase or delete you performed. It's not to hard to remember this command, since the carat is used in paper-and-pencil editing to signify an insertion. Be sure you don't press CTRL-N without SHIFT, since CTRL-N is the command to clear out (null) the buffer.
Another, more powerful, use of this buffer is to move or copy sections of text. To move some text from one location in your document to another, first erase or delete it with CTRL-E or CTRL-D. Then move the cursor to where you want the text to appear and press CTRL-carat. CTRL-carat instantly inserts the contents of the buffer at the cursor position. If you want to copy some text from one part of your document to another, just erase or delete it with CTRL-E or CTRL-D, restore it at the original position with CTRL-carat, then move the cursor elsewhere and press CTRL-carat to restore it again. You can retrieve the buffer with CTRL-carat as many times as you like. If there is no room left in memory for inserting the buffer, you'll see the message NO ROOM.
Important: The CTRL-E erase mode lets you erase up to the maximum size of the buffer (2K), and CTRL-E also removes the previous contents of the buffer. The buffer is also erased with the ERASE ALL option of CTRL-E. Keep this in mind if there's something in the buffer you'd rather keep. If you don't want the buffer to be erased, hold down the Open Apple key (or precede with ESC on the II+) when you press CTRL-E. This preserves the buffer contents and adds newly erased text to the buffer.
If you ever need to erase the contents of the buffer, press CTRL-N (null buffer).
Search And Replace
SpeedScript has a Find command that searches through your document to find a selected word or phrase. A Replace option lets you automatically change one word to another throughout the document.
ESC-CTRL-F or OpAp-CTRL-F (find) lets you define a search phrase, ESC-CTRL-R or OpAp-CTRL-R (replace) lets you define a replace phrase, and CTRL-Y is for automatically searching and replacing.
Searching is a two-step process. First you need to tell SpeedScript what to search for, then you trigger the actual search. Hold down Open Apple and press CTRL-F (on the Apple II+, press ESC, then CTRL-F). The command line prompts FIND:. Type in what you'd like to search for, the search phrase. If you press RETURN alone without typing anything, the Find command is canceled.
When you are ready to search, press CTRL-F. SpeedScript looks for the next occurrence of the search phrase starting from the current cursor position. If you want to hunt through the entire document, press CTRL-@ twice to move the cursor to the very top before beginning the search. Each time you press CTRL-F, SpeedScript looks for the next occurrence of the search phrase and places the cursor at the start of the phrase. If the search fails, you'll see the message NOT FOUND.
CTRL-R works together with CTRL-F. After you've specified the search phrase with OpAp-CTRL-F or ESC-CTRL-F, press OpAp-CTRL-R or ESC-CTRL-R to select the replace phrase. (You can press RETURN alone at the REPLACE WITH: prompt to select a null replace phrase. When you hunt and replace, this deletes the located phrase.) To manually search and replace, start by pressing CTRL-F. After SpeedScript finds the search phrase, press CTRL-R if you want to replace the phrase. If you don't want to replace the phrase, don't press CTRL-R. You are not in a special search and replace mode. You're free to continue writing at any time.
CTRL-Y links CTRL-F and CTRL-R together (think of the two branches of the Y linking together Find and Replace). It first asks FIND:, then REPLACE:, then automatically searches and replaces throughout the document starting at the cursor position.
There are a few things to watch out for when using search and replace. First, realize that if you search for "the," SpeedScript finds the em-bedded "the" in words like "therefore" and "heathen." If you changed all occurrences of "the" to "cow," these words would become "cowrefore" and "heacown." If you want to find a single word, include a space as the first character of the word, since almost all words are preceded by a space. Naturally, if you are replacing, you need to include the space in the replace phrase, too.
Also, SpeedScript distinguishes between upper- and lowercase. The word "Meldids" does not match with "meldids." SpeedScript will not find a capitalized word unless you capitalize it in the search phrase. To cover all bases, you will sometimes need to make two passes at replacing a word. Keep these things in mind when using CTRL-Y, since you don't have a chance to stop a linked find and replace.
Storing Your Document
To store your text, press CTRL-S. You'll see the prompt SAVE:. Type in the filename and press RETURN. If you need to access a second disk drive, precede the filename with 2:. This becomes the default drive for future disk access. To return to drive 1, precede the filename with 1:. If the filename you specify coincides with one already on the disk, the existing file will be overwritten by the new one.
CTRL-S always saves the entire document. The cursor position within the document is not important.
When the SAVE is complete, SpeedScript reports NO ERRORS if all is well, or gives a message like DISK FULL if not. Check your DOS or BASIC manual for a list of error messages and their causes.
Press CTRL-C to display the disk catalog. The catalog pauses when the screen is full, waiting for you to press a key to continue. When the catalog is finished, press RETURN to return to editing.
Loading A Document
To recall a previously saved, document, press CTRL-L. Answer the LOAD: prompt with the filename. Again, you can precede the filename with 1: or 2: to switch drives. SpeedScript loads the file and should display NO ERRORS. Otherwise, SpeedScript reports the error.
The position of the cursor is important before loading a file. Documents start loading at the cursor position, so be sure to press CTRL-@ twice or CTRL-E and A (Erase All) to move the cursor to the start of text, unless you want to merge two documents. When you press CTRL-L to load, a flashing asterisk appears to warn you if the cursor is not at the top of the document.
To merge two or more files, simply load the first file, press CTRL-Z to move the cursor to the end of the document, and then load the file you want to merge. Do not place the cursor somewhere in the middle of your document before loading. A Load does not insert the text from disk, but overwrites all text after the cursor position. The last character loaded becomes the new end-of-text pointer, and you cannot access any text that appears ahead of this pointer.
Since SpeedScript stores documents as binary files, you cannot read a text file in BASIC, load a BASIC program into SpeedScript, or upload a text file with a modem. However, Program 2 is a file conversion program which allows these functions. It converts SpeedScript binary files into ASCII text files. It can also convert an ASCII text file into a SpeedScript binary file. This lets you convert word processing files from other word processors, or change a SpeedScript document into a text file suitable for uploading. You can even edit BASIC programs with SpeedScript. Add the following line to your BASIC program and run it. It creates a text file on disk of your BASIC listing.
0 PRINT CHR$(4);"OPEN filename"
  :PRINT CHR$(4)"WRITE
  filename" : LIST
Run Program 2 to convert the BASIC text file to a SpeedScript file. You can then load this file into SpeedScript for editing. Save this file back to disk, run Program 2 to convert it back to a text file, then in BASIC use EXEC filename to read the text file back into BASIC. Although this seems rather tedious, you may find it quite worthwhile when working with long programs. A similar technique can be used to edit files written by other applications.
Note: Delete any SpeedScript print formatting commands (described below) before converting a text file to an ASCII file. Otherwise, they will not be converted correctly.
Additional Features
SpeedScript has a few commands that don't do much, but are nice to have. CTRL-X exchanges the character under the cursor with the character to the right of the cursor. Thus you can fix transposition errors with a single keystroke. CTRL-W (think sWitch) changes the character under the cursor from uppercase to lowercase or vice versa.
Apple SpeedScript traps the RESET key. RESET or CTRL-RESET always returns you to editing mode. There is no way to exit SpeedScript once you've run it, short of rebooting.
PRINT!
If you already think SpeedScript has plenty of commands, wait until you see what the printing package offers. SpeedScript supports an array of powerful formatting features. It automatically fits your text between left and right margins you can specify. You can center a line or block it against the right margin. SpeedScript skips over the perforation on continuous-form paper, or can wait for you to insert single-sheet paper. A line of text can be printed at the top of each page (a header) and/or at the bottom of each page (a footer), and can include automatic page numbering, starting with whatever number you like.
SpeedScript.can print on different lengths and widths of paper, and single-, double-, triple-, or any-spacing is easy. You can print a document as big as can fit on a disk by linking several files together during printing. You can print to the screen or to a file instead of to a printer. Other features let you send special codes to the printer to control features like underlining, boldfacing, italics, and double-width type (depending on the printer).
But with all this power comes the need to learn additional commands. Fortunately, SpeedScript sets most of these variables to a default state. If you don't change these settings, SpeedScript assumes a left margin of five, a right margin position of 75, no header or footer, single-spacing, and continuous paper page feeding. You can change these default settings if you want (see below).
Before printing, be sure the paper in your printer is adjusted to top-of-form (move the paper perforation just above the printing element). One additional note: Some printers incorporate an automatic skip-over-perforation feature. The printer skips to the next page when it reaches the bottom of a page. Since SpeedScript already controls paper feeding, you need to turn off this automatic skip-over-perf feature before running SpeedScript, or paging won't work properly.
To begin printing, press CTRL-P. If your printer is attached, powered on, and selected (online), SpeedScript begins printing immediately. To cancel printing, press CTRL and the RESET key.
If you need to print to an RS-232 printer or to a printer in a slot other than slot #1, press. ESC-CTRL-P (Apple II+) or OpAp-CTRL-P (Apple IIe/IIc). This brings up the prompt PRINT TO: SCREEN, PRINTER? Press S to print to the screen. If you don't have lowercase, the screen display won't make much sense, although you can still see where pages break. If you have an Apple lie, an Apple He with the 80-column card, or an Apple II+ with a compatible 80-column card, SpeedScript automatically prints to the screen in 80 columns, simulating the printer.
If you select P, you'll be asked for the slot number. Output is sent to the slot number you select. It's similar to PR# in BASIC. If you print to slot 6 (the disk drive), you'll cause the system to reboot, so be careful.
Formatting Commands
The print formatting commands are single letters embedded in text, such as L for left margin. To enter a formatting variable, press CTRL-V. You'll see the prompt ENTER FORMAT VARIABLE:. Now press any key. The print formatting commands must be distinguished from normal text, so they appear on-screen in flashing inverse video with the text and background colors switched. All lettered printer commands should be entered without the SHIFT key. During printing, SpeedScript treats these characters as printing commands.
There are two kinds of printing commands, which we'll call Stage 1 and Stage 2. Stage 1 commands usually control variables such as left margin and right margin. Most are followed by a number, with no space between the command and the number. Stage 1 commands are executed before a line is printed.
Stage 2 commands, like centering and underlining, are executed while the line is being printed. Usually Stage 1 commands must be on a line of their own, although you can group several Stage 1 commands together on a line. Stage 2 commands are by nature embedded within a line of text. Again, remember to press CTRL-V to enter the boldface characters shown below.
Stage 1 Commands
L Left margin. Follow with a number from 0 to 255. Use 0 for no margin. Defaults to 5.
R Right margin position, a number from 1 to 255. Defaults to 75. Be sure the right margin value is greater than the left margin value, or SpeedScript will go bonkers.
T Top margin. The position at which the first line of text is printed, relative to the top of the page. Defaults to 5. The header (if any) is always printed on the first line of the page, before the first line of text.
B Bottom margin. The line at which printing stops before continuing to the next page. Standard 8½ × 11-inch paper has 66 lines. Bottom margin defaults to the fifty-eighth line. Don't make the bottom margin greater than the page length.
P Page length. Defaults to 66. If your printer does not print six lines per inch, multiply lines-per-inch by 11 to get the page length. European paper is usually longer than American paper—11⅝ or 12 inches. Try a page length of 69 or 72.
S Spacing. Defaults to single-spacing. Follow with a number from 1 to 255. Use 1 for single-spacing, 2 for double-spacing, 3 for triple-spacing.
@ Start numbering at page number given. Page numbering normally starts with 1.
? Disables printing until selected page number is reached. For example, a value of 3 would start printing the third page of your document. Normally, SpeedScript prints starting with the first page.
X Sets the page width, in columns (think a cross). Defaults to 80. You need to change this for the sake of the centering command if you are printing in double-width or condensed type, or are using a 40-column or wide-carriage printer.
N Forced paging. Normally, SpeedScript prints the footer and moves on to the next page only when it has finished a page, but you can force it to continue to the next page by issuing this command. It requires no numbers.
M Margin release. Disables the left margin for the next printed line. Remember that this executes before the line is printed. It's used for outdenting.
W Page wait. This command should be placed at the beginning of your document before any text. With page wait turned on, SpeedScript prompts you to INSERT NEXT SHEET, PRESS RETURN when each page is finished printing. Insert the next sheet, line it up with the printhead, then press RETURN to continue. Page wait is ignored during disk or screen output.
J Select automatic linefeeds after carriage return. Like W, this command must be placed before any text. Don't use this command to achieve double-spacing, but only if all text prints on the same line with some printers.
I Information. This works like REM in BASIC. You follow the command with a line of text, up to 255 characters, ending in a return-mark. This line will be ignored during printing, and is handy for making notes to yourself such as the filename of the document.
H Header define and enable. The header must be a single line of text (up to 254 characters) ending in a return-mark. The header prints on the first line of each page. You can include Stage 2 commands such as centering and page numbering in a header. You can use a header by itself without a footer. The header and footer should be defined at the top of your document, before any text. If you want to prevent the header from printing on the first page, put a return-mark by itself at the top of your document before the header definition.
F Footer define and enable. The footer must be a single line of text (up to 254 characters) ending in a return-mark. The footer prints two lines prior to the last line of each page. As with the header, you can include Stage 2 printing commands, and you don't need to set the header to use a footer.
G Go to (link) next file. Put this command as the last line in your document. Follow the command with the filename (with no spaces between the G and the filename), including the drive number prefix 1: or 2:, if appropriate. After the text in memory is printed, the link command loads the next file into memory. You can continue linking successive files, but don't include a link in the last file. Before you start printing a linked file, make sure the first of the linked files is in memory. When printing is finished, the last file linked to will be in memory.
Stage 2 Commands
These commands either precede a line of text or are embedded within one.
C Centering. Put this at the beginning of a line you want to center. This centers only one line ending in a return-mark. Repeat this command at the beginning of every line you want centered. Centering uses the page-width setting (see above) to properly center the line. To center a double-width line, either set the page width to 40 or pad out the rest of the line with an equal number of spaces. If you use double width, remember that the spaces preceding the centered text will be double-wide spaces.
# When SpeedScript encounters this command, it prints the current page number. You usually embed this within a header or footer.
U A simple form of underlining. It works only on printers that recognize CHR$(8) as a backspace and CHR$(95) as an underline character. Underlining works on spaces, too. Use the first U to start underlining, and another one to turn off underlining.
Fonts And Styles
Most dot-matrix printers are capable of more than just printing text at ten characters per inch. Some printers have several character sets, with italics and foreign language characters. Most can print in double width (40 characters per line), condensed (132 characters per line), and in either pica or elite. Other features may include programmable characters, programmable tab stops, and graphics modes. Many word processors customize themselves to a particular printer, but for flexibility SpeedScript was purposely designed not to be printer-specific. Instead, SpeedScript lets you define your own Stage 2 printing commands.
You define a programmable printkey by choosing any character that is not already used for other printer commands. The numbers 0-9, most symbols, and some alphabetic characters are available for print-keys. You enter these commands like printer commands with CTRL-V. The printkeys are like variables in BASIC.
To define a printkey, press CTRL-V, then type the key you want to assign as the printkey, then an equals sign (=), and finally the ASCII value to be substituted for the printkey during printing. Now whenever SpeedScript encounters the printkey embedded in text, it prints the character with the ASCII value you previously defined. (If you have trouble passing some printkeys to the printer, try adding 128 to the ASCII value you wish to send. Otherwise, some printer interfaces intercept the printkey.)
For example, to define the + key as the letter z, you first look up the ASCII value of the letter z (in either your printer manual or in the BASIC manual). The ASCII value of the letter z is 122, so the definition is:

Now, anywhere you want to print the letter z, substitute the printkey:

This would appear on paper as:
Gadzooks! The zoo is zany!
More practically, here's how you could program italics on an Epson MX-80 compatible printer. You switch on italics by sending an ESC (a character with an ASCII value of 27), then the character 4. You turn off italics by sending ESC 5. So define * as the escape code. Anywhere you want to print a word in italics, bracket it with *4 and *5.
You can similarly define whatever codes your printer uses for features like double width or emphasized mode. For your convenience, four of the printkeys are predefined, though you can change them. The keys 1-4 are defined as 27, 14, 15, and 18 common values for most printers. On most printers, CHR$(27) is the ESCape key, CHR$(14) starts double-width printing, CHR$(15) either stops double width or starts condensed characters, and CHR$(18) usually cancels condensed characters.
Keep one thing in mind about printkeys. SpeedScript always assumes it is printing to a rather dumb, featureless printer, the least common denominator. SpeedScript doesn't understand the intent of a printkey; it justs sends out its value. So if you make one word within a line double width, it may make the line overflow the specified right margin. There's no way for SpeedScript to include built-in font and typestyle codes without being customized for a particular printer, since no set of codes is universal to all printers.
Hints And Tips
It may take you awhile to fully master SpeedScript, but as you do you'll discover many ways to use the editing and formatting commands. For example, there is a simple way to simulate tab stops, say for a columnar table. Just type a period at every tab stop position. Erase the line with CTRL-E, then restore it with CTRL-carat multiple times. When you are filling in the table, just use word-left/word-right to jump quickly between the periods. Or you can use the programmable printkeys to embed your printer's own commands for setting and jumping to tab stops.
You don't have to change or define printer commands every time you write. Just save these definitions, and load this file for each session. You can create many custom definition files and have them ready to use on disk. You can create customized "fill-in-the-blank" letters. Just type the letter, and everywhere you'll need to insert something, substitute a unique character, such as an * or a CTRL character. When you're ready to customize the letter, use Find to locate each symbol and insert the specific information. Instead of typing an oft-used word or phrase, substitute a unique character, then use CTRL-Y to automatically change these characters into the actual word or phrase. You can even use SpeedScript as a simple filing program. Just type in all your data, flagging each field with a unique character. You can use Find to quickly locate any field.
If you experience any problems with SpeedScript that you are sure are not due to your error, please write (don't call) with a detailed explanation of the problem and how it occurred. Describe your hardware configuration. It also helps to send us a disk copy of your typing so we can determine with our equipment whether you have a hardware problem.
Due to the volume of mail, we cannot always reply to individual questions, but we welcome your suggestions. Who knows—your feedback may help make SpeedScript 4.0 a reality.