Advanced Sound Effects
On The 64
Philip I, Nelson, Assistant Technical Editor
On The 64
Philip I, Nelson, Assistant Technical Editor
Here are some secrets to creating unusual sound effects with the Commodore 64's built-in synthesizer chip. Using the accompanying program, you can experiment with different sounds without programming.
The Commodore 64's SID (Sound Interface Device) chip is capable of creating rich, extraordinarily complex sounds-but its power doesn't come without a price. There aren't any sound commands in Commodore BASIC, so everything must be done with POKEs. It's tedious to look up all those POKE values and easy to get sidetracked, since you must define several parameters (controlling values) to make even a simple sound. Many programmers, including professionals, grow frustrated and settle for crude beeps and whooping noises, wasting the 64's classiest sound features.
The program following this article is designed to help beginners learn about two of the 64's advanced sound effects: ring modulation and synchronization. It lets you produce a tone with two sound channels, and also switch either effect on and off just by pressing one of the 64's special function keys. Don't worry if the following explanations seem confusing at first; they'll make more sense after you've tried the program.
Independent Voices
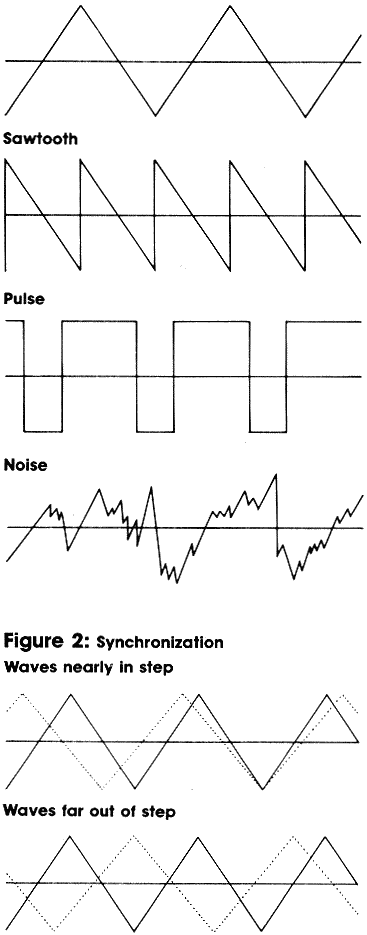
Any sound can be visualized as a waveform, like the cross section of a ripple on a pond. The Commodore 64 is capable of reproducing four different waveforms. Three of them (the triangle, sawtooth, and pulse waves) produce clear tones, and the fourth (the noise wave) makes a rushing or hissing sound. Figure 1 represents each of these waveforms. You can assign any one of the four waveforms to any of the 64's three sound channels, or voices.
Each of the computer's three voices normally plays independently. That is, each voice sounds the same, no matter what the other two are doing. If you make voice 1 beep and voice 2 growl, voice 1 always makes the same beep even if you change voice 2's growl to a screech. For a simple analogy, picture each voice as playing through a separate channel, like the two channels on a home stereo system.
Ring modulation and synchronization go beyond this to create interactive effects, in which a parameter controlling one voice also affects the sound produced by a second voice. In both cases, the special effect is created by a difference in the frequencies (pitches) of the two voices.
Synchronization
Synchronization is the simpler of the two effects. You may picture it as mixing two voices in one channel so that their waveforms intermingle. The result is often a rhythmic or beating effect, produced as the peaks and valleys of the two waves move in and out of step with each other.
When the two waves are more nearly in step, their combined sound is more pronounced. When their peaks and valleys are more nearly opposed, they tend to cancel each other out, and the combined sound is quieter. Figure 2 shows a simplified diagram of both extremes. If you program both voices so their frequencies are always identical, synchronization produces no audible effect.
In addition to the original tones each waveform produces by itself, synchronization adds nonharmonic overtones (also called sidebands). The overtones are entirely new waveforms which would not exist without synchronization. For instance, imagine someone pounding a huge gong. Gong sounds are full of nonharmonic overtones, which are created as different areas of the big, flexible metal plate vibrate in and out of phase.
In simplest terms, synchronizing two voices gives you both original tones plus new overtones. However, the original tones predominate.
Ring Modulation
Ring modulation is a special type of synchronization in which overtones almost completely suppress the original tones. What you're left with is a sound composed chiefly of nonharmonic overtones. The results are often surprising and bear little if any resemblance to so-called natural sounds.
Used with care, ring modulation can produce haunting, beautiful effects. However, it works through a complex interaction of two waveforms, largely suppressing what you'd hear without the feature. So it can be difficult to handle if you don't know how it works in the first place.
Experimenting With Effects
Let's hear how these effects sound. Type in the program, save it, and type RUN. The program is set up with several default parameters, so to hear a quick example, just press RETURN at every prompt. The default parameters will be displayed in each case.
You should hear a flutey tone sweeping up the scale, over and over. To pause the tone during its upward sweep, press the CTRL key. (Don't worry about accidentally hitting the RUN/STOP key; it's been disabled.)
To switch on synchronization, press the f7 special function key. The f5 key switches on ring modulation, and the f3 key activates both effects at once.
When synchronization is selected, you'll hear the beating effect as the tone ascends in pitch and the two voices move in and out of phase with each other. Ring modulation creates a rich, spacey sound. Note that you can pause the tone with CTRL while pressing a function key. As you'll hear, the sounds are far less exciting when both frequencies remain fixed. The most interesting effects are made by changing parameters in realtime.
In these two-voice effects, one of the voices is called the carrier, and the other the program voice. These terms are derived from electronics, meaning that the first voice carries the signal (produces the basic sound), and the second voice programs (modulates) it. In this example program, voice 1 produces the carrier tone, and voice 3 programs voice 1.
In both synchronization and ring modulation, it is the frequency of the program voice which affects the carrier voice. The other program voice parameters have no effect on the carrier (of course, they will affect the program voice if it is turned on).
Shifting Frequencies
Now that you've heard these special effects with the program voice set for a fixed frequency, let's try changing the frequency while the tone is being produced. To raise the frequency of the program voice, press either SHIFT key. To lower it, press the Commodore logo key (next to the left SHIFT). The most pronounced effects are produced by decreasing the program frequency during a rising tone, and vice versa.
Now let's hear a descending tone. Press the f1 key to stop the sound, and enter the following values when prompted:
| Rising/falling? | F |
| Carrier waveform | T |
| Program waveform | (any waveform works) |
| Hear program voice? | N |
| Program frequency | 9 |
| Starting frequency | 200 |
| Ending frequency | 5 |
| Loop rate | 6 |
Experiment with the program for a while, trying out different parameters. For example, try producing the same sound with a smaller loop rate. Press f1 to enter edit mode, then press RETURN after the first seven prompts. Now enter .75 for the loop rate. Pressing RETURN at a prompt preserves the old value, so you need to type in only the parameters you want to change (however, you must always enter the loop rate for a falling tone).
When picking the waveforms, press T for a triangle"wave, P for the pulse waveform, and so on. When you select a rising tone, the starting frequency must be smaller than the ending frequency. To create a falling tone, the first value must be larger than the second. If you make a mistake, use the DELete key to back up. The program signals an error if you enter illegal values. If you accidentally type in a letter when a number is required, the computer prints ?REDO FROM START. No harm is done; just enter the number you want.
The loop rate controls how fast the carrier frequency is changed as the tone moves up or down the scale. It corresponds to the STEP value in the FOR -NEXT loop that creates the tone (see lines 13-17). The smaller the loop rate (fractions are allowed), the slower the frequency will change, and vice versa. When the starting and ending frequencies are far apart, you can specify a large value for the loop rate; however, if you specify a starting frequency that is close to the ending frequency, you must keep the loop rate small to avoid causing an error in the program.
Programming Your Own Sounds
You can use this program to start building a library of sound effects. Just play around until you find a sound you like, copy down the values from the screen, and plug them into your own program.
As you'll discover by experimenting, these special effects work well with certain combinations, and poorly (or not at all) with others. Ring modulation works only when you set the carrier voice to the triangle waveform. Synchronization works with any waveform, but synchronizing any frequency with the noise waveform (a nearly random combination of many frequencies) doesn't accomplish much. The sawtooth and pulse waves often sound similar.
Most of the time, you'll want to keep the program voice silent, using only its frequency to control the carrier (in which case its other parameters are irrelevant). However, you can press Y when prompted to hear the program voice. If you have trouble understanding how an effect works, try listening to the program voice for a while.
Ring modulation and synchronization are most pronounced when the program frequency is considerably lower than the carrier frequency and remains fixed, as in the above examples. Changing the program frequency to a higher fixed value makes the two voices move in and out of phase more rapidly. Run the last example, and change the program frequency from 9 to 22. Now select synchronization, and you'll hear a sharp, meow-meow sound.
Controlling Voices With Voices
You can use ring modulation or synchronization with any of the 64's three voices, but the voice relationships are fixed: voice 1 modulates voice 2, voice 2 modulates voice 3, and voice 3 modulates voice 1.
Thus, if you want to synchronize or ring modulate voice 1, you must use voice 3 as the program voice, and so on. Again, it is the frequency of the program voice which affects the result. This simple tutorial program uses only the high byte frequency register for each voice; of course, you can achieve much finer frequency control by using both the high and low bytes.
To select these special effects in BASIC, simply add 2, 4, or 6 to the normal POKE value for the waveform register of the voice you want to affect. For instance, POKE 54276,17 selects the triangle waveform for voice 1. POKE 54276,19 adds synchronization to the triangle wave (17+2=19). POKE 54276,21 enables a ringmodulated triangle wave; and POKE 54276,23 turns on both effects at once. Use POKE 54276,67 to select synchronization with the pulse waveform, and so forth.
Naturally, you can use these effects with more than one voice at a time. If you select synchronization in voices 1 and 3, then voice 1 will be affected by voice 3's frequency, and voice 3 will be affected by voice 2's frequency. However, because multivoice modulation creates so many overtones, it's easy for things to get out of hand. If you create a three-note musical chord with triangle waves in every voice, and then switch each to ring modulation, the result will be anything but musical.
Play with those frequencies for a while, though, and you'll find you can push the overtones into complex chords. Such chords have a ringing, live sound, and contain more than three notes. Interesting effects can also be created by tuning one or more voices slightly off-key.
Hints For Programmers
This program employs a few tricks you might find useful. Many programmers use a long series of individual POKES to set up the SID chip at the beginning of a program. Line 1020 shows how to do this with a FOR-NEXT loop that READs the values from DATA statements and POKEs them into the SID chip. This makes your program easier for others to read and for you to modify. Note, however, that Commodore recommends POKEing attack/decay registers before waveform registers; the program follows this rule by POKEing the desired waveform values later on, in line 370.
To detect a single keypress, you can PEEK location 197 as we did in lines 14 and 15 (Z=197). Sometimes, however, you want to let the user do two things at once from the keyboard. In this program, for instance, you can select effects with a function key and simultaneously change the program frequency or pause the sound.
By PEEKing location 653, you can tell whether the CTRL, SHIFT, or Commodore logo key is pressed with another key (see line 16; Y=653). Location 653 holds the following values when the indicated key is pressed:
1 = SHIFT
2 = Commodore
4 = CTRL
2 = Commodore
4 = CTRL
You can also detect combinations of these keys. Location 653 contains a 3 when both SHIFT and the Commodore key are pressed, 5 when SHIFT and CTRL are pressed, and so on. Checking for these keys gives you great flexibility in designing keyboard input. However, it's prudent to disable the RUN/STOP key when using them.
The program disables the RUN/STOP key in line 1010 with POKE 788,52. However, you can still exit the program by hitting RUN/STOP and RESTORE together. In the same line, POKE 657,128 prevents the computer from flipping the entire screen display from uppercase to lowercase if the SHIFT and Commodore keys are pressed simultaneously.
Figure 1: Commodore 64 Waveforms
Triangle
Sound Effects Demonstrator
Please refer to "COMPUTE!'s Guide To Typing In
Programs" before entering this listing.
1 GOSUB 1000:GOTO100 :rem 118
2 PRINTCHR$(145)C$:FORJ=1TO400:NEXT:PRINT
ER$CHR$(145):RETURN :rem 35
4 Zl=UN:ZZ=ED:RETURN :rem 109
5 ZZ=ZZ-LR:RETURN :rem 191
6 POKEW1,VI+TU:RETURN :rem 142
7 POKEWI,VI+FR:RETURN :rem 126
8 POKEW1,Vl+SX:RETURN :rem 146
9 PF=PF+UN:IFPF>FFTHENPF=FF :rem 39
10 RETURN :rem 65
11 PF=PF-UN:IFPF<UNTHENPF=UN :rem 126
12 RETURN :rem 67
13 Z1=ZR:FORZZ=BGTOEDSTEPLR :rem 121
14 IFPEEK(Z)=NNTHENPOKEWI,VI:GOTO16
:rem 16
15 ONPEEK(Z)GOSUB10,10,6,4,8,7 :rem 202
16 ONPEEK(Y)GOSUB9,11,10,5 :rem 8
17 POKEHI,ZZ:POKEH3,PF:POKEBF,ZR:NEXT:IFZ
1=UNTHEN19 :rem 165
18 GOTO13 :rem 6
19 POKEH1,ZR:POKEH3,ZR:POKEW1,ZR:POKEW3,Z
R:POKE198,ZR :rem 29
100 PRINTFL$;:INPUTFF$ :rem 137
110 IFFF$<>"R"ANDFF$<>"F"THENFF$="":GOSUB
2:GOTO100 :rem 184
120 PRINTUL$FF$:PRINTCV$;:INPUTVV$
:rem 238
130 IFVV$<>"T"ANDVV$<>"S"ANDVV$<>"P"ANDVV
$<>"N"THENGOSUB2:GOTO120 :rem 0
140 FORJ=1TO4:IFVV$=VL$(J)THENVI=VC(J)
:rem 105
150 NEXT :rem 213
160 PRINTUL$VV$:PRINTPV$;:INPUTVW$:rem 32
170 IFVW$<>"T"ANDVW$<>"S"ANDVW$<>"P"ANDVW
$<>"N"THENGOSUB2:GOTO160 :rem 12
180 FORJ=1TO4:IFVW$=VL$(J)THENV3=VC(J)
:rem 112
190 NEXT :rem 217
200 PRINTUL$VW$:PRINTNF$;:INPUTYS$ :rem 9
210 IFYS$<>"Y"ANDYS$<>"N"THENGOSUB2:GOTO2
00 :rem 158
220 IF YS$="N"THENV3=V3-UN :rem 16
230 PRINTUL$YS$:PRINTPF$;:INPUTPF:rem 211
240 IFPF<UNORPF>FFTHENGOSUB2:GOTO230
:rem 132
250 PRINTNL$PF:PRINTBG$;:INPUTBG :rem 122
260 IFBG<ZRORBG>FFTHENGOSUB2:GOTO250
:rem 119
270 PRINTNL$BG:PRINTED$;:INPUTED :rem 111
280 IFED<ZRORBG=EDORED>FFTHENGOSUB2:GOTO2
70 :rem 107
290 IFFF$="R"ANDED<BGTHENGOSUB2:GOTO270
:rem 187
300 IFFF$="F"ANDED>BGTHENGOSUB2:GOTO270
:rem 169
310 PRINTNL$ED:PRINTLR$;:INPUTLR :rem 148
320 IFLR<=ZRORLR>FFTHENGOSUB2:GOTO310
:rem 216
330 IFFF$="R"ANDLR>ED-BGTHENGOSUR2:GOTO31
0 :rem 126
340 IFFF$="F"ANDLR>BG-EDTHENGOSUB2:GOTO31
0 :rem 115
350 IFFF$="F"THENLR=-LR :rem 115
360 PRINTUL$ABS(LR):PRINTCHR$(158)A$:PRIN
TB$:PRINTF$:PRINTCHR$(158)A$ :rem 63
370 POKEH3,PF:POKEWI,VI:POKEW3,V3 :rem 82
380 GOTO13 :rem 56
999 REM INITIALIZE :rem 129
1000 PRINTCHR$(147)CHR$(5)CHR$(142):POKE5
3281,0:POKE53280,0:Z=197:BF=198:Y=65
3 :rem 188
1010 POKE657,128:POKE788,52:S=54272:VM=S+
24:FORJ=STOVM:POKEJ,0:NEXT :rem 146
1020 FORJ=STOVM:READQ:POKEJ,Q:NEXT:rem 26
1025 FF$="R":BG=5:ED=125:LR=2:VV$="T":VW$
="T":PF=11:YS$="N" :rem 102
1030 ZR=O:UN=1:TU=2:FR=4:SX=6:NN=64:FF=25
5:Hl=S+1:Wl=S+4:H3=S+15:W3=S+18
:rem 63
1040 R$=CHR$(18) :rem 51
1050 A$=R$+"{37 SPACES}" :rem 77
1060 PRINTA$ :rem 185
1070 PRINTR$"{4 SPACES}SOUND MODULATION D
EMONSTRATOR{4 SPACES}" :rem 54
1080 PRINTA$ :rem 187
1090 B$=R$+CHR$(158)+" F7=SYNCH F5=RING F
3=BOTH Fl=RESTART "+CHR$(159)
:rem 108
1095 F$=R$+CHR$(158)+" CTRL=PAUSE COM=FRE
Q DN SHFT=FREQ UP "+CHR$(159)
:rem 163
1100 C$=CHR$(158)+"{31 SPACES}"+R$+"ERROR
"+CHR$(159) :rem 123
1105 ER$="{8 LEFT}{5 SPACES}" :rem 235
1110 BL$=R$+CHR$(159) :rem 68
1115 UL$=CHR$(145):FORJ=1TO31:UL$=UL$+CHR
$(29):NEXT:UL$=UL$+"{2 SPACES}"
:rem 104
1118 NL$=UL$+CHR$(157) :rem 165
1120 FL$=BL$+" RISING OR FALLING TONE? (R
,F) "+CHR$(146) :rem 228
1130 BG$=BL$+" STARTING FREQUENCY
{4 SPACES}(0-255) "+CHR$(146):rem 80
1140 ED$=BL$+" ENDING FREQUENCY{6 SPACES)
(0-255) "+CHR$(146) :rem 154
1150 LR$=BL$+" LOOP RATE{13 SPACES}(1-255
) "+CHR$(146) :rem 176
1160 CV$=BL$+" CARRIER WAVEFORM{4 SPACES}
(T,S,P,N) "+CHR$(146) :rem 132
1170 PV$=BL$+" PROGRAM WAVEFORM{4 SPACES}
(T,S,P,N) "+CHR$(146) :rem 162
1180 PF$=BL$+" PROGRAM FREQUENCY
{5 SPACES}(1-255) "+CHR$(146):rem 15
1190 NF$=BL$+" HEAR PROGRAM VOICE?
{5 SPACES}(Y,N) "+CHR$(146) :rem 10
1200 FORJ=1TO4:READQ:VC(J)=Q:NEXT :rem 85
1210 FORJ=1TO4:READQ$:VL$(J)=Q$:NEXT
:rem 203
1300 RETURN :rem 164
2000 DATA 5,0,128,7,0,15,240:REMVOICE1
:rem 12
2010 DATA 0,0,0,0,0,0,0:REMVOICE2:rem 251
2020 DATA 5,0,128,7,0,15,240:REMVOICE3
:rem 16
2030 DATA 0,0,0,15:REMFILTERS,VOLUME
:rem 148
2040 DATA 17,33,65,129:REMWAVEFORMS
:rem 17
2050 DATA T,S,P,N :rem 170