64 Paintbox
Chris Metcalf
One of the most powerful features of the Commodore 64 is its high-resolution color graphics. But like any powerful, versatile system, it can be difficult to learn and use. This program makes it easy. Atari computers have an efficient set of graphics commands, and "64 Paintbox" now makes them available on the 64 as well. You can plot points, set colors, or draw lines with just one statement. You can even type in programs originally written for Atari graphics modes 7 and 8 on your 64.
The Commodore 64 is an undeniably powerful computer; its capabilities in high-resolution color graphics, for example, surpass those of the Atari and Apple computers. Nonetheless, it takes time to calculate the POKEs and PEEKs required to access these graphics. Also, the resulting program will likely be fairly slow. This graphics program, "64 Paintbox," takes Atari's far more powerful command set and makes it available to the Commodore 64 user.
BASIC programs written for Atari graphics modes 7 and 8 can be transferred to the Commodore 64 with 64 Paintbox. You can type in an Atari program, line by line, adding an exclamation mark (!) before each graphics command to let the 64 BASIC interpreter know that it is a special command.
Entering 64 Paintbox
To enter Program 1, 64 Paintbox, you first need to load and run the MLX program found elsewhere in this issue. MLX makes it easy to type in a machine language program like 64 Paintbox and insures you'll have a working copy the first time. Once you've run MLX, it asks for two addresses. They are:
Starting address: 49152
Ending address: 51197
Now you can begin typing in Program 1. When you're through, save it to tape or disk, using the filename 64 Paintbox if you want to use the loader program (Program 2) to load it in.
Load 64 Paintbox by entering:
LOAD"64 PAINTBOX",8,1 (for disk)
LOAD"64 PAINTBOX",1,1 (for tape)
Then type
SYS 49152:NEW
to initialize the program and reset the pointers. To simplify loading the program, you may use Program 2. Use the Automatic Proofreader program to type in this short autoload routine. Save it on the same disk as 64 Paintbox. (If you're using tape, Program 2 should precede 64 Paintbox on the 8 is a 1.) Type LOAD"PROGRAM 2",8 (or just LOAD"PROGRAM 2" if you've got a Datassette) and RUN; the program will display the command set, load in 64 Paintbox, initialize 64 Paintbox, and execute a NEW. At that point, you can start entering Atari programs.
can start entering Atari programs.
No matter which method you use to load 64 Paintbox, the Atari graphics commands are easy to use. Each command must be preceded by an exclamation mark (and a colon, if following an IF-THEN statement). The command name can be spelled out in full, or abbreviated with a period as on the Atari. However, these abbreviations are not expanded when the program is listed. The various parameters follow the command name. Thus a typical syntax might be:
!PLOT 100,100
to plot a point at 100,100.
As with normal BASIC commands, spaces are ignored, whether in the command name or in the parameters.
Since the 64 Paintbox commands are not standard BASIC, the IF-THEN routine will not recognize them as being legal commands unless they're preceded by a colon. Imagine, for example, that you want to plot a point where there is no point already. Here's how:
!LOCATE 10,15,A : IF A = 0 THEN : !COLOR 1 : !PLOT 10,15
64 Paintbox Commands
The commands themselves are as follows (abbreviations are enclosed within parentheses):
- !GRAPHICS n (!G.)
This command is identical to the Atari GRAPHICS command, and takes only one parameter, n, the graphics mode. Since only graphics modes 7 and 8 are supported, all graphics commands between 1 and 6 are treated as if they were 0. As with the Atari, either 7 or 8 may have 16, 32, or 48 added to it. Plus 16 gives no text window; + 32 does not clear the graphics screen; and + 48 combines the two. Without any of these extra numbers (just !GRAPHICS 8, for instance), the graphics screen will clear, and a four-line text window will be set up at the bottom. Regardless of the additional numbers, however, the screens will always be reset to standard Atari graphics colors.
Do not try to use tape or disk with the text window enabled. For example, if you enter LOAD and hit RUN/STOP, the interrupts will be partially disabled, and you will need to reenter the graphics mode (with + 32). Attempted disk access will return a ?DEVICE NOT PRESENT ERROR.
The Atari does not allow plotting to the area "under" the text window, but 64 Paintbox does, although the graphics remain concealed until you view what you have done with a !GRAPHICS n + 48 where n is 7 or 8. Furthermore, when working with the graphics screen in immediate mode, 64 Paintbox does not need a text window, as the Atari itself does.
- !PLOT x,y (!P.) This is the PLOT command; x and y are offset from the top left corner of the screen, and have a range of 0–319 for x and 0–199 for y in graphics mode 8. In GRAPHICS 7, the ranges are 0–159 for x and 0–99 for y. The command is not set up to work in graphics mode 0. The PLOT command plots in the current color register (see the SETCOLOR and COLOR commands). PLOT also sets the starting point for the DRAWTO command.
- !POSITION x,y (!PO.) The POSITION command sets the starting point for the DRAWTO command without actually altering the display. The x and y values are the same as in the plot command. This command, like plot, positions the graphics screen "cursor" (not the actual text cursor), regardless of the graphics mode.
- !DRAWTO x,y, (!DR.) This command, DRAWTO, draws a line connecting the old starting point to the specified x,y, using the current color register, and then sets the starting point for the next DRAWTO to the specified x,y. The x,y parameters have the same range as for plot and position. This command does not affect the screen in GRAPHICS 0.
- !SETCOLOR r,c1,c2 (!S.) The SETCOLOR command changes the specified r register to hue (cl) and luminance (c2) in the range 0–15. The format is identical to that of the Atari. The various registers set the colors of the border, the background, the characters, and the pixels according to Table 1. Note that bit-pairs (00, 01, 10, and 11) are used to define single pixels in graphics mode 7. The number above is the graphics register r (the first parameter).
Table 1: SETCOLOR r Values
| GRAPHICS 0 | GRAPHICS 7 | GRAPHICS 8 |
| 0 ______ | 01 pair pixels | _____ |
| 1 Characters | 10 pair pixels | Characters/pixels |
| 2 Background | 11 pair pixels | Background |
| 3 ____ | _______ | _____ |
| 4 Border | Screen color | Border |
An unfortunate problem with the way the 64 and the Atari are configured is that, in graphics mode 7, the 64's character color in the window is set by SETCOLOR register 2, not 1, and that the text window cannot be set to its own color. Instead, it takes on the color of the rest of the screen.
Another problem with register 2 in graphics mode 7 is that this register is set to the background color (or white on old 64s) whenever the screen is cleared. Thus, printing the "clearscreen" character when in graphics mode 7 (even with no window) must be avoided. All 11 pixel pairs would become background color: in other words, invisible. Furthermore, any scrolling of the text window in GRAPHICS 7 will scroll strange color data into the 11 pixel pairs. This is, however, no problem in graphics mode 8.
You may be interested to know that executing a !SETCOLOR 2,c1,c2 in GRAPHICS 7 or a !SETCOLOR 1,c1,c2 in GRAPHICS 8 causes the character color register at 646 to be set to colors c1,c2. Thus, previous color codes are disregarded when a !SETCOLOR or !GRAPHICS command is executed (!GRAPHICS calls !SETCOLOR to set up default colors).
Table 2: Matching Atari Hue And Luminance To 64 Paintbox Color Codes
Luminance
Hue
| 0 | 2 | 4 | 6 | 8 | 10 | 12 | 14 | |
| 0 | 0 | 11 | 11 | 11 | 12 | 12 | 15 | 1 |
| 1 | 0 | 12 | 7 | 7 | 7 | 7 | 1 | 1 |
| 2 | 0 | 2 | 8 | 8 | 8 | 8 | 15 | 15 |
| 3 | 0 | 9 | 2 | 2 | 2 | 2 | 8 | 8 |
| 4 | 0 | 9 | 2 | 2 | 2 | 2 | 8 | 8 |
| 5 | 0 | 6 | 6 | 6 | 4 | 4 | 4 | 4 |
| 6 | 0 | 6 | 6 | 6 | 4 | 4 | 4 | 4 |
| 7 | 0 | 6 | 6 | 6 | 14 | 14 | 14 | 14 |
| 8 | 0 | 6 | 6 | 6 | 14 | 14 | 14 | 14 |
| 9 | 0 | 6 | 14 | 14 | 14 | 14 | 3 | 3 |
| 10 | 0 | 6 | 14 | 14 | 5 | 5 | 13 | 13 |
| 11 | 0 | 6 | 14 | 14 | 5 | 5 | 13 | 13 |
| 12 | 0 | 5 | 5 | 5 | 5 | 13 | 13 | |
| 13 | 0 | 5 | 5 | 5 | 13 | 13 | 7 | 7 |
| 14 | 0 | 8 | 8 | 8 | 5 | 5 | 13 | 13 |
| 15 | 0 | 8 | 8 | 8 | 10 | 10 | 10 | 10 |
The numbers (0–15) that you can use for c1 and c2 in SETCOLOR do correspond to various color and luminance settings on the Atari. Take a look at Table 2 to see what values in 64 Paintbox match Atari's hue and luminance values.
- !COLOR r (!C.) This command specifies which color register (given above for !S.) is to be used for plotting and line drawing. In both graphics modes, 0 has the same effect: It erases pixels. In GRAPHICS 8, an odd number for r always sets the computer to plot pixels. Registers 1–3 are used in GRAPHICS 7, where register 1 sets bit-pair 01, 2 sets 10, and 3 sets 11 (note that this is the SETCOLOR number plus one).
- !LOCATE x, y, v (!L.) The LOCATE command returns (in floating-point variable v) the pixel currently at location x,y and sets the starting point for DRAWTO to the LOCATEd pixel. Thus, for GRAPHICS 8, either a zero (no pixel) or a one (pixel present) is returned. In GRAPHICS 7, a zero also indicates no pixel, while one to three correspond to bit-pairs 01, 10 and 11. Using the LOCATE command with a non-floating-point variable does nonproductive (though interesting) things, so it's best to stick to floating-point variables. That is, use no % (integer variable) or $ (string variable) symbols after a variable.
- !FILL x, y (!F.) This command is a more powerful version of the Atari XIO fill command. It will fill any area, regardless of the shape. It will stop at any on pixel, as well as at the edges of the screen. The x and y parameters determine where it will start and also set a begin-point for future DRAWTO commands. Atari users, remember to draw a line at the left of whatever you are going to fill, as this FILL needs a border to stop at. However, it's much more flexible than the XIO command.
- !TEXT x, y, "string" (!T.) The TEXT command allows text to be located starting at any column and row on the GRAPHICS 8 screen (it will execute on GRAPHICS 7 screens, but produces strange multicolored characters). The "string" can be characters enclosed in quotes, a string variable, or combinations of the two. An additional parameter can be passed before the "string" a 0 or 1 in this position determines whether the computer will use upper/lowercase text or graphics and uppercase. The program is initially set up to use lower- and uppercase. No control characters will be printed, but the RVS ON and RVS OFF characters have their usual effect of putting the characters in-between in reverse video (or inverse video for Atari people). Remember that the x and y parameters must be specified for each TEXT command, although the uppercase/graphics need only be set once to be used repeatedly. The reverse video, however, turns off at the end of the string.
- !QUIT (!Q.) This command cuts 64 Paintbox out of the command processing loop and removes the check on error-message display. The program can be restarted with SYS 49152. Calling SYS49152 repeatedly will not, by the way, create any difficulty.
Programmer's Notes
Locations 3 and 4 hold two variables used by the interrupt that drives the text window to determine uppercase/graphics for the window and hires/multicolor for the graphics. To use location 3 to control the case in the window, POKE 3 with 21 for uppercase/graphics and with 23 for lowercase. (And note that lowercase is required for entering commands in lower/uppercase mode.) Register 4 is used by the program to determine pixel plots, LOCATE returns, and so forth, and so may be used to flip between hi-res (8) and multicolor (24). Other values generate interesting, and harmless, effects.
Memory configuration for 64 Paintbox is:
| 0400–07E7 | Used as the text window (the bottom four lines, at least) |
| 0800–9FFF | Unused and completely free for BASIC programs |
| A000–BC7F | BASIC ROM with RAM underneath |
| BC80–BFFF | Used for data tables and the FILL routine stacks |
| C000–C7FF | The 2000 bytes of actual program |
| C800–CBFF | Used as the color screen for all but 11 pixels in GRAPHICS 8 |
| CC00–CFFF | Left free for use by the DOS Wedge or other utility |
| E000–FFFF | Operating System ROM, with the graphics screen under it |
Variable storage is:
Permanent: locations 3–6, 251–254 (interrupt shadows: 3 = 53272, 4 = 53270)
Temporary: locations 27–42, 107–113, 158–159, 163–164, 167–170
Non-zero page storage: locations 670–699
Abbreviations For 64 Paintbox Commands
| DRAWTO | !DR. |
| PLOT | !P. |
| POSITION | !PO. |
| GRAPHICS | !G. |
| COLOR | !C. |
| LOCATE | !L. |
| FILL | !F. |
| TEXT | !T. |
| QUIT | !Q. |
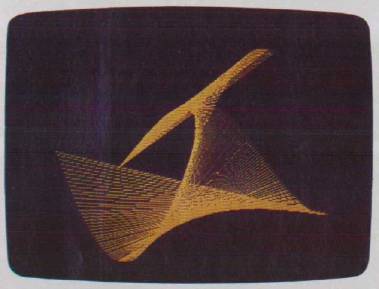
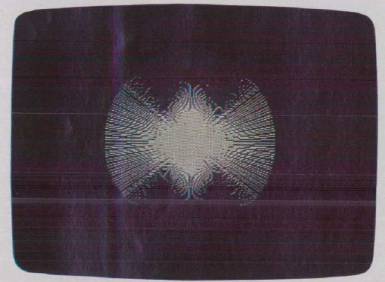
Demonstrations
Program 3 is a short program which illustrates how 64 Paintbox can be used. It draws several figures on the screen and then waits for a keypress from you to continue. To see this demonstration, make sure 64 Paintbox is in memory (if you load it manually, remember to type SYS 49152 and NEW), then load Program 3. Run it and watch the effects.