Part II
Constructing The Ideal Computer Game
Orson Scott Card Editor, COMPUTE! Books
Last month, in Part I, we explored the general notion of the ideal, involving computer game. This article now concludes with some hands-on, specific programming for an Atari version of the example game.
Laying Track At The Expert Level
If you are playing the expert game, there are a lot of track-laying options open to you, for you are allowed to create switches.
Simple Switches. To create switches, hold down the joystick button when you push or pull the joystick. You will get the following results.
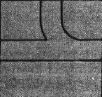
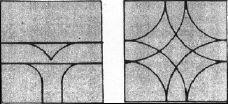
If, with the button held down, you push the joystick in the direction that would normally lay a straight track unit, a Y-switch will be laid:
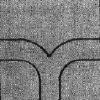
If, with the button held down, you push the joystick in the direction that would normally curve the track to one side or the other, one spur of the switch will go straight ahead, while the other spur will curve in the direction you pushed.
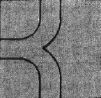
Laying Complex Switches. The most complicated switching operation is when you want the track to branch from another direction. If, with the button held down, you push the joystick back in the direction you came from, which would normally let you re-lay the last track unit, a low hum comes from the television.
While that low hum is sounding, the program will wait for you to push the joystick in one of the three valid directions (straight or curved to either side). The new switch will branch from whatever direction you chose.
Now a high-pitched sound will come from the television. This means that the program is waiting for you to choose one of the two remaining valid directions. The switch will branch toward the direction you choose.
The high-pitched sound will end. You can then change your mind, of course, and lay a different switch or a simple track unit – nothing is definite until you push START. But while those tones are sounding, you can choose only valid switching options, until you have completed the switch.
As you can see, there are only three possible switches – a left switch, a right switch, and a Y-switch. All switch units are laid by pressing down the button while moving the joystick. Only when you want a switch to branch from another direction does it take more than one step to lay a switch unit.
This sounds harder, and it is – but it also gives you more freedom when you come to track you have already laid. You still can do only crossovers and curved bypasses of the other player's track, but you can now join the spur you are working on to another segment of your own track.
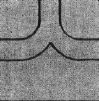
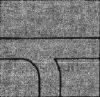
For instance, say you are laying a unit of track in the square shown below.
your old track
At the beginner level, you could lay only a straight unit, creating a crossover. But at the expert level, you can also choose a left curve or a right curve, which would create one of the following switches:


Please notice that you don't have to push a button to create one of these switches. In fact, the program will ignore the button if you are about to cross an existing track segment, for each switch can only branch into two spurs.
This means that every switch that creates a new spur must end with a switch that rejoins the spur to the main line.
To keep things from getting too cluttered in your layout, you can create a total of only eight switch-pairs if you are playing alone, or four switch-pairs for each player in a two-player game. So if you try to push the button to create a ninth (or fifth) switch, the program will ignore the button.
Play Options
How can you tell a spur from the main line? The only difference is the way the spur ends. If the spur ends by joining directly to the beginning of the very first track unit laid, it is the main line. If the spur ends by creating a switch to join it to any track segment, then that spur is not the main line.
"Railroader" keeps track of how many spurs there are, and will not let you join the last spur back to the main line with a switch, unless you have already joined the main line back to the first track unit. And if you press OPTION with any spurs left open, without being joined back to the main line, Railroader will automatically make one spur the main line by joining it to the first track segment, and then will join all the other spurs to the nearest segment of the main line by using switches.
• Choosing Which Spur to Build On. When you have more than one spur, of course, you get to decide which spur you are adding to. You do this by pressing the SELECT button at the beginning of your turn. Railroader remembers the location of every uncompleted spur end, and each time you press SELECT the cursor moves from one spur end to the next. Even if you have already laid a track unit in that turn, but have not yet pressed START, you can press SELECT and Railroader will erase the unit you just laid, then move the cursor square to the end of the next uncompleted spur.
• Crossovers and Bypasses. Just because you can join one track to another with switches at the expert level doesn't mean you have to. You can still create a crossover or curving bypass by pushing the joystick in the direction that would normally lay those track units.
• Erasing with Switches. What about erasing track units by pushing the joystick back in the direction you came from? You can still do that, but when you come to a switch, Railroader will not let you erase it until you have erased all of both spurs leading away from that switch. When you have erased all of one spur, up to the switch, then push SELECT until you are at the uncompleted end of the other spur, and erase that line of track up to the switch. Now Railroader will let you erase the switch. (Notice, though, that this works only if the spur has not been completed. If you come to a switch whose other end is already joined to the main line, pushing SELECT won't get you to the uncompleted end of that spur, since it has no uncompleted end.)
• Illegal Moves. Now that you can use switches to join onto existing lines of track, there are fewer illegal moves to worry about, right? Unfortunately, it isn't so. You still can't join your spur to the other player's track. And now you can't cross over or bypass any track unit that contains a switch, either your own or the other player's! This means that you will end up erasing more often, as you or the other player occasionally get one of your spurs in a box.
• Ending the Expert-level Session. Just push OPTION. If you left any loose ends, Railroader will clean them up, just as in the beginning level. If you left a spur in a box, however, from which Railroader can't legally escape without erasing, the program will put the cursor at the uncompleted end of that spur, so you can erase that line of track back to a point where either you or Railroader can legally complete the spur.
Running The Trains
When you end your track-laying session (or if you chose "Run Trains" instead of "Lay Track" at the beginning of the game), Railroader will ask you whether you want to use the layout you just created or load one from cassette or diskette. If you choose diskette, you will be asked the file name.
When Railroader saves a layout, the file that holds the data also remembers whether there was one player or two. When you decide to run trains on a layout, you do not get to choose one or two players – Railroader will run two trains if there are two tracks, one train if there is only one track.
If there is only one train, it is twice as long as each of the trains in a two-player game. (Since two trains use up twice as much CPU time as one train, this makes it so that one- and two-train games run at the same speed.) You cannot stop or speed up, but you can slow down your train by holding down your joystick button. When you let go, the train immediately resumes normal speed.
You can control the switches with your joy�stick. Of course, if the spur you are on is merely joining onto another line, with no choice of direction, you have no choice. But if your train could go either way, Railroader remembers whether you last pushed your joystick left or right. Other directions are ignored. If you last pushed left, your train will take the left-hand track at every switch it comes to until you push right. It doesn't matter when you push the joystick, except that once your engine has passed the switch, Railroader will not change that switch; instead, the program will assume you have changed the next switch.
Of course, if the train layout you are playing on was created at the beginner level, there are no switches. There will probably be crossovers and bypasses, however, which will make running the train more interesting.
Two-Player Scoring
If there are two players, Railroader keeps a score. You get one point for each track unit you pass through (which encourages you to stay at top speed); two points for each switch you cross over, and ten points if your opponent crashes into you. (You get no points for crashing into your opponent.) Only relative scores are kept - the difference between your scores. Your engines change color, depending on which of you is ahead. The leader has a brighter, warmer-colored engine; the other player has a darker engine, in cooler colors. The actual number of the difference in scores between the two players is not displayed until the end. This means that when you are playing noncompetitively, or with young children, they do not have to be aware of "winning" or "losing" - the color changes can be purely decorative.
The game ends when one player or the other pushes OPTION, or when the difference between the two players is greater than 255.
Programming Hints: Creating The Screen
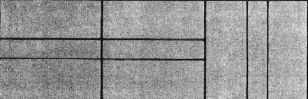
The easiest way to create the train layout is to use an alternate character set with a multicolor character mode, if your computer will allow it, though direct pixel manipulation will also work. On the Atari, for instance, you would probably use ANTIC mode 4, which provides a screen 24 characters high and 40 characters wide (just like Graphics 0). You might then divide the screen into four-character by four-character blocks, giving you a grid of six blocks vertically by ten blocks horizontally. (Any arrangement that comes out even will do.) Obviously, these blocks correspond to the "square" track units.
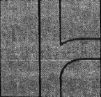
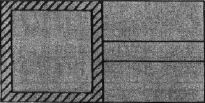
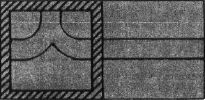
Individual characters might look like the seven characters depicted in Figure 1.
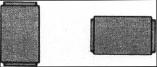
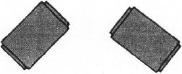
These characters might be combined into an up-right curving block of track as shown in Figure 2.
Figure 1. Seven Multicolor Characters
You might notice that the four corners of every block are never used, and depending on the track layout within each block, many other characters are blank. You could fill these blank spaces with almost anything. In fact, since the place where the corners of four blocks join will always be blank, you might put buildings, foliage, water, or practically anything into these spaces before the game begins, giving a sense of the space remaining to be filled.
How Many Characters Will It Take?
Surprisingly few characters will be needed to create the track itself. On the Atari, for instance, if the rails are drawn using color register 2 at location 710, then the second player's track can use the same characters, but entered in inverse mode. In inverse mode, the color of the rails will come from color register 3 at location 711.
There are two possible straight tracks: vertical and horizontal. Each requires two characters. The four possible curves (up-left, up-right, down-left, and down-right) require 12 more characters. There are 12 switches - four Y-switches, four left-hand switches, and four right-hand switches - but they might be able to use some pieces from the curves and straight tracks, so that only 32 new characters would be needed to make them. Bypasses and crossovers require another eight characters.
That means that 68 characters are required to make every essential track element - leaving you 60 characters for drawing buildings, foliage, ponds, or anything else you might want to add.
Putting Together The Blocks
How many total blocks would you need? For one player, you would need two straightaways, four curves, one crossover, two bypasses, four Y-switches, four left-hand switches, and four right-hand switches. For two players, double that and add six new blocks for situations where two different-colored tracks are present on the same block (two crossovers and four bypasses). That gives you a total of 48 blocks, each consisting of 16 characters.
Blocks could be stored as a two-dimensional or three-dimensional numeric array, and your program could POKE them into screen memory:
500 FOR 1 = 0 TO 3
510 FOR J = 0 TO 3
520 POKE SCREEN + PLACE + (40*1) + J,BLOCK (UPLEFT,I,J)
530 NEXT J : NEXT I : RETURN
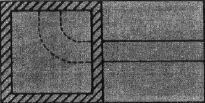
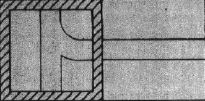
In this subroutine, BLOCK is a three-dimensional array, in which the first subscript defines which block it is, the second defines the row of the block, and the third defines the character on the row. The characters in Block 7 would be defined like this:
Figure 2. Block Of 16 Characters Forming An Up-Right Curve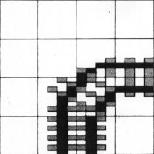
BLOCK(7,0,0) BLOCK(7,0,1) BLOCK(7,0,2) BLOCK(7,0,3)
BLOCK(7,1,0) BLOCK(7,1,1) BLOCK(7,1,2) BLOCK(7,1,3)
BLOCK(7,2,0) BLOCK(7,2,1) BLOCK(7,2,2) BLOCK(7,2,3)
BLOCK(7,3,0) BLOCK(7,3,1) BLOCK(7,3,2) BLOCK(7,3,3)
ULEFT is the variable holding the number of the block that draws an up-left curve. SCREEN holds the address of the start of screen memory. PLACE holds the offset of the block's starting address from SCREEN: 40 is added to PLACE for each new line, and 1 for each new character.
The same sort of thing could be done with string arrays, using POSITION and PRINT commands:
500 FOR I = 0 TO 3
510 POSITION COLUMN, LINE +I
520 PRINT BLOCK$(ULEFT, I)
530 NEXT I : RETURN
Atari users could dimension one long string –DIM BLOCK$(767) – and then use POSITION and PRINT commands like this:
500 FOR I = 0 TO 3
510 POSITION COLUMN, LINE +I
520 PRINT BLOCK$(ULEFT + (I*4), ULEFT + (1*4) + 3)
530 NEXT I : RETURN
You don't have to settle for the 24-row by 40-column screen, either. Even with coarse scrolling, instant vertical wraparound can be achieved by making the last 24 rows of screen memory identical with the first 24 rows, and then page-flipping instead of scrolling at the very top and bottom of screen memory. As players lay track at the top or bottom of the screen, they might notice a slight delay as the program POKEs the blocks into two places in screen memory instead of one, but during the actual scrolling there will be little if any hesitation.
Moving The Train
If you want to have a smoothly moving train, you'll heed to use player/missile graphics. You'll get best results with machine language subroutines for movement. The train can still be run 1 with BASIC, however, and the illusion of speed can be maintained if you move the train in increments of, say, half a screen character – two horizontal pixels or four vertical pixels at a time, each way. Movement is a little jerky, but it is fast.
Animation will be a little tricky. On straight tracks it is simple enough – you need only four positions for each car – two, if the front and back of the car are identical, so that it doesn't matter which way it is facing. If your engine and train cars are identical, except for color, it is all the simpler, since one shape will control each position for all the cars.
There is nothing wrong with using only straight vertical and horizontal movements – the curving tracks are abrupt enough so that the train won't "leave" the track. However, for smooth movement you may want intermediate positions:
Another animation technique is to use part of your character set to generate trains, with characters representing track sections with train cars on them. By POKEing "train car" characters into screen memory and then restoring the old values afterward, you can get longer, four-colored trains – but with jerkier movement.
You will also need to decide how to handle collisions. Stop one train? Let them pass through each other? Design an explosion?
The answers to these and many other questions are best left to your own creativity. After all, there are hundreds of ways to design elegant programs to bring this game to life. Solving the problems to create your version of Railroader is half your fun.
The other half is making layout after layout. No two games will ever be the same; and as generations of model railroaders can tell you, actually running the trains is just an extra, like the orchestra doing a quick encore when the concert is over.
Variations
After you've carried out this game design (no doubt improving on it many times along the way), you might try one of these variations:
• Traffic. One player designs a system of one-way and two-way streets, setting up stoplights. Then up to five players use paddles to drive cars on the streets, getting "tickets" for disobeying laws and losing even more points for crashing, while the program systematically changes the red and green traffic lights.
• Treasure Map. Using a font of old-fashioned map characters, a player designs a treasure map; when the game is played, the program randomly or systematically assigns certain treasures and dangers to certain locations.
• Houseplan. The player uses the joystick to build the walls of a house, and the keyboard to put in doors and windows and furnish the house.
Does It Matter?
After all, it's only a game. It's only play. It's only supposed to make money, isn't it? Like the movies. The success of a game is measured in dollars per week. It couldn't possibly be art.
But it is art. Computer games are created by human beings, using the computer, the television screen, and the sound speaker as their medium. And like other artists, computer gamemakers – let's call them videowrights – find that their medium is at once limiting and liberating.
The videowright has only a tiny fraction of the painter's palette to work with. The scan lines and color clocks of the TV set force the videowright to paint in discrete dots, while memory limitations discourage extravagant use of color and images. Yet painters cannot make their paintings move.
Novelists and playwrights can create far deeper characters, far more intricate plots than the videowright, but novelists cannot make you see, and playwrights cannot bring off the fantastic milieux of the videogame.
Above all, the videowright can create an art that the audience takes part in. When you play a videogame, you become part of the act. It's as if you went to the movies and, without stopping the flow of the film, you got to decide what Clint Eastwood or Katharine Hepburn would say next; as if you went to the theatre, and were given a script and put into the play; as if you went to a concert and got to control the program as it went along.
World-Making
Despite their differences, all the arts have some things in common. I believe that this is the most important:
The audience voluntarily comes to dwell in the world that the artist has created.
Playing Joust and Dig-Dug is more than racking up points. It's dwelling for a time in a world that you can't visit any other way. There are dangers; there are laws; there are strategies for survival; there are rewards for achievement. There is a beginning, an ending. You have more than one chance to make good.
Audience Or Artist
My children are still so young that they don't know that it takes years of training to dance or sing or act out plays or write books. Geoffrey is halfway through writing a novel. Emily improvises plays all day. When the kids like the music they hear, they dance. When they want to sing, they sing, and never mind the melody. And we have enough drawings and paintings to paper a good-sized office building.
We wouldn't dream of telling children that baseball and basketball were only for grownups – they can only go to the ballpark and watch. It's no better to limit them to being in the audience of videogames. Even though it's the most participatory of the arts, the barrier between maker and audience shouldn't be so vast.
Of course, people don't always want to be creative. More often than not, I prefer to play. I like dwelling in some of those worlds that videowrights have made for me.
But when I want a more creative kind of entertainment, I'd like to be able to sit down at the computer and build, the way my children and I build with wooden blocks and plastic bricks. I can always write my own program if I want to, of course. But that's like cutting down a tree and sawing it into blocks and sanding them in order to play with building blocks. Doing it once is fine, but you wouldn't want to have to do it every time.