THE ATARI® GAZETTE
Designing Your Own Atari Character Sets
Craig Patchett
Greenwich, CT
If you want to draw boxes, or design a card game, then Atari's graphics characters are terrific. But what if you're writing an outer-space game or a music program? Wouldn't you prefer a rocket ship or a musical note to a vertical line? This article will explain not only how to change Atari's graphics characters to whatever you desire, but also how to change any Atari character at all, from letters to numbers to punctuation.
What does a character really look like?
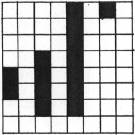
An Atari character, as you may already know, is made up of a bunch of small dots grouped close together. A total of 64 dots, arranged in an eight-by-eight square, can be used to make one character. An Atari "4", for example, really looks like this:
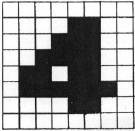
Here, the squares colored in represent the dots that are used. Notice that the outside squares are not used. If they were, then the characters would touch each other when printed side by side, and would be difficult to read. Graphics characters can be made to touch, however, since side by side they could be made to look like one large, continuous character.
How does the Atari know which dots to use for each character?
Somewhere in memory the Atari has a list of which dots are used for each character. Before we find out where this list is, let's see how the Atari represents each character in the list.
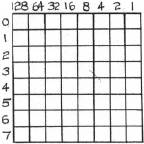
The Atari remembers each character as eight numbers, each representing a row of eight dots. These rows I have numbered above from 0 to 7. Row 0 is always the first number, row 7 the last. The Atari changes each row of dots into a number from 0 to 255 in the following way. Each dot in the row is assigned a multiple of two (fron 1 to 128) as its value, as shown above. To get the number for a given row, just add up the values of the dots used in that row. For example, let's look at the "4". The first number will be 12, since dots 4 and 8 are being used in row 1 (4 + 8 = 12). The third number will be 28, since dots 4, 8, and 16 are being used in row 2 (4 + 8 + 16 = 28), and so on down to row 7, which will be 0, since no dots are being used. Before going on, make sure you understand how to get the following eight numbers as representing the number "4": 0, 12, 28, 60, 108, 126, 12, 0.
Where does the Atari store the list?
Since there are a total of 128 Atari characters, not counting reverse characters (see Appendix C: ATASCII Character Set, in the BASIC Reference Manual), the list will contain 1024 numbers (8 numbers per character X 128 characters = 1024 numbers), Look at Appendix D: Atari 400/800 Memory Map in the BASIC Reference Manual. This simply describes what some of the different memory locations are used for. We're interested in the first locations, containing the "Operating System ROM." The Operating System is just a program that tells the Atari how to do everything it can do in the "Memo Pad" mode, simple things such as putting a character on the screen when a key is pressed, etc. ROM means that the program will always be in the computer's memory, even when the computer is turned off, and can never be changed by the programmer (that's you). Unfortunately, the first 1024 locations in the Operating System ROM (locations 57344 to 58367) contain the list of numbers we are interested in. In order to change the characters we are going to have to change the list, which ROM won't let us do. There's an easy way out, however, and that's to move the list to a place where we can change it.
Where do we move the list to?
We need a place where the list will be safe from us accidentally changing it, but where we will be able to change it when we want to. Looking at Appendix D again, about halfway down the page is a box labeled "RAMTOP". RAMTOP points to the last location in user memory, the memory we have available for our use. What if we were to change RAMTOP so that it pointed 1024 locations before the end of user memory? Then the Atari would think that user memory ended at the new RAMTOP and would not try to put anything in memory after that location. We would still be able to use those locations ourselves though. Let's flip over to Appendix I: Memory Locations. If we look up decimal location 106, we see that it contains the value of RAMTOP. So if we change location 106, we can trick the Atari into staying away from our list. Before we do that, however, let me point out that adding one to the value in 106 actually adds 256 to RAMTOP. This is because of something called "paging", which is too complicated to explain here, and not really important for what we're doing anyway. Just be aware that to move RAMTOP back 1024 locations, we need to subtract four (4×256 = 1024) from location 106. To give us some extra space in case the Atari accidentally goes a little past RAMTOP, we'll subtract five instead. We do this using POKE and PEEK as such (finally some programming!):
10 POKE 106, PEEK (106)-5 : GRAPHICS 0
The reason we use a GRAPHICS 0 right after changing RAMTOP is because the Atari normally stores screen data in the locations we'll be using for the list (see Designing Your Own Atari Graphics Modes in the Sept/Oct issue of COMPUTE). If we don't use a GRAPHICS command to move that list to a new location, the screen will do strange things when we move the character list into place, which we are now ready to do (yay!).
How do we move the list?
Moving the list is extremely simple; we just use a FOR/NEXT loop and POKE the values from ROM into their new locations. We first need to figure out the value of the location of the first number in the new list as such:
20 STARTLIST = (PEEK(106) + 1)*256
Remember, we subtracted an extra one from location 106 to be safe, so we have to add it back on to determine the start of the list. Also don't forget that we have to multiply the value in 106 by 256 because of paging. Now let's move (!):
30 ? "HOLD ON..." : FOR MOVEME = 0 TO 1023 : POKE STARTLIST + MOVEME, PEEK(57344 + MOVEME) : NEXT MOVEME
All that's left now is to tell the Atari where the new list is. We do this by changing the value in location 756, which points to the starting location of the character set to be used (look at Appendix I). If you look at location 756 at this stage (use PRINT PEEK(756)), you'll see that it contains the value 224. Again, because of paging, this really means 224 × 256, or 57344 (surprise!), the starting location of the character set in ROM. So we go:
40 POKE 756, STARTLIST/256
A few words of warning about location 756. Everytime you use the GRAPHICS command, the Atari sets the value in location 756 back to 224. That means that after each GRAPHICS command, you'll have to execute the equivalent of line 40. No big deal, but if you forget...
Let's change some characters!
Before we actually make any changes, let's look at the order the characters are stored in the list. For this we'll need Appendix C again (and you thought you'd never use the Appendices!). Unfortunately, Atari chose not to store the characters in memory exactly in the ATASCII order. Almost, but not exactly:
| TYPE | ATASCII ORDER | MEMORY ORDER |
| uppercase, numbers, punctuation | 32-95 | 0-63 |
| graphics characters | 0-31 | 64-95 |
| lowercase, some graphics | 96-127 | 96-127 |
As you can see, all that Atari did was to move the graphics characters between the uppercase and lower�case (they did this in order to be able to choose between uppercase and lowercase/graphics in modes one and two). In the meantime, they made our job harder for us. In order to determine where a character is stored in memory, we have to perform a little mathematical wizardry on its ATASCII value. In the following "formulas," keep in mind that each character is represented by eight numbers, which is why we multiply by eight:
| ATASCII VALUE (AV) | MEMORY LOCATION (of first number) |
| 32-95 | (AV-32)*8 + STARTLIST |
| 0-31 | (AV + 64)*8 + STARTLIST |
| 96-127 | AV*8 + STARTLIST |
Of course, to get the location of the original character (in ROM), we would add 57344 instead of STARTLIST.
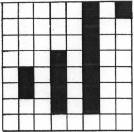
With these mathematical manipulations in mind, let's try one of the original examples that I mentioned. We'll change one of the graphics characters, let's say ◃CTRL▹, to a musical note. First, let's design our note:
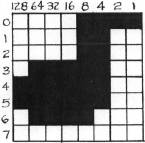
This may not look exactly like a note as is, but because of the size of the dots, it will look fine when printed on the screen, as we shall soon see. I'll leave it up to you to check for yourself that the note translates into the following eight numbers: 15, 12, 12, 124, 252, 252, 120, 0. We now want to replace the eight numbers already in memory for ◃CTRL▹T with these eight. ◃CTRL▹T has an ATASCII value of 20 (see Appendix C), which fits in the 0-31 category in the formula chart above. The first thing to do, therefore, is to add 64 (20 + 64 = 84) and multiply by eight (8×84 = 672) to give us a value of 672. So to change the ◃CTRL▹T character we would have to change the eight numbers in memory beginning with location 672 + - STARTLIST. We make this change using a FOR/NEXT loop and DATA statements as such:
50 FOR MOVEME = 0 TO 7 : READ VALUE : POKE 672 + STARTLIST + MOVEME, VALUE : NEXT MOVEME
60 DATA 15, 12, 12, 124, 252, 252, 120, 0
Now, after this has been RUN, whenever we use a ◃CTRL▹T, we will have a musical note. Try it!
As an informal kind of self-test, make sure you understand the following two lines. Try and work out which character they will change, and what the new character will look like, before you actually RUN them (with the rest of the program of course):
70 FOR MOVEME = 0 TO 7 : READ VALUE : POKE 776 + STARTLIST + MOVEME, VALUE : NEXT MOVEME
80 DATA 0, 0, 60, 102, 102, 102, 63, 0
As you can see, lines 50 and 70 are very much alike except for the initial value added to STARTLIST. This should light up a sign in your brain saying "SUBROUTINE!" If you have more than one or two characters to be redesigned, you should use a subroutine to save memory.
A few details and programming hints.
- In graphics modes one and two, to use lower case and graphics characters with your new character set, POKE 756 with STARLIST /256 + 2. To go back to uppercase, etc., POKE 756 with STARTLIST/256.
- If you press the RESET button, the Atari will change the value of location 106 and put the display list back in place of your character set. Under such circumstances it is necessary to run the program over again in order to get your character set back again.
- If a character is too complicated to put in an eight by eight box, then use more than one box (and therefore more than one character), and combine them in a string. For example, using the Atari's regular graphics characters:
DIM BOX$(7):BOX$ = " (see below) ":PRINT BOX$ Type BOX$ as ◃CTRL▹Q, ◃CTRL▹E,
◃ESC▹ ◃CTRL▹ =, ◃ESC▹ ◃CTRL▹ +, ◃CTRL▹Z, ◃CTRL▹C.
Bonus: Four Colors In Graphics Mode O!
It is possible to define a character to be one of three different colors (4 = 3 + background). The only drawback is that once you have defined the letter "A" to be orange, for example, all "A" 's will be orange, not just the ones you would like to be.
How do we define the color of a character? It's really quite simple. Just as in graphics mode eight, a dot in an even numbered column will be a different color than a dot in an odd numbered column. Two dots side-by-side will produce yet another color. This is why an Atari "4" (and all other Atari characters) and my musical note have vertical lines that are two dots wide, compared to the horizontal lines that are only one dot wide (or thick if you prefer). If the vertical lines were only one dot wide, they would be a different color than the horizontal ones, unless the horizontal lines alternated one dot on and one dot off. Confused? Don't worry, just substitute the following variations of the musical note for the data in the sample program and see what they look like:
60 DATA 10, 8, 8, 40, 168, 168, 32, 0
80 DATA 5, 4, 4, 20, 84, 84, 16, 0
Such characters will, of course, look unusual in graphics modes one and two, just as they look unusual in the above diagrams.
You can't do a lot of experimenting with this "phenomena" to get such effects as multicolored characters. Changing the background color will change the colors of the columns, and thus the colors of the characters. Finally, if you only need one "A", or whatever, to be a different color, define it as a graphics character.
Bonus: Upper and Lowercase in Graphics Modes 1 and 2.
By now, after hopefully running things over in your mind, you might even suspect already how to mix upper and lowercase in modes one and two. If not, it is a painfully simple trick. Since modes one and two allow use of lowercase and graphics characters together, just redefine the graphics characters to be uppercase letters! You can do this by moving the uppercase character descriptions from the ROM list to your own list like so:
35 FOR MOVEME = 256 TO 472 : POKE STARTLIST + MOVEME + 256, PEEK(57344 + MOVEME) : NEXT MOVEME
Typing a "◃CTRL▹A will now give us an upper�case "A" and so on. Of course, this is not the best way to do it, since we no longer have any graphics characters. If we know that we will only need certain uppercase letters in our program, then it would be better to move just those letters, one by one, using the tables given earlier in the article. In any case, we are now able to mix almost any combination of characters we wish in graphics modes one and two.
And as the sun sets slowly in the west...
I realize that I have attempted to cover quite a bit of information over the course of this article, and most likely was not able to explain everything to everyone's satisfaction. If you have any pressing questions with regard to what I have covered here, please feel free to send them to me at the above address, along with any constructive criticism you might also have, and I'll do my best to answer them. Good luck, and always remember; the Atari is your slave and you its master.