USING DIALOG BOXES
WITH GFA BASIC 3.0, PART 2
 by David Plotkin
T h e G F A R C S
GFA BASIC 3.0 comes with an RCS, but unless I missed something, it doesn't come with any instructions on how to use it. Most of it is fairly intuitive, but I want to cover the most important aspects of its use so that you will understand how I built the sample dialog box.
Figure 1 shows the RCS. You will notice two main areas: the icons on the left side of the working window and the icons across the bottom. These have been numbered. I will discuss each one briefly, starting with the icons on the left side, which are used to modify the objects' appearances and attributes. To select one of these items, click on it and a box will open, showing your options:
1. Modifies the background color. If the color is set to white, no pattern will show, regardless of what is chosen in 2.
2. Modifies the background pattern.
3. Modifies the text color.
4. Modifies the text size (two sizes are available) and text writing mode (replace, transparent, etc.).
5. Sets the alignment for text (within a box-type object) and objects within the dialog box (centered, left aligned, bottom, etc. ).
6. Sets flags and states. As mentioned last month, the flags are EXIT, EDITABLE and SELECTABLE. The states select such attributes as SHADOWED, OUTLINED and CHECKED.
7. Sets the border color for box-type objects.
8. Sets the thickness of borders for boxtype objects.
The
Dialog Box Objects
Across the bottom of the screen are the dialog box
objects (numbered nine through 19). To move an object into the dialog
box, click and drag the appropriate item from the bottom of the screen
into its position in the dialog box. To modify the object with the
icons at the left side of the screen, you must click on the object to
select it, then select the icon you want to use to modify the object.
Objects can have their size modified by clicking on the object to
select it, then clicking and dragging to the new size the dark box in
the lower-left corner of the object. An object can be moved within the
dialog box by clicking on it to select it, then dragging the object to
its new position.Objects with strings or single characters in them can have their text modified by double-clicking on them to open a dialog box for input. Editable text fields can have all their fields set (template, validation and initial string) by double-clicking on them to open a dialog box. One bug I've discovered is that if you've modified a G _Text-or G_Boxtext-type object and then go to modify a G_FTEXT or G_FBOXTEXT (editable) object, the first two fields (template and validation) are missing from the dialog box. To work around this, you must close the dialog box you are working on (use the Close item under the File menu), then reopen it.
The 11 objects at the bottom of the screen are somewhat bewildering, but many of the objects are identical except for the default setting of the Type item under the Options menu. Object types can be changed by selecting the Type item; the choices are shown below:
9. Button- This is a G_Button-type object. The Type item presents two options: String (no border) and Button (has a border).
10. String-This is a G _Button-type object, identical to 9.
11. Edit-This can be one of four different object types, depending on the Type item selection. If you select Text, you get a G_TEXT-type object (noneditable). If you select Boxtext, you get a G_BOXTEXT-type object (noneditable with a border). If you select Ftext, you get a G_FTEXT (editable) object, and if you select Fboxtext, you get a G_FBOXTEXT-type object (editable with a border).
12. Identical to 11.
13. This object can take on one of three object types, depending on the Type item selection. If you select I-Box, you get an object of type G _IBOX (box with invisible interior). If you select Box, you get an object of type G_BOX. Finally, if you select Boxchar, you get an object with type G_BOXCHAR (box with a single character inside).
14. This object is identical to 13.
15. Text This object is identical to 11.
16. This object is identical to 13.
17. Boxtext-This object is identical to 11.
18. This object is an icon. No icon editor is included with the RCS; however, you can import icons from other sources by using the Load item under the Options menu.
19. This object is a bit image. No bitimage editor is included with the RCS; however, you can import bit images from other sources by using the Load item under the Options menu.
You should notice that one of the things you can set for each object is the object's name. While this is optional, you should do it for an important reason. Under the Global menu there is an item called Output. Clicking on this item brings up a dialog box where you can choose to have the RCS write out a GFA .LST file, which can be merged into your program. This file equates variables to the numbers assigned to each object by the RCS. It is obviously much easier to refer to the object in your program by name, rather than by number. However, the .LST file uses the names you gave the objects as the variable name, so you should name each object (and don't use spaces in the names). To see an example of this, check out the procedure Initialize in the sample listing. The comments were modified to note what each field is used for (the RCS doesn't provide very informative comments as part of the .LST file).
Using
the Dialog Box
Now that we've gotten all that out of the way, it's
time to see exactly how to retrieve information from editable fields,
exit buttons, radio buttons, up/down buttons and sliders. We'll look at
each section of the accompanying listing.The first line of the program dimensions two arrays for the two sets of radio buttons. As we'll see later, it is much simpler to use radio buttons if the object values of the radio buttons are contained in arrays. The next line calls the procedure that sets up the simple menu at the top of the screen and is followed by a line that calls the procedure to initialize the variables. The bulk of the procedure Initialize is the modified listing file written out by the RCS, as described above. The last part of this procedure places the object values for the radio buttons into their arrays. Notice that the variable values set earlier in Initialize are used here.
The next line calls the procedure to open a window, clear it and give it a title. Now we are ready to load our resource file, which is accomplished by the procedure Id_resource. In this procedure, we first reserve some memory for the resource file:
| RESERVE FRE(0)-30000 |
Then we use RSRC_L0AD to attempt to load the resource file called BENEFITS.RSC. If we are successful, we proceed, but if not (the value returned is zero), we give back the memory and end the program:
| IF
RSRC_LOAD("BEREFITS.RSC")=0 ALERT 3,"Resource file not found",1," STOP ",a% RESERVE FRE(0)+30000 EDIT ENDIF |
The next task is to determine the address of the resource and place that address into the variable adr%:
|
~RSRC_GADDR(0,0,adr%) |
Finally, we need to find out the width of the box that contains the "importance" slider, less the width of the slider itself. This number will be used in calculating the new position of the slider when it is dragged by the user:
|
width%.=OB_W(adr%,imparent&)- OB_W(adrr%,IMPSL1DE&) |
Returning to the first portion of the program, the last lines of the main program simply tell GFA to jump to the procedure respond_menu when a menu item is selected and then enters a loop to test for a menu selection. Since there are three menu items, there are three main parts to procedure respond_menu. The first responds when the user clicks on the "Dialog Tutorial" item under the Desk menu and simply puts up an alert box. The last one responds when the user clicks on "Quit" by jumping to procedure pgm_ end. This procedure gets rid of the resource, recovers memory, closes the window and returns to the editor.
It is the second menu item, "Add Info," which puts the dialog box into motion. In show_resource, the centered coordinates of the dialog itself are calculated by a call to FORM_CENTER. The GET command is used to store a copy of what is on the screen where the dialog box will be drawn. This will be used later to restore the screen after we are done with the dialog box. The next five lines use the CHAR command to place an empty string in each editable field. You could just as easily place a non-empty string in each field to initialize it, but again, be careful not to try to put in a string that is too long. Remember that since these are editable fields, you must use the double braces with CHAR.
The next two lines set the number of dependents, depnum %, equal to zero and then place that number in the boxed text field designed for that purpose. The number depnum % is first converted to a string with STR$, then placed in the text field using CHAR with only a single set of braces. Next we stuff the number 50 into the slider and set its starting position. The exact steps used here will be discussed in more detail in the section on sliders. The FORM_DIAL command with a parameter of one draws an expanding box on the screen, and OBJC_DRAW puts the dialog box on the screen.
The Repeat/Until loop drives the whole process. The first line of the loop uses FORM_DO to tell AES to handle the dialog box. The FORM_DO command returns the number of the exit object on which the user clicked, and depending on that value, we want to take different actions.
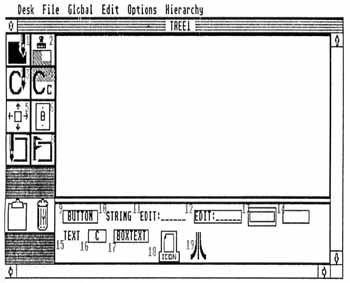
FIGURE 1
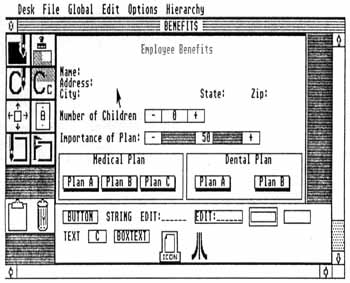
FIGURE 2
The
Up and Down Buttons
When we click on the "+" or "-" buttons for the
number of dependents, we want the number displayed in the center box to
change. The dialog box can't handle this on its own; we must exit the
dialog box, adjust the number and reenter the dialog box. For this
reason, these two buttons are "touchexit" buttons. As discussed
previously, when you click on a touchexit object, the dialog box is
exited immediately, without waiting for the button to be released.In our sample program, the dialog box is entered (FORM_DO), and if the "+" button is selected, the depnum % variable is incremented. A test is made to ensure that the variable is within legal limits, and it is adjusted if it isn't. The new value of depnum % is placed back into the box:
|
CHAR{0B_SPEC(adr%,depnbrsl&)} =STR$(depnum%) |
And the box is redrawn to show the new number:
|
~OBJC_DRAW(adr%,depnbrsl%, 6,x%,y%,w%,h%) |
Note that although we exited the dialog box as soon as the touchexit button was clicked, the dialog box was still visible on the screen because we never erased it. Once we are done processing the button, we reenter the dialog box by reexecuting the FORM_DO command within the repeat loop. One of the side effects of using a touchexit button here is that the numbers will change as long as the user holds down the left button.
The previous section illustrates one of the things that confuses people who are programming their own dialog boxes for the first time. From the user point of view (which is what they have been up till now), everything appears to be handled by the dialog box, when in fact, a great deal is being handled by the program itself.
The next eight lines of the program handle the case where the user selected the "-" button.
Sliders
Sliders are interesting and useful constructs, so
we'll cover them next. The first thing you need to know is that the
slider box itself is a touchexit object. When the user clicks on it,
the dialog box is exited. How do you get the effect of dragging the
slider around inside the larger box? This is done with the AES function
GRAF_ SLIDEBOX. This function
allows the user to drag a child object
(the slider box is a child of the box it resides in) inside a parent
object. When the user releases the mouse button, GRAF_ SLIDEBOX returns
the new position of the child object. Let's illustrate. First, we'll
call GRAF_SLIDEBOX:| sliderpos%=GRAF_SLIDEB0X (adr%,imparent&,imps1ide&,0) |
The first parameter is the dialog box address; the next one is the object number of the parent object, followed by the object number of the child object and then a flag. If the flag is zero, the user can drag the child around inside the parent on a horizontal axis (left and right). If the flag is one, then the user can drag the child around inside the parent on a vertical axis (up and down). The function returns the position of the child object (slider) inside the parent object and is always a number from 0 (left or up) to 1,000 (right or down).
The next step is to convert the returned number (0-1,000) to the new X coordinate of the slider:
|
newpos%=width%/1000*sliderpos% |
Thus, we get a ratio of the actual width of the parent object, less the width of the child object (defined as width %) to the maximum range:
|
width%/1000 |
This number is then multiplied by the actual slider position (sliderpos % ). For example, if the width is 200 and the returned position was 500 (halfway to 1,000), then the new position of the slider relative to the parent object would be 100 or exactly halfway across, just as you'd expect.
Then, we use OB_X to set the new coordinates of the slider:
|
OB_X(adr%,impslide&)=newpos% |
Now we need to convert the new slider position, as given by sliderpos% (which can vary from 0-1,000), to a number in our range (0-100). This is simple:
|
import%=sliderpos%/10 |
We then put this new number back into the slider:
|
CHAR{OB_SPEC(adr%,impslide&)} =STR$(import%) |
The "+" and "--" buttons associated with the "importance" slider work somewhat similarly to the slider, except that GRAF_ SLIDEBOX is not required. These buttons are again touchexit, as were the buttons for the number of dependents. Once the user clicks on one of these buttons, the program takes over. In the case of clicking on "-", a certain amount is subtracted from the slider position:
|
SUB sliderpos%,10 |
The number subtracted should be no less than the total range (1,000) divided by your total range (100 in this example). If the number is smaller than this ratio (ten, in case you can't find your calculator) then the slider number won't change every time you click on the "+" or "-" buttons. This is because, as noted above, we divide the new slider position by ten before we put the number back into the slider. We again test to make sure that sliderpos % hasn't moved outside the legal range, correct it if it has, then calculate the new slider position:
| newpos%=width%./1000*sliderpos% OB_X(adr%, impslide&)=newpos% |
Does this look familiar? It should; it's the same equation used for the slider. Finally, we use exactly the same steps as with the slider to position the slider, calculate the new value and place it in the slider box. It is then redrawn to show the new value with OBJC_DRAW.
The next 13 lines of the listing handle the case of the user clicking on the "+" button.
It's
okay to Quit
When the user clicks on the OK button, the procedure
hndl_ ok takes over. The first
line calls FORM_DIAL again,
this time
with the first parameter of two, to create the shrinking rectangle. The
screen is then restored with PUT. The next order of business is to
return the OK button back to the nonselected state:|
~DBJC_CHANGE(adr%,exit_obj%, 0,x%,y%,w%,h%,0,0) |
Note that we are not bothering to redraw the button in its new state (last parameter is zero) because the dialog box is no longer on the screen. We now recover the data that was entered into the edit fields using statements such as:
| nm$=CHAR{{OB_SPEC(adr%,name&)}} |
Remember that since we are using editable fields, we must use the form of the CHAR command with two sets of braces. Once we have recovered the information into strings, we print them on the screen.
Don't
Touch That Dial!
Now we are ready to handle the two sets of radio
buttons. We'll need a variable to hold which radio button was selected.
so we zero that variable out first. We'll do the three "medical" radio
buttons first, so we need to step through them and test each one to see
if it was selected:|
FOR cnt&=1 to 3 |
Remember that in Initialize, we placed the values of the radio button objects into the array medrbtn&. Thus, medrbtn&(1) contains the value of the "Plan A' radio button (which happens to be 9). In order to find the state of the "Plan A" radio button, we need to use the OB_STATE function:
| OB_STATE(adr%,medrbtn&(cnt&)) |
Here medrbtn&(cnt&) contains the successive values of the medical radio buttons as the FOR loop is executed successive times. To find out if the selected state of a radio button has been set (and thus that radio button is the one selected; remember, only one radio button in a set can be selected at a time), we use the function BTST, which checks to see if a particular bit is set. In our case, we want to see if bit () is set (because bit 0 is the selected state, as noted last month in the section on states):
|
IF BTST(OB_STATE(adr%,medrbtn&(ctn&)),0) select&=medrbtn&(ctn&) ENDIF |
Next, we want to see which radio button was selected and handle the results accordingly:
| IF
select&<>0 ! a radio button was selected 'so retrieve the text of the radio button med$=CHAR{OB_SPEC((adr%,select&)) PRINT "Medical plan selected: ":med$ ' change the radio button back to nonselected ~+OBJC_CHANGE(adr%,select&,0,x%,y%,w%,h%,32,0) ELSE PRINT "No medical plan was selected" ENDIF |
This section of code should look familiar, except for one thing. Note how the second-to-last parameter in the OBJC_ CHANGE function is 32. Previously, we had used zero. We are changing the object state to 32 because the radio buttons in this dialog box are shadowed, which is state= 32. Thus, 32 is what we must change them back to in order to turn off the selected state. If we had changed them back to 0, we would lose the shadowing.
The next 16 lines of code in the sample listing perform the same task for the dental plan buttons, except that there are only two of them. Finally, the last four lines of the program recover the number of dependents from the box and the importance of the plans from the slider and print them on the screen.
Some
Closing Thoughts
The dialog box used in this program was quite
complex in order to illustrate the many things you can do with a dialog
box. Most of your dialog boxes will be simpler, since you won't need
everything (editable fields, text, buttons, radio button, sliders and
up/down buttons) in one box. And, although this article has been long,
the actual explanation of how the dialog box works was quite short.Finally, you will notice that the sample dialog box doesn't actually do anything useful. This was deliberate. The program is already long enough without adding the necessary code to make it useful too. Obvious extensions would be to store the numbers and editable text fields in an array, so that the data would not simply be thrown away when you clicked on OK. Additional buttons such as "Next" or "Previous" could let you move through the database, recovering the contents of each field from the arrays and placing them into the dialog box fields before drawing the dialog box.
Now that you know how to use dialog boxes with GFA BASIC, let's see some GFA programs that use these handy GEM devices. After all, it's the right way to get information from the user.
David Plotkin is a chemical engineer currently working as a data analyst for the Human Resources department of the Chevron Corporation. He has had an Atari since 1980.